Moving a Domain to a Dedicated or Different IP Address
Every server at Liquid Web has an IP address assigned at creation. This IP address will then also be assigned to any domains (websites) you add to your server. You can, however, add IP addresses to your server and assign specific domains to specific IPs.
Using dedicated IP addresses was fairly common, but now there is rarely a need to move a domain to a dedicated IP.
Can a dedicated IP address help me?
If you have an older server operating system, it may not support Server Name Indication (SNI). SNI allows multiple SSL certificates on one IP address. Before SNI, an IP address could only be associated with one IP address. If you needed SSL security on your site (to take credit card payments, for instance), you’d need to have that site on a dedicated IP. This is usually no longer the case, and most servers at Liquid Web support SNI. However, if you have an older server operating system, you might need to stick to one SSL per IP. There are still some PCI auditors who prefer to see dedicated IPs.
Some people believe that using a dedicated IP address will improve your search rankings. Dedicated IPs do not have any impact on SEO. Google has extensively documented how to improve your search rankings, and dedicated IP addresses will not improve your rankings.
If you have many websites on your server, you may want to sort them into different IP addresses to keep yourself organized or to differentiate between clients. This won’t have any effect on site performance, but it might be more convenient for you. You can have multiple websites on a single IP, even if it’s not your server’s main IP address.
When should I use a dedicated IP address?
A common reason to use a dedicated IP is to have full control over email reputation. When your website sends a lot of email, you might not want it to be on the same IP with other sites. If another site on the IP is compromised or is otherwise flagged for sending spam, all the sites on the IP could have trouble sending mail until any problems are resolved. A dedicated IP address, combined with rDNS, SPF, DKIM, and a Secure Password, is a good way to protect your ability to send mail.
Other than email, you might want dedicated IPs if you are running game servers which need to run multiple instances of the same program or if your server has certain applications that require a dedicated IP address. For these setups, we recommend speaking with your developer who will have a good idea of your needs.
Change Your IP Address
Before you can change the IP address of a domain, you’ll need to purchase more IP addresses. Cloud servers can currently have up to eight IP addresses (the main server IP and seven additional IPs). Dedicated servers can currently have up to four IP addresses. If you need even more IP addresses, contact the Support team for assistance. Once you’ve purchased as many IPs as you need, you can assign them to domains:
Changing Your Website’s IP Address (cPanel)
- Log into WHM.
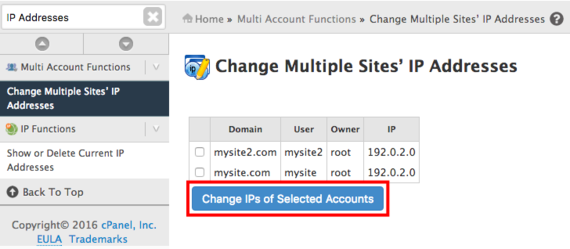
- In the search bar, search for “IP Addresses”. Then, click on Change Multiple Sites’ IP Addresses.
- Use the checkboxes to select the domains you’d like to modify and click Change IPs of Selected Accounts.

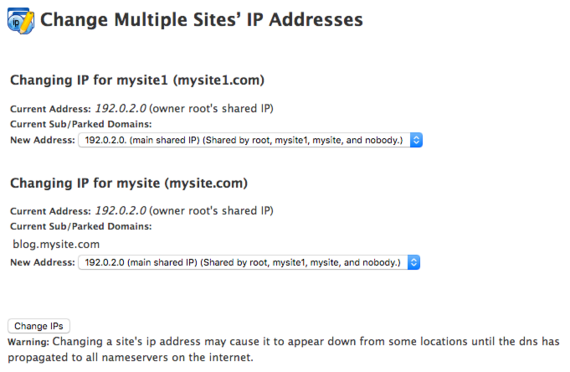
- You’ll see a list of the websites you selected with the IP address they are currently using. Use the drop-down menus to choose IP addresses for your domains.

- To save your work, click Change IPs.
- After you change your website’s IP address, you need to update your DNS A records to the new IP address or your site will not be viewable.
Changing Your Website’s IP Address (Plesk)
Once you have purchased as many IP addresses as you need, you can add them to Plesk and then assign them to domains.
Adding IP Addresses to Plesk
- Log into Plesk.
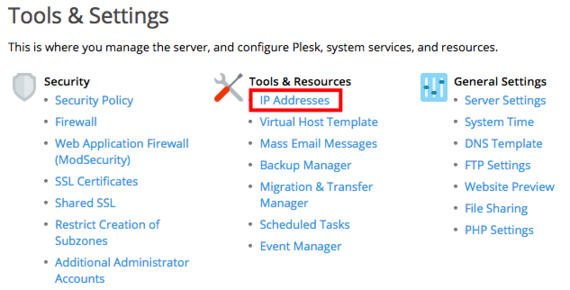
- In the left navigation bar, click on Tools & Settings.
- Under Tools & Resources, click on IP Addresses.

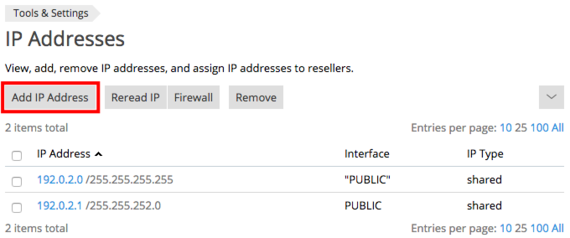
- Click on the Add IP Address button.

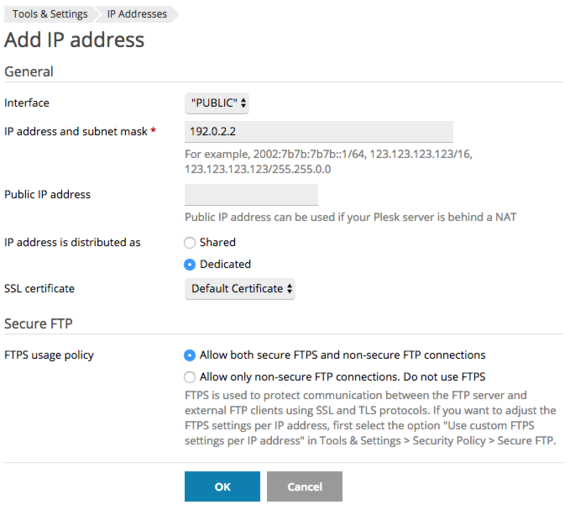
- In the IP address and subnet mask field, enter the IP address you purchased.

- If you have a special server setup, make sure any other settings are correct before adding the IP. If you don’t, we recommend setting IP address is distributed as to Shared.
- When all the settings are correct for your server, click OK to add the IP address to your server.
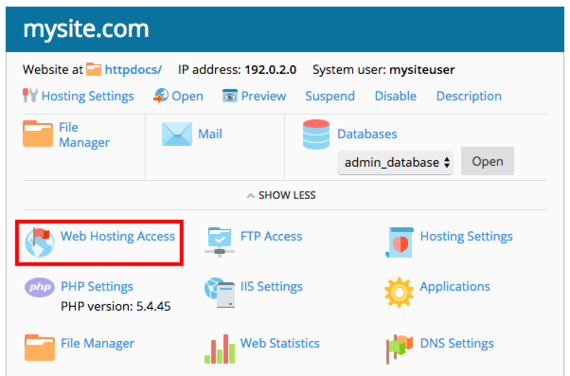
Assigning an IP Address to a Website
- Log into Plesk.
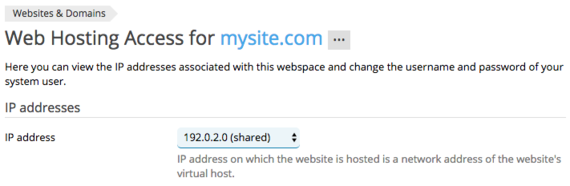
- In Power User view, click on Websites & Domains in the left navigation menu and scroll down to the domain where you’ll be changing the IP address. Then, click on Web Hosting Access in the domain management menu. In Service Provider View, click on Domains in the left navigation menu and then click on the domain where you’ll be changing the IP address. Click on Web Hosting Access.

- In the IP Addresses section, use the dropdown menu to select the IP you’d like to use.

- Click OK to save your changes.
- After you change your website’s IP address, you need to update your DNS A records to the new IP address or your site will not be viewable.