Optimizing WordPress with Caching Plugins
To have a successful website, it’s important that your pages load as quickly as possible. A website that loads quicker often ranks higher in search results and has a lower bounce rate. This article explores speeding up specifically WordPress-powered websites by using caching plugins.
A cache is temporary data storage for data on your website. In a general sense, commonly accessed data (like popular images, files, precompiled PHP scripts, database queries, etc.) is stored in a cache, creating a smaller pool of potential data. When someone requests a webpage, this smaller pool of data is checked first. That way, if the page is in the cache, it can be shown more quickly. If the page isn’t in the cache, the page is served from the regular, uncached website files.
There are many different ways to cache data, both on the server and on web browsers. When you’re using WordPress, there are caching plugins designed just for caching WordPress data. Using a caching plugin is a great way to improve your site’s page load times. Before you install and configure a plugin, we recommend you use an online tool like GTMetrix to check your site’s performance. This will both help you decide what to cache and give you a baseline to see how much your site has improved.
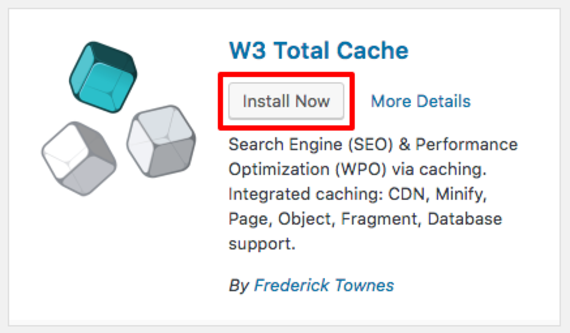
The two most popular free WordPress caching plugins are W3 Total Cache and WP Super Cache. They both have similar functionality: which one you choose is up to you! W3 Total Cache has more options and features than WP Super Cache. If you are interested in very specifically controlling your caching preferences, it might be the best choice for you. If you’d like a simpler plugin, WP Super Cache also works very well, although it may have difficulty with some themes and is not as regularly updated. This article will cover common configuration choices for both plugins.
Installing Caching Plugins
Installing these caching plugins follows the same process as installing any other WordPress plugin.
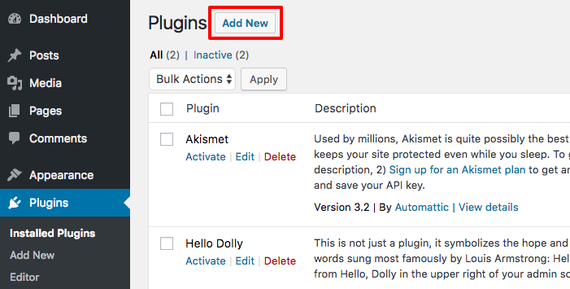
- Log into your WordPress dashboard.
- In the left navigation menu, click Plugins and then Add New.

- Use the search bar to find the plugin you’re installing. Once you find it, click Install.

- Once your plugin is installed, click Activate to start using your plugin.


Once you’ve installed your preferred caching plugin, you can choose how you’d like the plugin to cache your WordPress site.
W3 Total Cache
Once you’ve installed W3 Total Cache, the left navigation menu in your WordPress dashboard will have a new option: Performance. This is where you’ll make changes to your W3 Total Cache setup.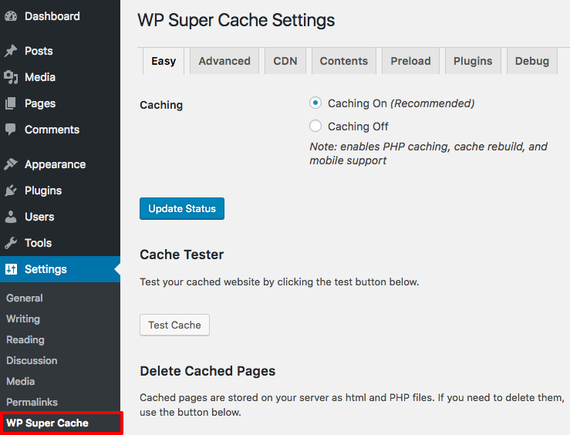
W3 Total Cache has extensive customization options, and the plugin does a good job of recommending settings. Remember: depending on your specific site, theme, and other plugins, you may need different settings! Make sure to test your site after making configuration changes.
The following settings are a good starting point when you’re working on optimizing your WordPress site. Every section can be found in the left navigation menu under Performance. Make sure to click Save all settings as you are editing your caching settings!
General Settings
- Enable Page Cache.
- Page Cache Method: Disk: Enhanced (or Memecached if it’s available).
- Enable Minify. If you have Pagespeed or Cloudflare minification, enabling Minify here can have unexpected effects on your sites.
- Minify Cache Method: Disk.
- Enable Database Cache
- Database Cache Method: Memecached or Opcode (if installed on your server) or Disk
- Enable Object Cache.
- Object Cache Method: Opcode, Memecached, or Disk, depending on your server setup.
- Enable Browser Cache.
If you don’t experience faster site performance, you may need to adjust the settings for your particular site. One option is to experiment with using either database caching or object caching, instead of both at once.
Page Cache
If you have a lot of traffic, disk caching can create high load on your server. If you experience this, we recommend installing memecached.
You can leave anything checked by default alone. It’s usually a good idea to:
- Check the box next to Cache 404 (not found) pages.
- Check the box next to Automatically prime the page cache.
Minify
You can leave anything checked by default alone. It’s usually a good idea to:
- Enable HTML minify settings and check Inline CSS minification, Inline JS minification, and Line break removal.
- Enable JS minify settings.
- Check the box next to Preserved comment removal.
- Check the box next to Line break removal.
- Enable CSS minify settings.
- Check the box next to Preserved comment removal.
- Check the box next to Line break removal.
Minifying can sometimes affect your theme. If your theme isn’t functioning properly after changing these settings, you may need to disable them.
Browser Cache
Use the checkboxes to select everything in the General section.
Once you’ve selected your settings, click on Dashboard in the left navigation menu and select empty all caches. This will cause a new cache to be built. Visit your site to make sure your theme wasn’t affected and that everything else is working as intended. Once you’ve tested, use GTMetrix (or another tool) to compare your site’s performance to before you enabled caching.
WP Super Cache
Once you’ve installed WP Super Cache, you can change the caching configurations by clicking on Settings in the left navigation menu and then clicking WP Super Cache.
The plugin does a good job of recommending settings. Remember: depending on your specific site, theme, and other plugins, you may need different settings! Make sure to test your site after making configuration changes.
If you are using Cloud Sites, use all these settings and then read Using WP Super Cache on Cloud Sites for Cloud Sites-specific recommended settings.
Be sure to click Update Status as you’re making configuration changes so you don’t lose your work!
Easy
In the Easy tab, you start by turning caching on! Simply select the radio button next to Caching On. Click Update Status to save your changes.
Advanced
You’ll make most changes to your configuration in this tab. You can usually leave the default settings as they are. In addition, some settings are recommended by WP Super Cache. Select the checkboxes or radio buttons to select these recommended options:
- Cache hits to this website for quick access.
- Use PHP to server cache files.
- Compress pages so they’re served more quickly to visitors.
- Don’t cache pages for known users.
- Cache rebuild.
- Extra homepage checks
In the Expiry Time & Garbage Collection section, choose how often you’d like old cached files to be replaced with new files. The times you choose will depend on your site function and traffic. You’ll see multiple potential scenarios within the plugin to help you choose. Remember that all these settings can be changed at any time.
Preload
Next, click on the Preload tab. Enable Preload mode using the checkbox and select how often you’d like to refresh these preloaded files.
Once you’ve selected your settings, visit your site to make sure your theme wasn’t affected and that everything else is working as intended. Once you’ve tested, use GTMetrix (or the site you used before) to compare your site’s performance to before you enabled caching. These settings are suggested by WP Super Cache as recommended for most sites, but your site might be slightly different! You may need to try different settings to find the best configuration for your website.