How to Create a Flex Plan
Prerequisites
- Your my.nexcess.net login credentials. If you cannot locate them, please use the “Forgot Password?” feature on the login page.
- Valid Credit Card.
Creating a new Flex Plan account
- Navigate to my.nexcess.net and use your credentials to log into your account. New clients can use the “Sign Up” feature to create a new Nexcess account.
- Navigate to the “Plans” section. This section can be found inside your Client Portal on the left-side menu.
- Once you have navigated to this section, click on the “Create Plan” button.
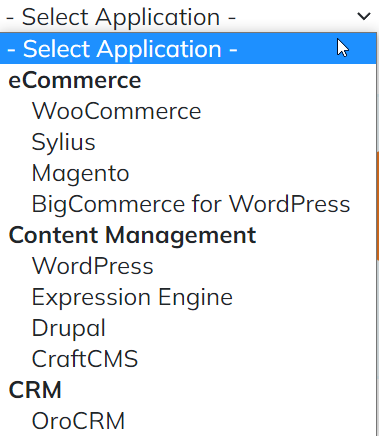
- The next page will offer you a few of the major applications to choose from: to create a new Flex Plan, select from the full list that can be found by clicking on the “Select Application” dropdown menu:
- Next, select the desired plan size by clicking “Select” under it.
- After choosing the plan and billing model, you can click “Next” under the plans table to proceed to the checkout.
- On the checkout page, you will be able to review your order and account details before creating a cloud account.
Account Information: Shows the account you are currently logged in for. Clicking on “Login with another account” will log you out and populate fields to create a new account. Logging into another account is possible by clicking on “Login” at the bottom of this section.
Billing Information: Shows your current billing address and credit card. It is possible to modify it before completing the purchase. The order may not be placed if an invalid credit card is used.
Plan Information: Allows you to name your plan and select the Nexcess data center for your plan. All sites created under this plan will be hosted in the same facility.
Order Summary: Shows the total for your order and all the applicable discounts (in case you chose an annual plan or inputted a coupon code at the Cart Summary).
- After verifying all the details, you can click on the “Purchase” button at the bottom of the page to complete the checkout.
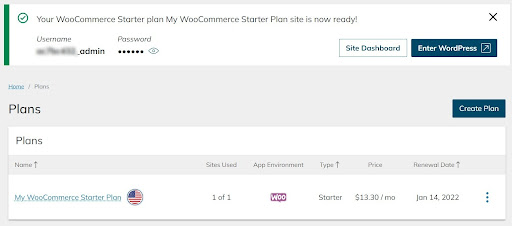
- It takes about 15 minutes to provision your plan. Once it is ready, you will see the following notification, and the plan will be visible in the “Plans” section.