Adding Custom RBLs
Using remote block lists (RBLs) is an effective way to minimize the spam that reaches your mailbox. (Read What Is an RBL? for more information.)
Before you start adding custom RBLs, you’ll need to gather some information from the RBLs you want to add. Your server uses a DNS query to ask the list about spam IP addresses every time you get an email. Because DNS is very efficient, this puts very little load on your server.
Every RBL has a website with the DNS list address for the RBL. You’ll need this address, which looks like a normal URL, to set up your RBL. It won’t be the same URL as the RBL website homepage. Some RBLs require that you register your IP with them before you start using their lists. Each RBL website will let you know what you need to do before you start using the list.
Using Plesk? |
| Plesk doesn’t use any default RBLs: you can add whatever RBLs you want to your server simply by following Filtering Spam Using RBLs. You’ll still need to visit the RBL’s website for the DNS list. |
Adding Custom RBLs in WHM (cPanel Servers)
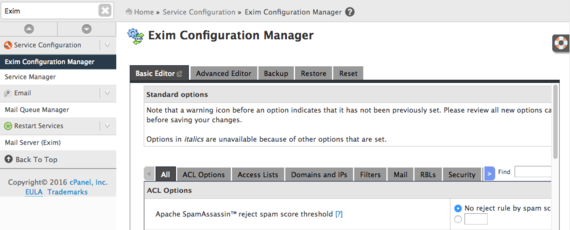
- Log into WHM.
- In the left hand search bar, search for “Exim.” Then, click on Exim Configuration Manager.

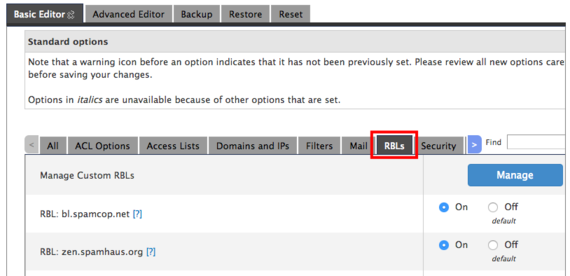
- In the Basic Editor, click on the RBLs tab.

- Click on Manage next to Manage Custom RBLs.

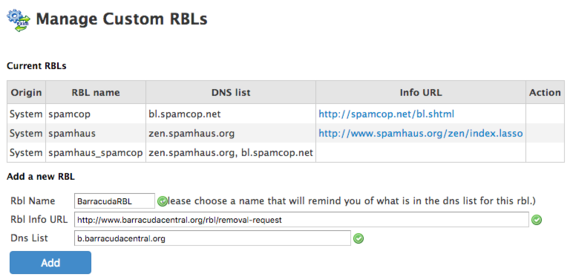
- Here you’ll see a list of all the RBLs your server is using. WHM supports Spamhaus and SpamCop, so if you’ve already enabled them in Exim Configuration Manager, you’ll see them listed. To add a new RBL, fill in three fields:
- RBL Name can be any name you’d like, but using the name of the RBL is recommended in case you have to make changes later.
- RBL Info URL is the URL of the RBL website. This is useful if you need to get more information at a later date from the RBL website.
- DNS List is the actual list host where your server will check emails against listed IPs. Remember: these are listed on RBL websites.

- Once you’ve entered the information for the additional RBL, click Add.
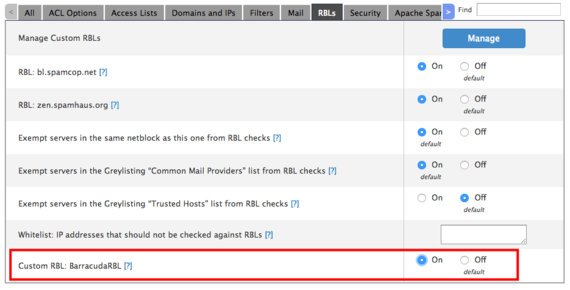
- Once you have added the RBL, you’ll need to enable it, also in the Exim Configuration Manager. If the Manage Custom RBLs page opened in a new tab or window, return to the Exim Configuration Manager. If it didn’t open in a new tab or window, click on Exim Configuration Manager at the top of the screen.
- If necessary, click on the RBLs tab again. At the bottom of the RBL settings, you will see Custom RBL: followed by the name of the RBL you added. Click the radio button next to On to start using this RBL.

- Click Save to apply your new settings.

Testing Your Custom RBLs (cPanel Servers)
Once you’ve added custom RBLs, you can test to make sure your server can retrieve the list. This requires Logging into Your Server via Secure Shell (SSH) and running one simple command.
- Using the terminal program of your choice, log into your server via SSH.
- In the command prompt, type:
host 2.0.0.127.b.barracudacentral.org
Replace “b.barracudacentral.org” with the DNS list address of the RBL you’re checking. Then, press Enter.
- After pressing enter, you should see this output:
2.0.0.127.b.barracudacentral.org has address 127.0.0.2
(With the correct RBL DNS list address.) This means your RBL is working!