

Setup Email in Outlook
Desktop email clients, like Outlook, retrieve your email from your server so you can read email without opening a web browser. You don’t have to use a desktop client, but many people find it convenient.
This article will walk you through setting up email on Outlook 2013. If you have a different version of Outlook, try:
Or, read more about Outlook email setup on the Microsoft Office website.
Before you set up Outlook, you’ll need to find your email client configurations:
- Finding Your Email Client Configuration in cPanel
- Finding Your Email Client Configuration in Plesk
- Finding Your Email Client Configurations in Premium Business Email
Once you know your email settings, you’re ready to connect your account to Outlook.
Configuring Outlook
- To set up a new email account, click the File tab and then click Add Account.

- Select the radio button for Manual setup or additional server types. Then click Next.

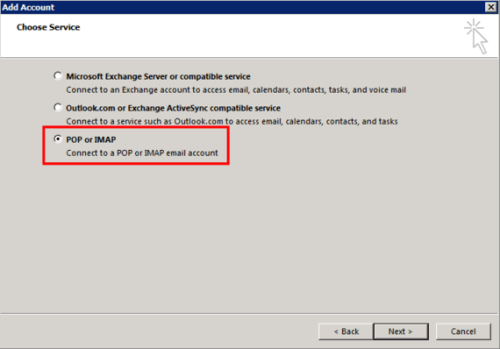
- Select the radio button for POP or IMAP. Then click Next.
- Now you’ll enter your server and email settings. For this, you’ll use the Manual Settings from your cPanel account.
- Your Name is your name as you want it to appear in emails that you send
- Email Address should be your full email address.
- Account Type will be POP3 or IMAP, depending on your preference. If you’re accessing your email from multiple devices, we recommend IMAP. Read about the difference between POP3 and IMAP to decide which account type will work best for you.
- For Incoming mail server, use the Incoming Server settings from cPanel.
- Outgoing mail server (SMTP), use the Outgoing Mail Server settings from cPanel.
- Your User Name is your full email address, not just the part before the “@” symbol.
- Password is the email account password.
- Require logon using Secure Password Authentication (SPA) must not be checked. You are using SMTP authentication
You cannot change an existing email account from POP3 to IMAP (or vice versa). To switch, you must configure the email as a new account. Most mail clients allow you to do this without deleting the original account.
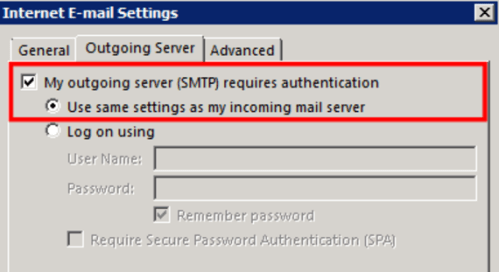
- Click the More Settings button, and select the Outgoing Server tab.
- Make sure the box for My outgoing server (SMTP) requires authentication is checked.
- Make sure you select the radio button next to Use the same settings as my incoming mail server.
- Now select the Advanced tab at the top of the More Settings window.
- Using the settings from the Manual Settings in cPanel, set your Incoming server port number. Then, enter the Outgoing server port number.
- If you are using the SSL/TLS settings, make sure Use the following type of encrypted connection is set to TLS. Otherwise, choose None in the dropdown menu.

- Click OK.
- Click Next to test your settings.
Your mail client may warn you about a self-signed SSL certificate during setup. Your connection is still securely encrypted, so you can safely click Yes to accept the certificate and proceed. (To learn about recognized certificate authorities, read What Is an SSL Certificate?).
- When you see the success message, you’re ready to start using your email address with Outlook 2013.
