Creating a Cron Job in Interworx Web Panel
Automating commands to run periodically on your server is a great way to keep files and processes cleaned up and running efficiently. Linux servers use Cron to manage these automated commands. Cron allows you to schedule scripts to be run by the minute, hour, day of the month, month, and day of the week. Cron in InterWorx Web Panel can be configured by the administrative (root) user or by the domain user.
Creating a Cron Job as the Administrative (root) User
The Administrative user can configure Cron jobs to run as either the root user (with full permissions) or as a domain user (with more limited permissions).
Running a Cron Job as the Root User
- Login to your InterWorx Server using the administrator (root) user credentials. For help with logging in, see Logging into InterWorx Web Panel.
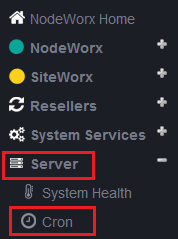
- Click on Cron in the Server section of the left navigation bar.
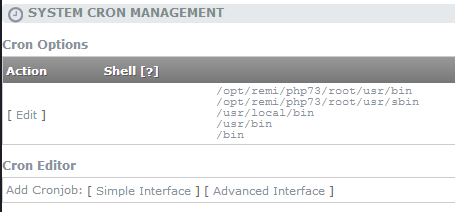
- This opens the System Cron Management screen. Listed here are all currently scheduled cron jobs, as well as links to create new cron jobs (simple interface or advanced interface). Both types of cron jobs function in the same way, but InterWorx makes scheduling the jobs simpler in the Simple interface. The Advanced interface is used to create cron jobs in classic crontab format.

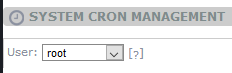
- Choose root as the user in the first drop-down menu.
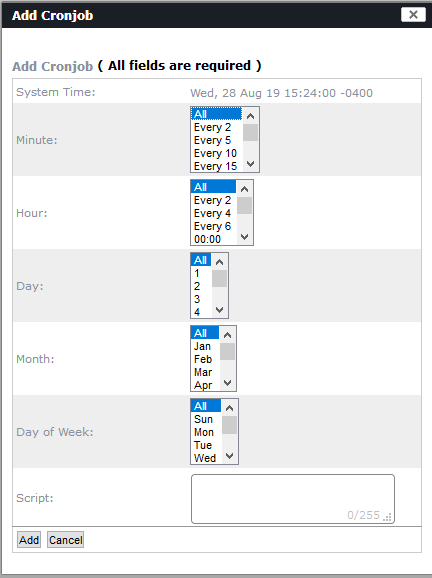
- Click either Simple Interface or Advanced Interface. Choose the frequency from the drop-down menus in the Simple Interface or enter the scheduling options in class Crontab format in the Advanced Interface. Enter the script in the script text box (always use the full path to the script). Click Add to finish creating the cron job. The cron job will now run on the schedule that you have provided.
Running a Cron Job as a Domain User (from the root control panel)
- Login to your InterWorx Server using the administrator (root) user credentials. For help with logging in, see Logging into InterWorx Web Panel.
- Click on Cron in the Server section of the left navigation bar.
- This opens the System Cron Management screen. Listed here are all currently scheduled cron jobs, as well as links to create new cron jobs (simple interface or advanced interface). Both types of cron jobs function in the same way, but InterWorx makes scheduling the jobs simpler in the Simple interface. The Advanced interface is used to create cron jobs in classic crontab format.
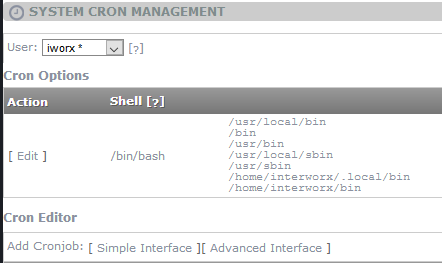
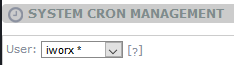
- Choose the user you want to run the job as in the first drop-down menu. In this example, we selected the iworx user.
- Click either Simple Interface or Advanced Interface. Choose the frequency from the drop-down menus in the Simple Interface or enter the scheduling options in class Crontab format in the Advanced Interface. Enter the script in the script text box (always use the full path to the script). Click Add to finish creating the cron job. The cron job will now run on the schedule that you have provided.
Creating a Cron Job as a Domain User
Domain users can create cron jobs from their own control panel in a similar manner to the administrative panel. The main difference is that user crons can only run as the user (with limited permissions) and cannot be run as the root user.
- Login to your InterWorx Server using the domain (SiteWorx) user credentials. For help with logging in, see Logging into InterWorx Web Panel.
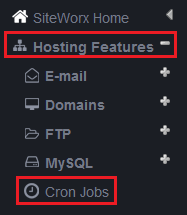
- Under Hosting Features in the left navigation bar, click on Cron Jobs .
- This opens the System Cron Management screen. Listed here are all currently scheduled cron jobs, as well as links to create new cron jobs (simple interface or advanced interface). Both types of cron jobs function in the same way, but InterWorx makes scheduling the jobs simpler in the Simple interface. The Advanced interface is used to create cron jobs in classic crontab format.
- Click either Simple Interface or Advanced Interface. Choose the frequency from the drop-down menus in the Simple Interface or enter the scheduling options in class Crontab format in the Advanced Interface. Enter the script in the script text box (always use the full path to the script). Click Add to finish creating the cron job. The cron job will now run on the schedule that you have provided.