FileZilla & FTP Clients: Transfer Files Using SFTP
This article will help you understand how to transfer files with SFTP, or SSH (or secure) file transfer protocol, which encrypts files as they are being transmitted.
How to Transfer files Using SFTP with FileZilla
The following process will help you understand how to transfer files with SFTP, or SSH (or secure) file transfer protocol, which encrypts files as they are being transmitted.
The SFTP method is preferred over regular FTP when transferring confidential data, as FTP poses significant security risks despite its popularity. Nexcess requires the use of SFTP or FTPS when transferring files associated with your account for security reasons.
- Locate your account’s SFTP details by accessing the Nexcess Portal.
- Open the FileZilla application, or you can download the latest from the FileZilla website.
- To connect to the website using the SFTP option, open the file Zilla and select the File> Site Manager option.
- The Site Manager will open a new session where you can select the SFTP option to transfer files.
Select the Protocol as SFTP, then update the HOST, PORT, and user section you obtained from step 6. In this case, you can select a Login Type as Ask for the Password, which will pop up a new screen to enter the password.
- Enter your password and click on the OK option.
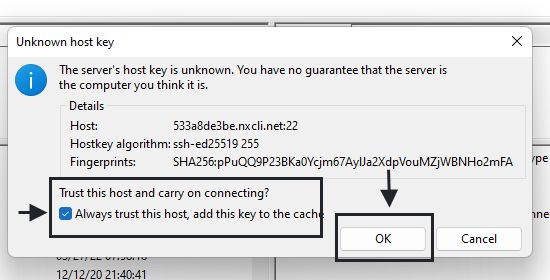
- Now, you will get a new pop-up warning message asking for a verification message. This warning message will be displayed for every first connection to the website.
- Select the Always trust option and click the OK button to connect to the website.
- It will now connect to the website, where you can transfer files using the SFTP process.
How to Transfer Files Using SFTP with WinSCP
The process for WinSCP is like that of FileZilla, which will help you to transfer files using the SFTP method.
1. Locate your account’s SFTP details by accessing the Nexcess Portal.
2. Once the details are obtained, open your WinSCP application. You can download WINSCP it from the official website if needed.
3. Click on the New session option on the WinSCP.
4. A new session screen will pop up. Select the protocol as SFTP.
5. Enter the Hostname, Port Number, Username, and Password obtained from step 1.
6. Once the login details are entered, click on the Login option to transfer the File using the SFTP method.
Note: Once you click on the Login option, you will get a pop-up warning message to verify the connection, which is asked on every new SFTP connection to the website. Click on the Yes option.
7. Now the connection to the website is established, and you can process transferring the files using SFTP now.
How to Transfer Files Using SFTP With Cyberduck
Cyberduck is a similar application to the above two, which will help to connect to the website and transfer the files using the sftp option. It is available for Windows and macOS, though the below steps use the latter.
1. You can locate your SSH credentials in managed WordPress and managed WooCommerce hosting.|
2. Open the Cyberduck application. If you do not have one, you can download the same from the official site of Cyberduck.
3. Click on the open connection on the Cyberduck.
4. It will take you to a new session, where you can select the protocol needed for the connection from the dropdown. Ensure you Select SFTP Protocol.
5. Enter the Hostname, Port Number, Username, and Password obtained from step 1. Once details are filled, click on connect.
6. Once you click on connect option, you will get a popup warning message to verify the connection, which is asked on every new SFTP connection to the website. Next, click on the Allow option and select the Always box.
7. It will connect you to the website, and you can now transfer files using the SFTP method.
Frequently asked questions
Conclusion
Now you know how to transfer files with SFTP, or SSH (or secure) file transfer protocol, in a number of ways.