How to allow or block hostnames and IP addresses in SiteWorx
Use SiteWorx to allow or block specific hostnames and IP addresses while managing permissions for a site or domain directory.
Prerequisites
- A backup of your .htaccess file
- An enabled global or directory-specific .htaccess file. See How to create .htaccess files for details
Step by step instructions
The hostnames and IP addresses you intend to add to the Trusted or Blocked fields will apply to the current directory and all of its subdirectories.
- Log in to your SiteWorx account.
- If you do not know your password, click Forgot your password on the login page.
- From the main menu, click Hosting Features > Htaccess.
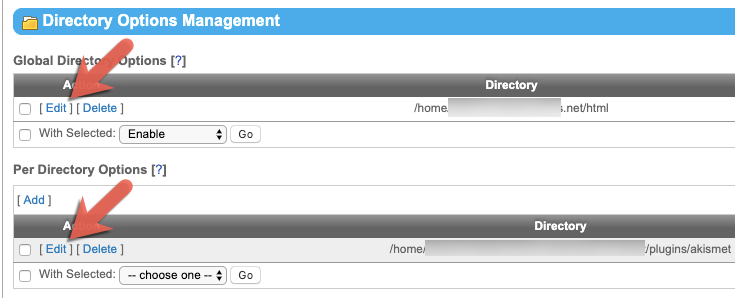
- Locate your desired directory, then click [Edit].

- Locate your desired directory, then click Access Control.
Reference the below image for steps 5–8.
- From the Access Order panel, select the order in which trusted or blocked”lists should be considered:
- Deny first, then allow: Blocked Hosts list will be evaluated first.
- Allow first, then deny: Trusted Hosts list will be evaluated first.
- Type the domain names or IP addresses in the TrustedHosts field. The domain names and IP addresses listed will be allowed access to this directory and all of its sub-directories.
- Type the domain names or IP addresses in the Blocked Hosts field. The domain names and IP addresses listed will be denied access to this directory and all of its sub-directories.
- Click Update. A message will display at the top of the page indicating that access control has been enabled for the directory that you selected; for example, Access Control updated: global.