

Configuring NodeWorx Spam Filtering
InterWorx uses SpamAssassin to help keep levels of email spam reasonable. From the Spam Filtering page in NodeWorx, server administrators may manage the SpamAssassin service, edit SpamAssassin and Bayes Learning settings, specify global blacklist and whitelists, and add custom rules.
NOTE: |
| This documentation refers specifically to NodeWorx SpamAssassin settings, which are set globally for the server. Information on SiteWorx-level SpamAssassin settings can be found in our article, Configuring SiteWorx Spam Filtering. |
Checking SpamAssassin Status
- Log into NodeWorx from the browser (https://ip.ad.dr.ess:2443/nodeworx)
- In NodeWorx, navigate to System Services > Mail Server > Spam Filtering

- Under SpamAssassin Control, the SpamAssassin Status bar indicates the current status of the service
- It is also possible to control the status of the service from this interface:
- Play starts the service
- Arrow restarts/refreshes the service
- Stop stops the service

Setting SpamAssassin Start-On-Boot Options
- Log into NodeWorx from the browser (https://ip.ad.dr.ess:2443/nodeworx).
- In NodeWorx, navigate to System Services > Mail Server > Spam Filtering.
- Under SpamAssassin Control, select either Yes or No from the Start on Boot-up dropdown (see image above).
- Click Update.
Setting SpamAssassin Auto-Restart Options
- Log into NodeWorx from the browser (https://ip.ad.dr.ess:2443/nodeworx).
- In NodeWorx, navigate to System Services > Mail Server > Spam Filtering.
- Under SpamAssassin Control, select either Yes or No from the Auto-restart SpamAssassin dropdown (see image above).
- Click Update.
Edit SpamAssassin Scanning Options
- Log into NodeWorx from the browser (https://ip.ad.dr.ess:2443/nodeworx).
- In NodeWorx, navigate to System Services > Mail Server > Spam Filtering.
- Under SpamAssassin Options, update the desired fields:
- SMTP Level Scanning: If enabled, this option scans all e-mail as it enters the server, using the SpamAssassin content filter. The SMTP connection will be dropped only if the Spam Score is higher than the SMTP Spam Score option. Otherwise, the e-mail will still be delivered to the recipient
- SMTP SPAM Score Threshold: This is the SpamAssassin score threshold at which the SMTP server will reject a message before local delivery begins. Use a very high number if spam should not be blocked at the SMTP level
- Maximum File Size: The maximum message size to be scanned. Messages larger than this threshold will be returned, unprocessed.
- Rewrite Header Subject: Determines the rewritten email subject for E-mails marked as spam
- Reporting Method: This option sets the method of delivering the actual e-mail spam message
- Attach Original: Original method is attached to an email from SpamAssassin
- Add X-Spam Header: Email is sent, unchanged, with the subject rewritten
- Attach Plain Text: Original email is attached as plain text to an email from SpamAssassin
- Auto Whitelisting: Enable or disable the SpamAssassin AutoWhitelist functionality. More detailed information can be found in SpamAssassin’s documentation.

- Click Update.
Edit SpamAssassin Bayesian Learning Options
Bayesian filtering is user-driven spam filtering, where users tag messages as either spam or non-spam (ham). By keeping an even number of spam and non-spam messages flagged, the system is able to filter messages based on words present in the message. More detailed information can be found in SpamAssassin’s Bayes Documentation.
- Log into NodeWorx from the browser (https://ip.ad.dr.ess:2443/nodeworx).
- In NodeWorx, navigate to System Services > Mail Server > Spam Filtering.
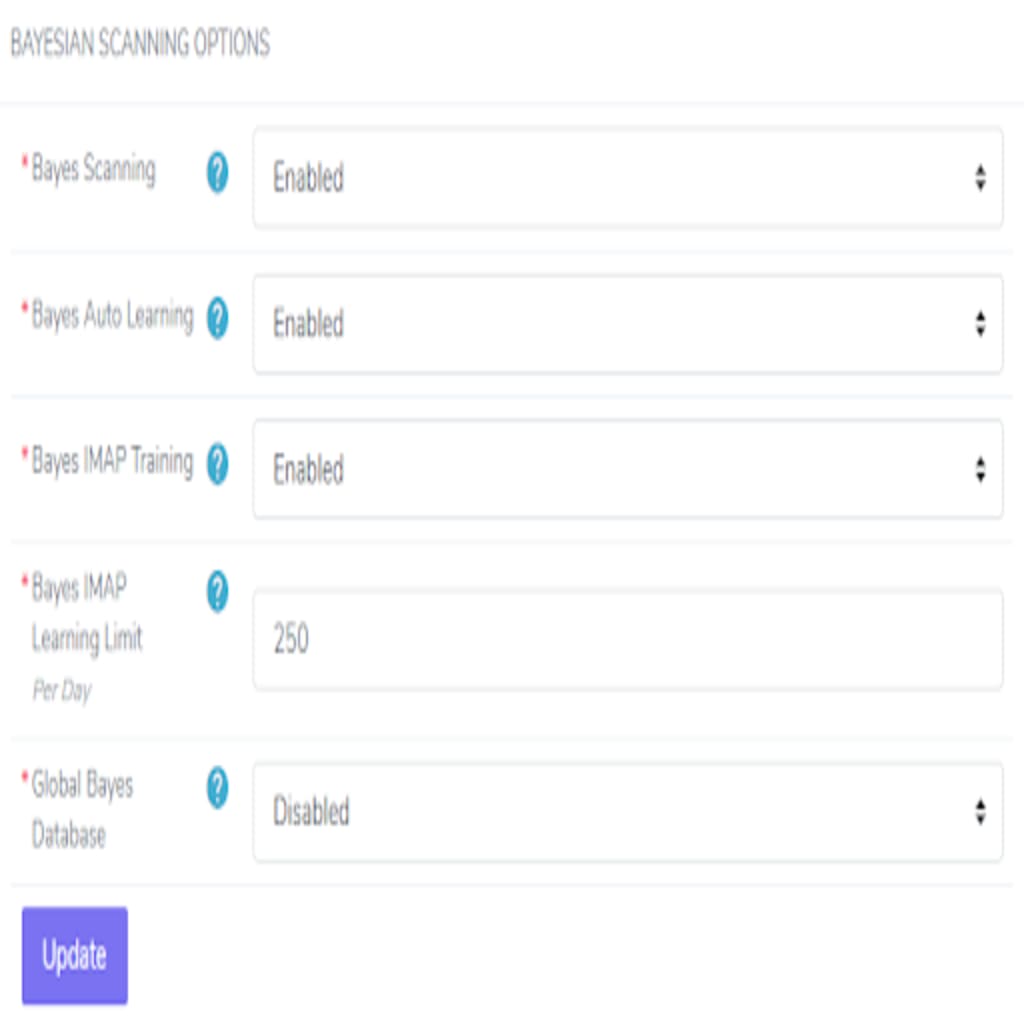
- Under Bayes Scanning Options, update the desired fields:
- Bayes Scanning: Enable or Disable the Bayes Database system server-wide. Given training, Bayes will learn which emails are most likely spam and most likely ham (not spam), and handle those messages according to set preferences.
- Bayes Auto Learning: If enabled, the system will automatically train the Bayes database by analyzing messages with a score that strongly suggests that they are spam or non-spam.
- Bayes IMAP Training: If Bayes IMAP training is enabled, two folders will automatically be created for all e-mail accounts on the system: “Learn Spam” and “Learn Ham”. Users may then move spam emails into the Learn Spam folder and messages that are not spam into the Learn Ham folder. This will train the Bayes system on which messages ares spam, and which are not. The training occurs once, daily.
- Bayes IMAP Learning Limit: The maximum number of e-mails that will be trained from the Learn Spam or Learn Ham folders, each day.
- Global Bayes Database: If enabled, all the Bayes data will be stored as a single global user. If disabled, each e-mail box user will have their own Bayes database to store bayesian data. Disabled is considered more effective for fighting spam, but requires all e-mail users to train their messages individually, and uses more disk space, compared to the global database option.
- Click Update.
SpamAssassin Access List-Based Filtering
SpamAssassin allows the ability to globally designate “good” and “bad” email addresses, so as to target specific spammers or domains, as well as to clear email addresses and domains that are marked as false positives. More details can be found in SpamAssassin’s Configuration Documentation.
- Log into NodeWorx from the browser (https://ip.ad.dr.ess:2443/nodeworx).
- In NodeWorx, navigate to System Services > Mail Server > Spam Filtering.
- Under Spam Access Lists, update the desired fields:
- Global Whitelist: List of email addresses or domains that are valid to send email from on a server-wide level. Enter one domain or email address, per line.
- Global Blacklist: List of email addresses or domains, that should always be tagged as spam, and that are not that are not valid to send messages from, on a server-wide level. Enter one domain or email address, per line. To block all emails from a domain, use the format ‘*@domain.com’.
- Trusted Networks: List of trusted networks or hosts. Trusted in this case means that relay hosts on these networks are considered to not be potentially operated by spammers, open relays, or open proxies. A trusted host could conceivably relay spam, but will not originate it, and will not forge header database.

- Click Update.
Manage Custom Spam Settings
SpamAssassin allows for custom rules to more specifically target and manage potential spam messages that enter the server. More detailed information can be found in SpamAssassin’s User Preferences documentation.
Adding a Custom Spam Setting
- Log into NodeWorx from the browser (https://ip.ad.dr.ess:2443/nodeworx).
- In NodeWorx, navigate to System Services > Mail Server > Spam Filtering.
- Under Add Spam Preference, select the desired custom rule from the Preferences dropdown.
- Update the Value field with the specific desired value for the rule.

- Click Add.
Editing Custom Spam Setting
- Log into NodeWorx from the browser (https://ip.ad.dr.ess:2443/nodeworx).
- In NodeWorx, navigate to System Services > Mail Server > Spam Filtering.
- Under Advanced SpamAssassin Custom Options, click the Pencil next to the rule. This opens the Edit Spam Preference form.
- Update the desired fields.

- Click Save.
Deleting a Custom Spam Setting
- Log into NodeWorx from the browser (https://ip.ad.dr.ess:2443/nodeworx).
- In NodeWorx, navigate to System Services > Mail Server > Spam Filtering.
- Under Advanced SpamAssassin Custom Options, click the Trash can next to the rule. This opens the Delete Confirmation form.

- Click Delete.