Install an SSL Certificate in Cloud Sites
Adding an SSL certificate to your website isn't mandatory, but it ensures security for features like secure login and ecommerce. Cloud Sites has a unique installation process, but you need to obtain the SSL first before installing it.
Notice: |
| Cloud Sites does not support Wild Card SSL Certificates. They cannot be installed or configured to work with the Cloud Sites framework. |
An SSL certificate isn’t required on your website, but once you’ve added an SSL certificate, your site will be secure if you want to add secure login capabilities or ecommerce. If you haven’t read What Is an SSL Certificate?, check it out to decide if an SSL certificate is right for you. Before you try to install an SSL certificate, make sure you’ve:
Once you’ve completed those steps, this article will walk you through installing an SSL certificate on your domain.
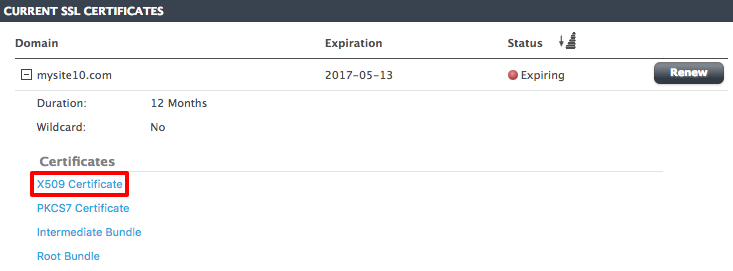
- In your Liquid Web Account, go to the SSL Certificates Dashboard, click on X509 Certificate under Certificates. Text should appear that looks very similar to your CSR. Copy this text. It might be easiest to paste it into a plaintext text editor for now.

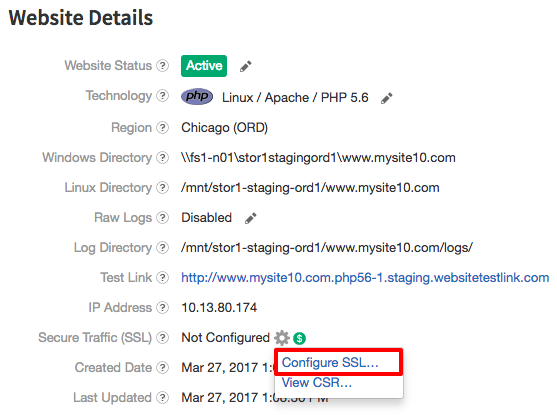
- Log into your Cloud Sites account.
- Click on the domain for which you’ve ordered the SSL. Then, click on the gear icon next to Secure Traffic (SSL) and click on Configure SSL.

- Paste the X509 certificate into the Certificate field. The private key will be automatically filled in from your CSR.

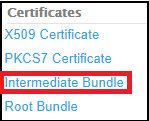
- OPTIONAL: Some browsers (such as Google Chrome) may flag a site as “unsecure” if there is no Intermediate Certificate. To avoid this problem, copy the text from the Intermediate Bundle in your SSL Dashboard from Step 1 and paste it into the Intermediate section in Step 4.
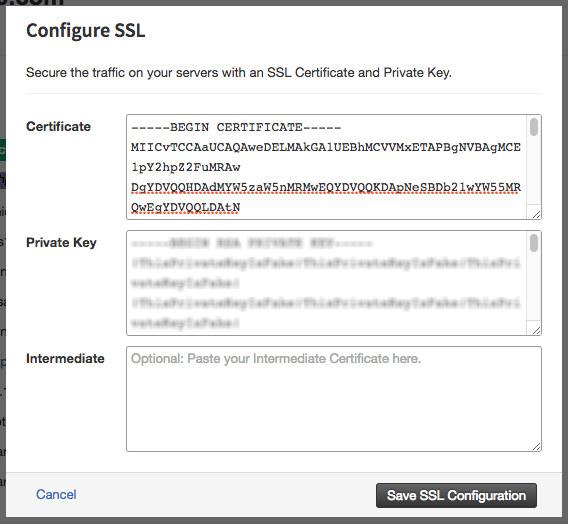
- Click Save SSL Configuration. You’ve successfully installed an SSL certificate on your domain! You can make sure everything is installed correctly by running your domain name through an SSL checker.