
◦ Comprehensive security
◦ Support
WordPress Guide → Build → Start a Blog
Q: How do I start a WordPress blog?

Starting a WordPress blog is an exciting step toward sharing your ideas, building your brand, or growing your business online. This comprehensive guide walks you through the entire process, making it simple to launch your blog with confidence. Get ready to learn what steps you need to follow to create a professional WordPress blog that gets results.
What do you need to start a WordPress blog?
Creating a successful WordPress blog starts with proper planning. Take time to think through your blog’s purpose, gather the tools you’ll need, and understand the basic steps ahead. You’ll want to:
- Define your blog’s main topic and target audience
- Set aside dedicated time for the setup process
- Prepare to make decisions about hosting and design
- Have access to a computer with reliable internet
- Get familiar with basic WordPress terminology
Thankfully, WordPress is an open source platform, so once you get going, countless developer resources are available to help you launch your blog – including this one.
With these preparations in place, you’ll be ready to follow our step-by-step process with confidence.
1. Purchase a domain name
First things first. You need to name your blog and purchase the domain name from a domain registrar. A domain name is also called your website address or URL.
If possible, your domain name should match the name of your business or blog. If your business, brand, or personal name isn’t available, consider using the big result you help clients achieve or brand keywords as your domain name.
When selecting your domain name, focus on these key principles:
- Make it memorable and easy to type: Avoid complicated spellings or long strings of words.
- Keep it professional: Choose something that represents your blog’s topic or brand.
- Avoid hyphens and numbers: These can make your domain look unprofessional and are harder to remember.
- Think about pronunciation: Your domain should be easy to say and spell when shared verbally.
- Consider your audience: Use words that resonate with your target readers.
Remember, your domain name is your blog’s permanent online address. Choose something that you’ll be proud to share.
2. Purchase managed WordPress hosting
Once you have your domain name secured, you also need to purchase hosting for WordPress. You can get self-managed or fully-managed WordPress hosting, but if you’re new to this, we recommend managed hosting. WordPress comes already installed, so you don’t have to do any of the setup.
Managed WordPress hosting from Liquid Web includes several features that make maintaining your blog easier:
- Automatic updates with visual comparison testing ensure your site stays secure without breaking
- Daily backups protect your content and give you peace of mind
- Staging environments let you safely test new themes and plugins
- Easy migrations with our WordPress-specific plugin
- Free SSL certificates and SFTP/SSH access included
- No limits on plugin installations
For those managing multiple sites, our Solid Central dashboard helps you oversee all your WordPress installations in one place.
3. Connect your domain name and hosting
Now you need to connect your domain name and hosting account so your new WordPress website will show up at your web address. To do this, you need to do the following.
- When you sign up for your managed WordPress hosting account, you’ll receive an IP address for your website either in your hosting dashboard or by email.
- Within the hosting panel, you need to add your domain name to the configuration settings so the host knows the right domain for the website.
- Log into your account with the domain registrar you used to buy your domain name and edit the DNS settings. Change the A-Record to the IP address provided to you. This change can take anywhere from an hour to 24 hours to propagate.
- Back in the Liquid Web hosting panel, enter your domain name into the field labeled primary domain and click the update button to change all of the settings to use your URL.
4. Choose a WordPress theme
Now that your domain name is connected to your hosting account and your new WordPress site shows up at your desired URL, it’s time to choose a WordPress theme. The theme you choose will dictate the design and look of your blog.
- In your WordPress dashboard, under the Appearance > Themes menu on the left-hand side, you’ll find the option to add a new theme.
- You can then browse themes available through the WordPress.org theme repository right in your dashboard, select the one you like, and be on your way.
- If you don’t see a theme you like, you can search for a premium WordPress theme online that best fits your needs, purchase that theme, download a zip file of the theme, and upload it right to your website in the themes dashboard.
- Look at the developer’s support channel and check their responsiveness. Poor support means issues with your theme might be harder to resolve.
- If you’re thinking about a paid theme, make sure there’s a refund policy.
Quick tip: When selecting a WordPress theme, ignore the colors, images, and design elements, as all those items can be changed easily. Instead, focus on the structure and layout of the page templates and how the content is organized.
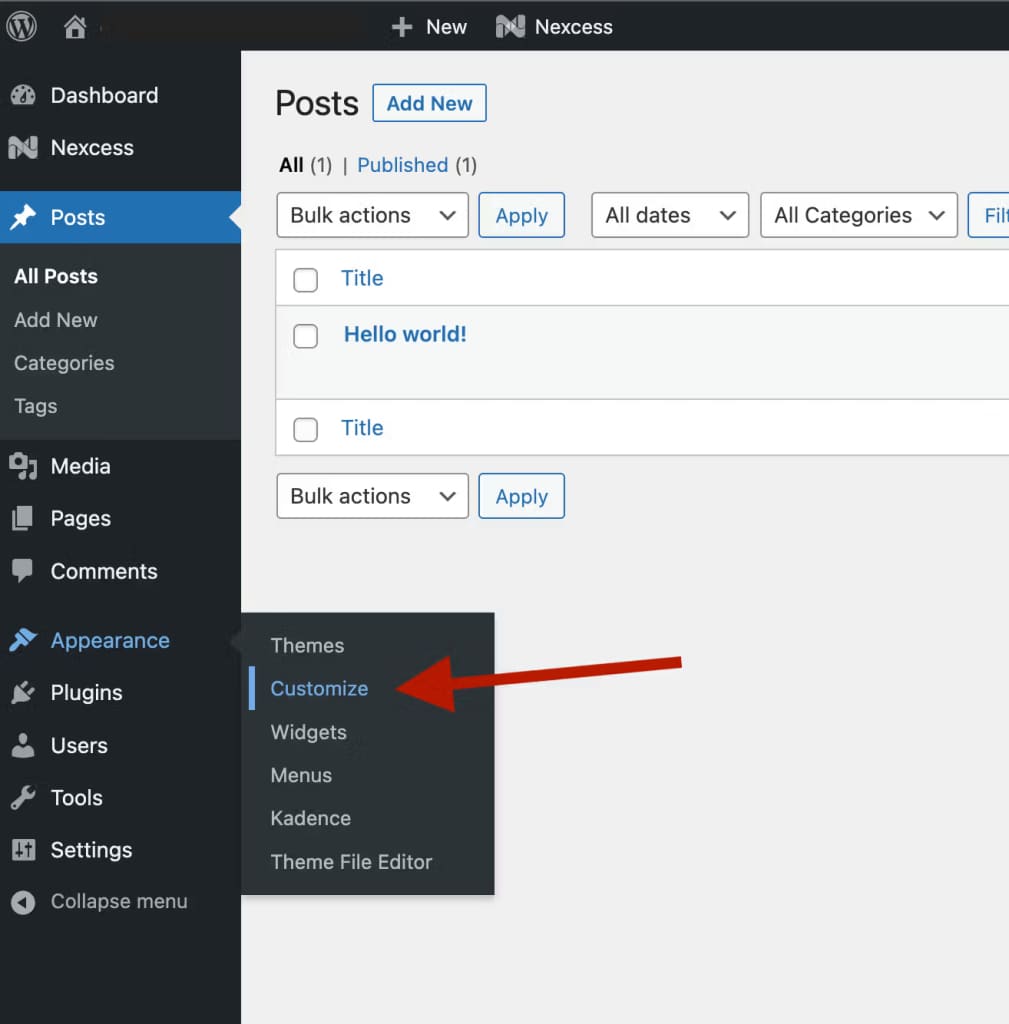
5. Customize the WordPress theme
After installing your theme, use the WordPress Customizer (found under Appearance > Customize) to make it your own. You can preview changes live while adjusting your site’s colors, fonts, layout, and menus. Add your logo, customize button styles, and ensure your design looks great on all devices.

6. Add content and images
The theme you selected will determine the layout of your homepage and whether your blog archive (main list of all your blog posts) is on the home page or a separate blog page. Now that you have customized the theme to be reflective of your brand, it’s time to add your core pages like the about page and contact page and to add your content and images to the homepage and any other page that you create.
To add new pages, navigate to the Pages menu and select “Add New.”
From there you’ll get a blank page template. Add the page title to the first line and enter your content. You can edit options on the right sidebar. When you’re done, click “Publish.”

Navigate back to the Posts menu and repeat to create your Contact pages or any other additional pages. Alternatively you can begin adding posts.
There are two ways to add a post. You can add it from the main Posts page using the “Add New” button. You can also use the dashboard menu option on the left sidebar under the Posts menu.

You can also edit both the formatting of your text, the blocks, and the post itself by using the tabs on the right.

When you’re done, click “Publish.”
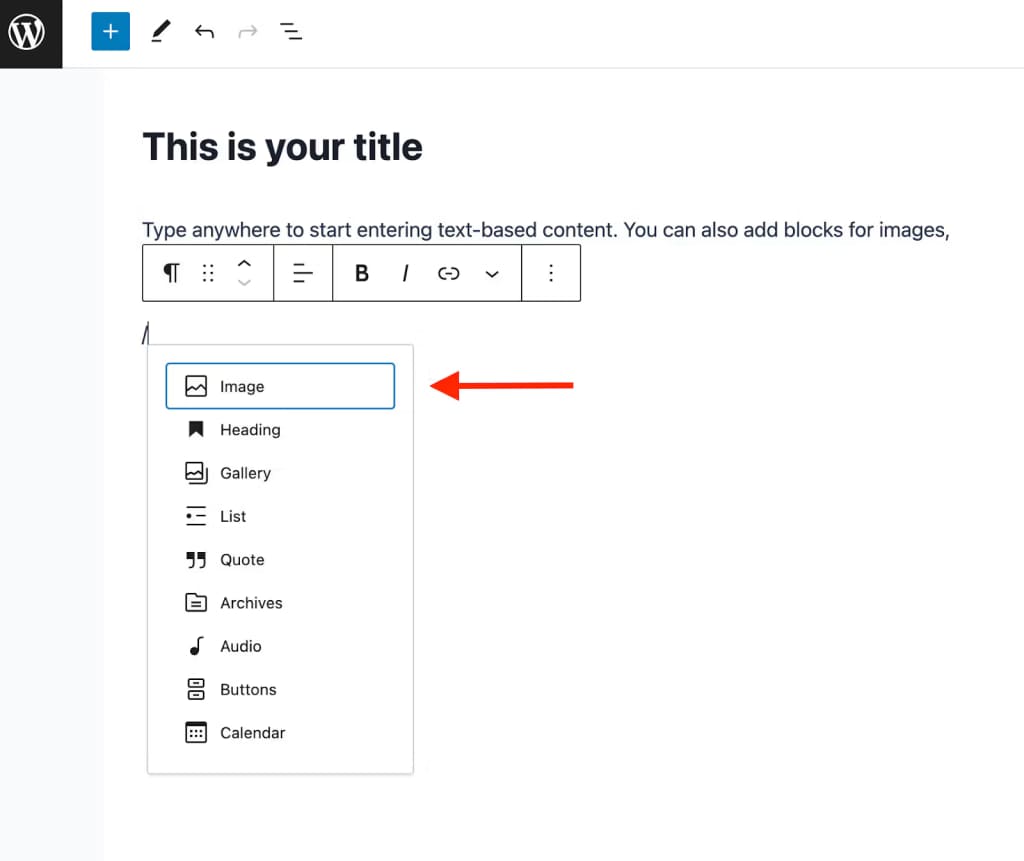
People are visual creatures. A site that is just text might be full of great content, but you want people to stay engaged. That’s where images come in.
Within a post, you can type “/” to select a block. Select “Image” as shown below.
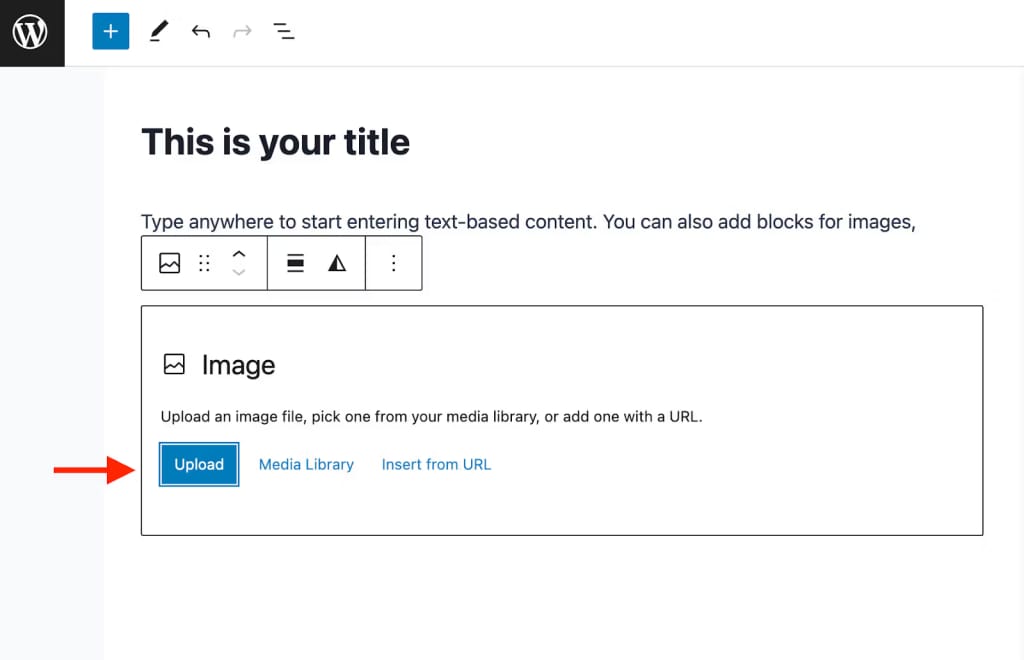
The image menu options will appear. You can either upload an image directly from your computer, select one from your media library, or use an image hosted elsewhere by typing in the URL.
To access your media library, navigate to the media menu on the left dashboard.
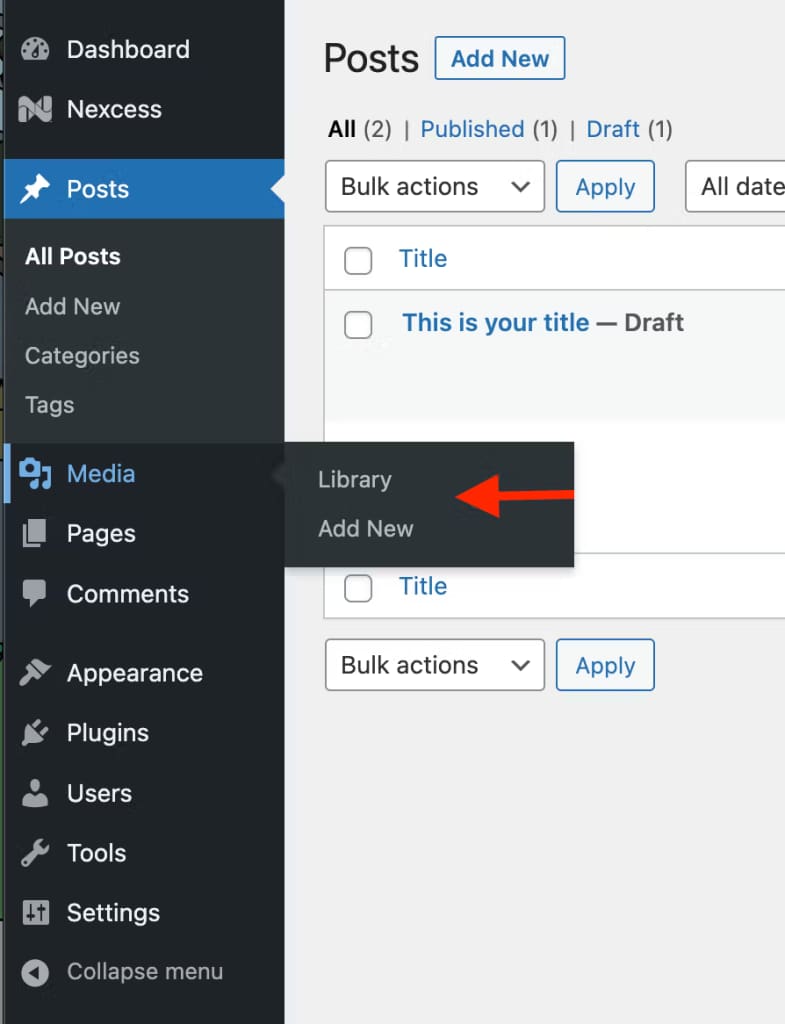
Click “Add New” to add an image.

Upload your image(s), and now they can be selected from the media library when you want to add an image block.
Now you’re ready to start adding the final bits of your site that improve user experience and help track your performance and success.
7. Add a contact form and social icons
Along with the content and images for the site, it’s also a smart idea to add a contact form to your contact page to easily allow people to contact you without publishing your email address online and opening yourself up for a barrage of spam.
Also, take a moment to think through how you would like to connect your social media audiences to your website, whether through prominent positioning of the social icons in your nav menu or minimized icons in your footer or sidebar.
8. Set up Google Analytics
Google Analytics is a powerful analytics service that provides reports on website traffic, page views, bounce rate, referral sources, user behavior, website conversions and goals, and more. You’ll want to add Google Analytics to WordPress prior to launching your site. This information is critical to the growth and improvement of your website, your ongoing marketing strategy, and the expansion of your brand.
9. Start publishing blog posts
At this point your new WordPress blog exists on your new URL, the theme is set up and customized to reflect your brand, and the homepage, about page, contact page, and any other needed pages have been created and the content has been added. This means there is only one last thing left to do.
Start creating blog content and publishing blog posts. Now it’s up to you to write or record new blog posts, publish them, and share them out across social media to bring traffic back to your site. It’s also up to you to market your new blog and get the word out so new readers can find you.
Post-launch: Growing your WordPress blog
Turn your new WordPress blog into a thriving destination by focusing on these proven strategies:
Content foundation
- Create 5-10 cornerstone content pieces that thoroughly cover your main topic areas
- Use WordPress’s built-in editor to create well-formatted, engaging posts
- Include relevant images and clear subheadings for better readability
- Build a content calendar and publish consistently (weekly or bi-weekly)
SEO and traffic growth
- Install an SEO plugin for better search visibility
- Write descriptive titles and use clear heading structures
- Optimize images with alt text and descriptive filenames
- Create internal links between related content
- Continue to use Google Analytics and Search Console to track performance
Audience building
- Add an email signup form with a valuable lead magnet
- Share new posts on relevant social media platforms
- Respond to comments to build community
- Network with other bloggers in your field
Site maintenance
- Keep WordPress core, themes, and plugins updated
- Monitor your site’s performance regularly
- Back up your content consistently
- Review analytics and adjust your strategy based on data
With Liquid Web’s managed WordPress hosting handling your technical maintenance, you can focus entirely on these growth activities that directly impact your blog’s success.
Next steps for starting a WordPress blog
If it seems like a lot, don’t worry. Just take it one step at a time.
First, you just need to choose a domain name and set up hosting. There are several good options on the market for hosting WordPress sites. Find one that seems like the best fit for you.
I should mention, though, that Liquid Web has been providing top-notch hosting services for about three decades. And we have the widest variety of options available for WordPress specifically—from fully managed to completely self-managed. Our servers are fast and secure, and our customer support is unbeatable.
Click below to explore options, or start a chat to get more details!
Additional resources
How to build a WordPress site →
A complete beginner’s guide that covers 9 key steps to a successful launch
The best managed WordPress hosting providers →
Six WordPress hosting providers compared
What is managed WordPress hosting? →
What it really looks like, benefits, and how to decide if it’s for you

Samantha Mueller was born and raised in Brooklyn, NY. Prior to joining the Liquid Web marketing team, she worked for area nonprofits and lectured at CUNY. Samantha now lives in Fond du Lac, Wisconsin with her husband and two miniature pinschers (Ziggy Woofdust and Stevie Licks). She is an avid gamer, writer, and world-class pet namer.