
 Haritha Jacob
 Welcome to your essential guide to Magento 2 email settings. As a Magento website owner, you know that active and helpful communication with your customers is essential for the success of your online store, just like having a reliable Magento host is critical to your site’s security, speed, and availability.
Whether sending order notifications, promoting your products, or providing customer support, properly configuring your email settings is crucial. In this step-by-step tutorial, we’ll walk you through setting up and optimizing your email settings in Magento 2. From basic configurations to advanced strategies, we’ll cover everything you need to know to enhance email communication and drive success in your ecommerce venture. Let’s dive in!
Key points
Below are the key points covered in this article:
- Why your Magento 2 email settings matter
- Introduction to email settings and the associated configuration steps
- Accessing email settings
- Managing the SMTP configuration
- Looking at advanced email optimization strategies
- Studying answers to common questions regarding Magento 2 email settings
Why email settings matter
Before diving into the configuration process, let’s understand why email settings are essential for your Magento 2 store. Email serves as a primary channel for customer communication, including order confirmations, shipping updates, password resets, and promotional messages. Configuring email settings ensures that these messages are delivered reliably to your customers, enhancing their shopping experience and fostering trust in your brand.
Using these business best practices along with executing comprehensive testing, you can make sure that your Magento 2 store’s email settings are configured correctly and that emails are being sent and received as intended. This optimal email setup helps to maintain effective communication with your customers and enhances their overall shopping experience.
Order notifications
Email is the primary channel for delivering order notifications to your customers. Whether confirming their purchase, updating them on the status of their order, or notifying them about shipping and delivery details, timely and accurate communication is essential for providing a seamless shopping experience. Configuring email settings ensures that these notifications are delivered promptly, keeping your customers informed and satisfied with their purchase journey.
Customer support
Email provides a convenient and accessible avenue for customers to reach out to your support team with inquiries, issues, or feedback. Whether it’s seeking assistance with product selection, addressing concerns about an order, or resolving any post-purchase issues, efficient email support is crucial for fostering positive customer relationships. Configuring email settings ensures that customer inquiries are received promptly and addressed in a timely manner, enhancing overall satisfaction and loyalty.
Marketing and promotions
Online marketing is an excellent tool for driving sales, promoting your products, and nurturing customer relationships. Whether it’s sending out promotional offers, announcing new product launches, or sharing relevant content with your audience, effective email communication can significantly impact your marketing efforts. By configuring email settings to deliver personalized and engaging marketing messages, you can effectively reach with your customers, boost traffic to your store, and increase sales.
Brand identity and trust
Consistent and professional email communication reflects positively on your brand’s identity — and fosters trust among your customers. From the sender’s name and email address to the content and design of your emails, every aspect of email communication contributes to shaping the perception of your brand. By configuring email settings to ensure deliverability, personalization, and consistency, you can strengthen your brand’s reputation and build trust with your audience.
Introduction to email settings configuration steps
Configuring email settings in Magento 2 is crucial for running your online store smoothly. It’s like setting up your store’s phone system so you can talk to customers and send them meaningful messages. There are a few main steps to this, and they’re all about making sure your store can communicate effectively with customers and deliver messages reliably. Let’s take a quick look at each step to understand what it involves.
Step #1. Accessing email settings
To begin configuring email settings in Magento 2, you’ll first need to access your store’s Admin Panel. Here’s how in the next sections.
1.1. Log into the Magento 2 Admin Panel
Use your appropriate credentials to open the Magento 2 Admin Panel for your account.
1.2. Navigate to the Stores > Configuration area
Once logged in, locate and click the Stores option in the main menu. From the dropdown menu, select the Stores Configuration option. This menu entry will take you to your store’s configuration settings:

Step #2. Managing General email settings
Under the Configuration menu, you’ll find a section dedicated to General email settings. Follow these steps to access and configure these settings.
2.1. Locate the Configuration > General section and email settings
Within the Configuration menu, navigate to the General section under the Advanced category on the left-hand sidebar:
2.2. Customize the Sender Name and Email Address values
Here, you’ll find options to customize the sender’s name and email address for outgoing emails. This information is crucial as it determines how your customers perceive the sender of the emails they receive:
- Sender Name: Enter the name you want to display as the sender of outgoing emails. This name could be your store’s name or a personalized name.
- Sender Email: Specify the email address from which emails will be sent to customers. It’s essential to use a legitimate and verified email address to ensure deliverability and trustworthiness.
2.3. Customize email template settings
Magento 2 allows you to customize email templates for various purposes, including order confirmation, shipment notification, and customer registration. You can personalize these templates to align with your brand’s voice and aesthetics, thereby enhancing the overall customer experience.
Step #3. Setting up the SMTP configuration
While Magento 2 supports sending emails via PHP’s built-in mail function, configuring an SMTP (Simple Mail Transfer Protocol) server offers enhanced deliverability and reliability. See how to configure SMTP settings in Magento in the next sections.
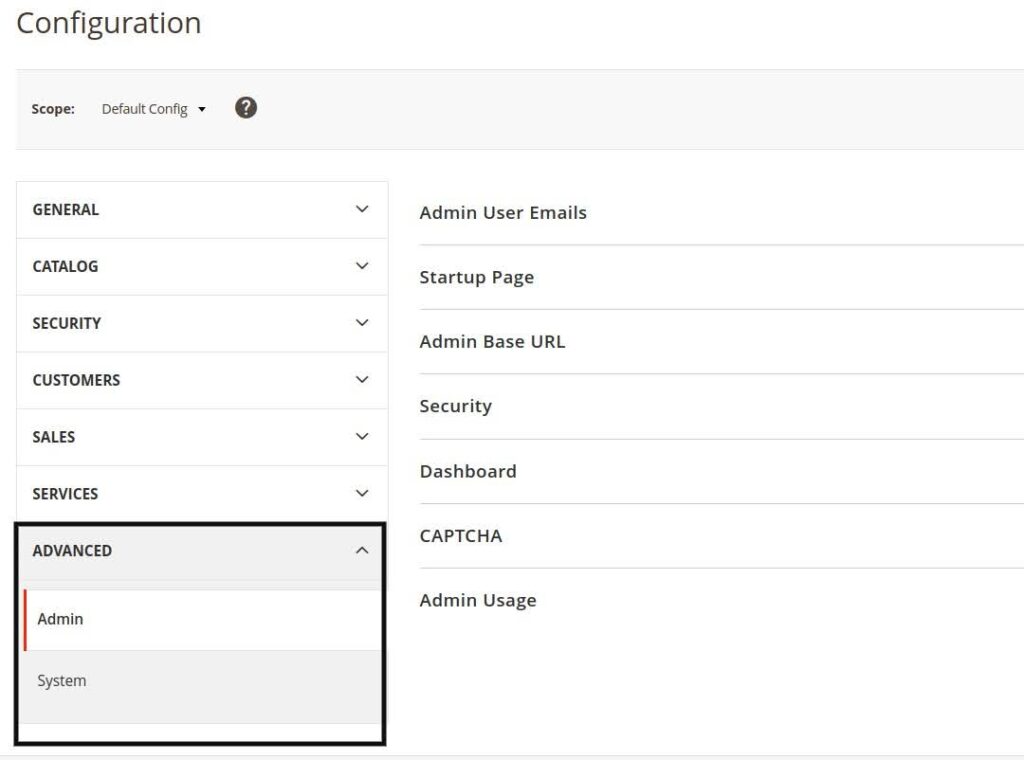
3.1. Navigate to the System > Advanced > System area
Within the Configuration menu, locate and click System under the Advanced category.
3.2. Expand the Mail Sending Settings section
Within the System settings, expand the Mail Sending Settings section to access SMTP configuration options.
3.3. Configure SMTP settings
Fill in the following details to configure your SMTP settings:
- Host: In this field, enter the SMTP server hostname or IP address provided by your email service provider.
- Port: Here you specify the port number for SMTP communication (commonly port 25, 587, or 465).
- Encryption: For optimal security, choose the desired encryption method (None, SSL, TLS) based on your SMTP server’s configuration.
- Username and Password: For these fields relating to the SMTP server, supply the username and password for the server, if required, to authenticate outgoing emails.
3.4. Save the SMTP configuration details
After entering the necessary SMTP configuration details, click Save Config to apply the changes.
Step #4. Testing email settings
After configuring email settings, it’s crucial to test your email setup end-to-end to make sure emails are being sent and received successfully. Review the following sections to learn how to test email functionality in Magento 2.
4.1. Navigate to System > Tools > Email Communications:
Within the Admin Panel, locate and click System in the main menu. From the dropdown menu, select Tools, then choose Email Communications.
4.2. Click the Sent Test Email option
Click Sent Test Email to initiate the testing process.
4.3. Enter valid email address
Enter a valid email address to receive the test email. This entry could be your own email address or any other address you have access to.
4.4. Send a test email
Once you’ve entered the email address, click the Send Email option in the user interface to send out the test email.
Advanced email strategies
Beyond basic email configuration, there are several advanced strategies you can employ to optimize email communication in Magento 2.
Email deliverability optimization
Having high email deliverability rates is important for the success of you online marketing campaigns. Leverage best practices that include maintaining a clean email list, avoiding spammy content, and adhering to email authentication protocols (SPF, DKIM, DMARC) to improve deliverability.
Personalization and segmentation
Personalized emails engage your customers better as compared to generic messages. As legally allowed, fine your customer data related to purchase history, browsing behavior, and demographics in order to personalize email content and tailor messages based on customer segments.
Automated email workflows
Implement automated email workflows to streamline communication and enhance customer engagement throughout the customer lifecycle. Automated workflows can include welcome emails for new subscribers, abandoned cart reminders, and post-purchase follow-ups, among others.
Email analytics, insights, and actions to improve conversion rates
Email analytics tools can be used to track metrics that include open, click-through, and conversion rates. Analyzing these metrics enables you to gain information about the success rates of your email campaigns and optimize them for better performance.
Frequently asked questions (FAQs) related to Magento 2 email settings
Here are seven common questions related to Magento 2 email settings paired with answers.
FAQ #1: Can I customize the sender name and email address for outgoing emails in Magento 2?
Answer: Yes, Magento 2 allows you to customize the sender’s name and email address for outgoing emails. This can be done in the General email settings area found within the Admin Panel using the Configuration menu.
FAQ #2: What are email templates in Magento 2, and how can I customize them?
Answer: Magento 2 email templates come with predesigned formats for a variety of email types, including order confirmations and shipment notifications. These templates can be customized to sync up with your brand’s voice and aesthetics by accessing the Template Settings in the General email settings area.
FAQ #3: What is SMTP, and why should I configure it in Magento 2?
Answer: SMTP — or with the acronym spelled out Simple Mail Transfer Protocol — is used for sending emails over the internet. Configuring SMTP in Magento 2 enhances the deliverability and reliability of outgoing emails, so that they will not be flagged as spam by the majority of email providers.
FAQ #4: How do I configure SMTP settings in Magento 2?
Answer: You can configure SMTP settings in Magento 2 by navigating to the System > Advanced > System in the Configuration menu. Once there, enter the corresponding SMTP server hostname or IP address, specify the port number and encryption method, and provide the username and password for authentication.
FAQ #5: Why is testing email functionality necessary after configuring email settings in Magento 2?
Answer: Testing email functionality ensures that emails are being sent and received successfully and verifies that your email settings are configured correctly. This testing effort helps you anticipate potential issues with email communication and ensures a seamless experience for your customers.
FAQ #6: Regarding delivery, can you track the status of emails sent from Magento 2?
Answer: Indeed, you have the option to track the status of emails sent from Magento 2 by configuring SMTP settings with an SMTP server that provides detailed logs and analytics. This functionality lets you to monitor the delivery state of the email and troubleshoot any issues effectively.
FAQ #7: Are there any best practices for configuring email settings in Magento 2 to improve deliverability?
Answer: Yes, some best practices for configuring email settings in Magento 2 to improve deliverability include using a legitimate and verified sender email address, avoiding spammy content in emails, and adhering to email authentication protocols (SPF, DKIM, DMARC).
Your key to successful email communication in Magento
Configuring email settings in Magento 2 is crucial for maintaining effective communication with your customers, ensuring they receive timely updates about their orders and promotions. Following the guidelines outlined in this post, you can set up your email settings seamlessly, from customizing sender details to configuring SMTP for enhanced reliability. Testing your email functionality is essential to ensure everything is working as expected.
Effective email communication is paramount for establishing trust with your customers and enhancing their overall shopping experience. By personalizing emails, tracking their performance, and ensuring reliable delivery, you can strengthen your brand identity and foster long-term relationships with your customers.
Get high performance Magento hosting
As you navigate the world of ecommerce, consider the importance of reliable hosting for your Magento 2 store. We offer high-performance hosting solutions tailored to the needs of Magento 2 websites. From robust infrastructure to expert support, we provide the reliability and scalability you need to succeed in the competitive online landscape.
Take the next step towards optimizing your Magento 2 store’s performance by exploring our hosting plans today. Your journey to ecommerce success starts here.