◦ Comprehensive security
◦ 24/7 support
WordPress Guide → SEO → Add Google Analytics
How to Add Google Analytics to WordPress and Track Data

Have you ever wondered about your audience? Wanted to know where visitors to your website lived? How old they were? Google Analytics (sometimes referred to as just “GA”) can help you better gauge visitors and make informed, data-driven decisions regarding your website.
Keep reading to learn how to add Google Analytics to WordPress.
Get fast, reliable hosting for WordPress
Power your site with the industry’s fastest, most optimized WordPress hosting
What is Google Analytics?
Google Analytics uses a web beacon to gather and collate data about visitors to your site. This free-of-charge service by Google enables you with the tools you need to sift through that data and understand how your customers behave while they visit your website. Google Analytics also offers insights into how you can provide a better customer journey and customer experience.
What can be tracked in Google Analytics?
You may be asking yourself, “If I connect Google Analytics to WordPress, what can be tracked?” Here are just a few of the things that can be tracked.
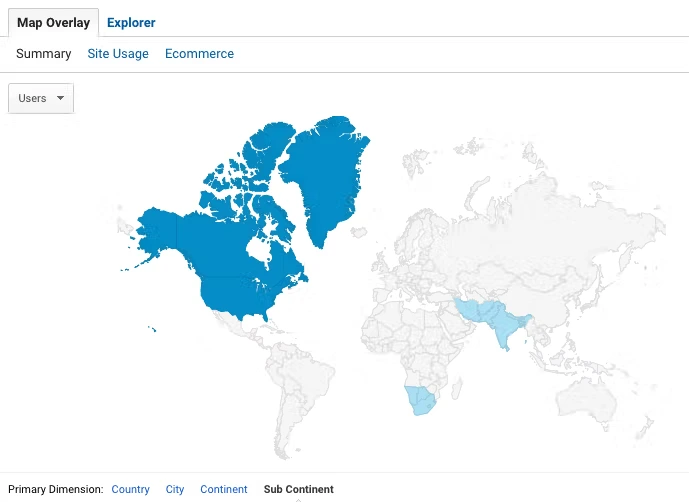
Geographical data
Google Analytics can allow you to see where your customers are. You can view by city, by country, by continent, and by subcontinent.
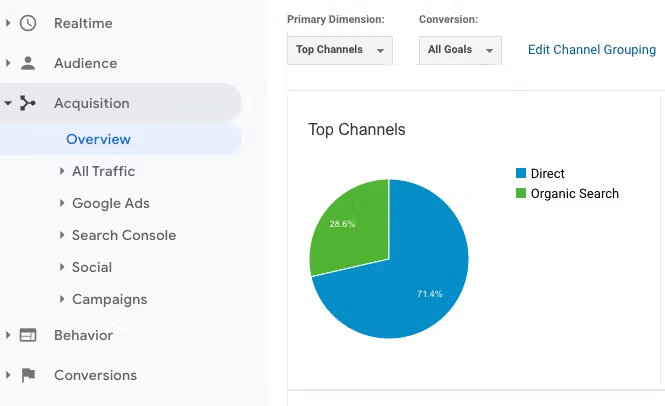
Source of traffic
If you’ve ever wondered, “How did my customers find me?” Google Analytics will help you. Here are a few types of traffic you can find in Google Analytics.
- Direct Traffic — These are visitors who manually typed in your address (or, more likely, clicked on a bookmark).
- Search Traffic — These are visitors who searched for something using Google and clicked on your site in the search results.
- Referral Traffic — These are visitors who arrived at your website by following a link to your website from some other website.
Technology
Are your customers viewing your site by using their cell phones or their desktop computers? Are they using Safari or are they using Chrome? Google Analytics answers these questions.
Event tracking
Once you’ve added Google Analytics to your WordPress site, you will be able to track events. Here’s a quick run-down of just a few types of web events that can be tracked:
- Page events using the mouse (e.g., where a visitor clicked on your site).
- Keyboard events (e.g., what a visitor typed into frames and forms on your site).
- Frame events (e.g., when a visitor scrolls through a frame).
- Form interactions (e.g., when a user adds payment information or proceeds to checkout).
Page views
How many pages did each visitor view? What was the average number of views across all visitors?
Session duration
Closely related to Page Views is Session Duration. How long was each visitor viewing your site?
Exit pages
What page was a viewer last viewing when they left your site?
Conversions
Google Analytics helps you track conversions. Conversions are when visitors to your site perform an action you value, such as subscribing to your mailing list or confirming a purchase. This is about converting random site visitors into loyal customers and clients, and turning clients and customers into dedicated fans.
Acquisitions
This is related to sources of traffic. Google Analytics helps you turn insights into results. In particular, by linking the Google Ads and Google Analytics accounts for your website, you can track which Google Ad Campaigns were most successful in bringing visitors to your site, your cost per acquisition, and how much each site conversion costs.
Behavior
Your website is your store window. Formerly known as “Content Experiments,” this feature of Google Analytics has been expanded and migrated to Google Optimize. You can leverage Google Analytics with Google Optimize to better understand split-tests for your WooCommerce site.
That’s a very, very brief introduction and broad overview of what Google Analytics can track. For guides, videos, and demos, head over to the official Google Analytics developer portal.
Why is Google Analytics important?
From reading the above list, you’ve probably already gleaned a few ideas you could use and are maybe now wondering how to add Google Analytics to WordPress. If not, here are a few more suggestions for why you should connect Google Analytics to your WordPress or WooCommerce site.
Integration
As suggested above, Google Analytics “just works” with most other Google platform services. If you have a Google Play app, you can use GA to track the Google Play Referral Flow from your associated WooCommerce site. If you have an active AdWords campaign with an email campaign component, you can align that data to track what’s working and what isn’t.
Attribution
Whether it’s a new sale or a new subscription, a new conversion is a delight. Whether you’ve had a managed WooCommerce site with us for years, or you’ve just decided to create your first online store, knowing why you gained a conversion is true bliss.
Imagine you’ve just got an unexpected rush of new conversions. Was it that new AdWords campaign? Did your latest Facebook campaign bring in those new clients? Or maybe it was the funny tweet from your college intern? Attribution (now in beta) from Google Analytics will help you stop wondering and start smiling as you better model the attribution for your conversions.
Recognition
Recognizing shifts in your website traffic and conversion rates spotlights new opportunities and helps you better focus your marketing efforts. For example, Google Analytics will help you break down which social media platforms are just bringing in new traffic and which platforms are now also bringing new conversions.
How to sign up with Google Analytics
Ready to see what your visitors are up to? Follow this quick-start guide and you’ll have your own Google Analytics 4 (GA4) property in minutes.
- Create an account on Google Analytics.
- Click “Start measuring.”
- This blue button launches the account setup wizard. Think of it as your onboarding tour guide.
- This blue button launches the account setup wizard. Think of it as your onboarding tour guide.
- Create your account.
- Type an account name that makes sense to you (for example, “My Site Analytics”).
- Choose your data-sharing settings. Leaving most boxes checked helps Google troubleshoot issues and improve products, but uncheck anything you’re not comfortable sharing.
- Type an account name that makes sense to you (for example, “My Site Analytics”).
- Set up your first GA4 property.
- Enter your website or brand name in the Property name field.
- Pick the correct reporting time zone (e.g., “Eastern Daylight Time, USA GMT-4”) and currency (e.g., “US Dollars — $”). Accurate settings keep your reports tidy.
- Click Next and answer a few short questions about your business size and goals. These answers tweak the default reports but won’t lock you in.
- Enter your website or brand name in the Property name field.
- Create a data stream.
- Choose Web as the platform.
- Type your full website URL, select https:// or http:// from the dropdown, and give the stream an easy-to-spot name like “Main Site.”
- Click Create stream. Google now generates a Measurement ID that starts with “G-”. Copy or jot this down. It’s the key that connects your WordPress site to GA4.
- Choose Web as the platform.
- Grab (or skip) Google Tag Manager.
- On the confirmation screen you’ll see your gtag.js tracking code. If you like adding snippets by hand, this is the script you’ll paste into WordPress later.
- Prefer something more organized? Click the Google Tag Manager link and set up a free account there. Tag Manager lets you manage Analytics, Ads, and other pixels from one dashboard—no more hunting through theme files.
- On the confirmation screen you’ll see your gtag.js tracking code. If you like adding snippets by hand, this is the script you’ll paste into WordPress later.
- Confirm everything looks good.
- Back on the Admin panel, make sure your new property and data stream appear under the correct account. Seeing them here means the setup is complete.
That’s it! You’re now the proud owner of a GA4 property and a fresh Measurement ID. Keep this ID handy because you’ll need it when we add the tracking code to WordPress in the next section.
How to install Google Analytics using headers and footers Plugin
After you’ve created a Google Analytics account and created at least one tracking code, you’ll want to know how to add Google Analytics to WordPress. To enable Google Analytics to start collecting data, you’ll simply add the tag from Google Analytics to the headers (or footers) of your WordPress site.
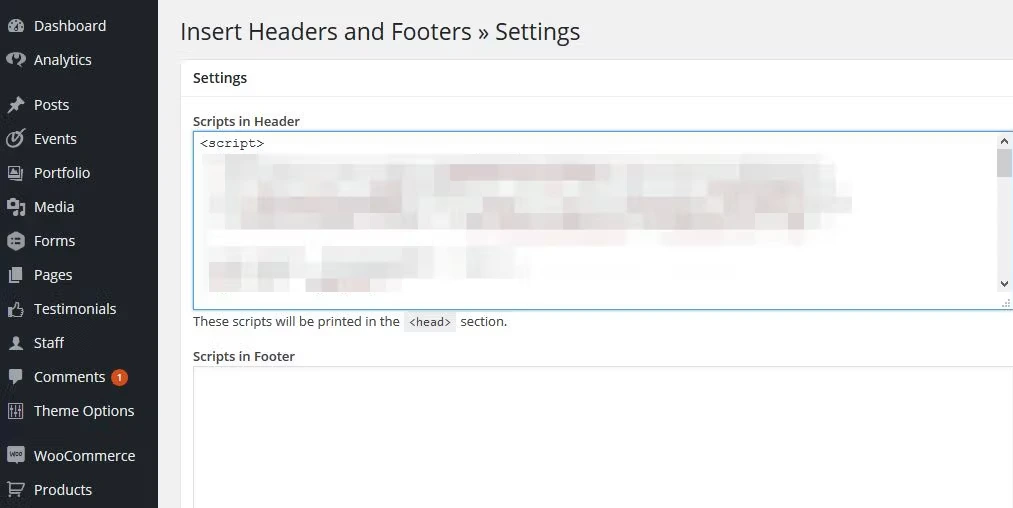
One easy way to add the newly created tracking code is to use the Insert Headers and Footers plugin.
Step 1: Install and activate the plugin. If you have one of our Managed WordPress or Managed WooCommerce plans.
Step 2: Insert code in your header or footer by going to the Settings > Insert Headers and Footers menu.
Step 3: That’s it! Google Analytics will now start collecting data.
Alternatively, add the code in functions.php
If you’d rather not rely on a headers-and-footers plugin, you can drop your Google Analytics script straight into your theme’s functions.php file. This keeps the tag in place even when the theme updates its header.php. Follow these steps:
1. Open Theme File Editor.
In your WordPress dashboard, go to Appearance → Theme File Editor (or use an FTP/SFTP client if you prefer).
2. Locate functions.php.
In the list of theme files on the right, click functions.php. If you’re using a child theme (recommended), edit the child theme’s copy so your changes survive parent-theme updates.
3. Add the tracking function.
Scroll to the bottom of functions.php and paste the snippet below. Replace the placeholder with your real GA4 script.
/** * Add Google Analytics tracking code to the site header. */ function add_googleanalytics() { ?> <!-- Google tag (gtag.js) --> <script async src="https://www.googletagmanager.com/gtag/js?id=G-XXXXXXXXXX"></script> <script> window.dataLayer = window.dataLayer || []; function gtag(){dataLayer.push(arguments);} gtag('js', new Date()); gtag('config', 'G-XXXXXXXXXX'); </script> <?php } add_action( 'wp_head', 'add_googleanalytics' );4. Save the file.
Click Update file (or save via FTP). Visit your site, view the page source, and confirm the script appears inside <head>.
5. Verify the connection.
In Google Analytics, open Admin → Data Streams → Web and use Realtime reports to see if your visit shows up. A green dot means you’re good to go.
Using functions.php ensures that the tracking code is safe during header rewrites and keeps your site lean, with no extra plugin required.
How to install Google Analytics using headers and footers Plugin
Google Tag Manager (GTM) lets you handle all tracking scripts from a single dashboard, so you never have to touch theme files again. Follow these steps to connect Google Analytics with GTM:
- Set up your GTM account.
Go to tagmanager.google.com, sign in, and click Create account. Name the account, choose your country, and add a Web container for your WordPress site. Click Create and accept the terms. - Add the GTM container code to WordPress.
- Plugin method. Install and activate “Google Tag Manager for WordPress,” then paste your container ID (looks like GTM-XXXXX) into the plugin settings.
- Manual method. Copy the two snippets GTM provides and paste them into your site: the first inside <head>, the second right after the opening <body> tag. Use a child theme or a headers-and-footers plugin so updates don’t overwrite the code.
- Plugin method. Install and activate “Google Tag Manager for WordPress,” then paste your container ID (looks like GTM-XXXXX) into the plugin settings.
- Create a Google Analytics tag in GTM.
- In your GTM workspace, click Add a new tag.
- Choose Tag configuration → Google Analytics: GA4 (or Universal Analytics if you still run UA).
- Enter your Measurement ID (starts with G- for GA4) or Tracking ID (starts with UA- for Universal).
- In your GTM workspace, click Add a new tag.
- Set the trigger and publish.
- Click Triggering → All Pages to fire the tag everywhere.
- Click Triggering → All Pages to fire the tag everywhere.
- Click Save → Submit → Publish to push the container live.
Using GTM keeps your tracking organized, lets you roll out new pixels (like Ads, Facebook, or Hotjar) with a few clicks, and reduces the risk of breaking your theme by editing code directly.
Adding Google Analytics to WordPress.com
WordPress.com keeps things simple, but Google Analytics is only available on paid tiers. Make sure you’re on the Premium, Business, or Commerce plan before you start.
- Confirm your plan supports GA.
Check your current plan in Upgrades → Plans. If you’re on a Personal plan, you’ll need to upgrade. - Open the Traffic settings.
In your WordPress.com dashboard, go to Tools → Marketing → Traffic. - Paste your Measurement ID.
Scroll to the Google section, enter the GA4 Measurement ID (starts with G-), and click Save Settings. Your site will begin sending data to Google. (wordpress.com) - Wait for data to appear.
Give Analytics a few hours, then check the Realtime report to confirm hits are coming through.
Tip: Every WordPress.com site already includes Jetpack Stats for basic traffic numbers. If you only need quick view counts, Jetpack might be enough. Use Google Analytics when you want deeper insights like user paths, events, and e-commerce tracking.
How to install Google Analytics in WordPress
After a few days, Google Analytics will have enough data collected to begin offering you insights. Unfortunately, the official Google Analytics dashboard offers you so much data and ways of looking at the data that it collects, it can feel a little like drinking water from a firehose. Many first-timers to GA will find a Google Analytics WordPress plugin essential to not feeling overwhelmed.
Unfortunately, there isn’t an official WordPress plugin for Google Analytics. There is, however, an official plugin for WooCommerce called WooCommerce Google Analytics. Fortunately, there are quite a few 3rd-party plugins available. One such plugin is the MonsterInsights plugin.
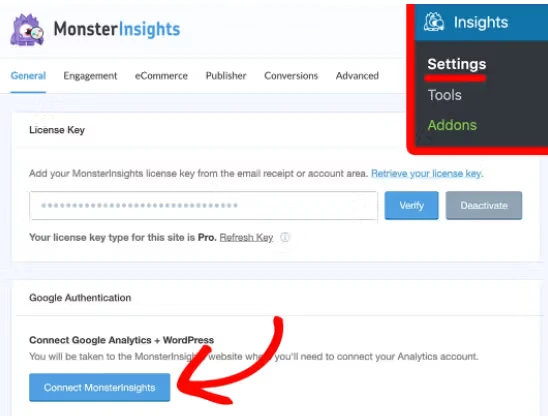
Whichever plugin you choose, the installation instructions will be similar to the MonsterInsights installation instructions. The plugin will have a settings section where you can link the plugin to your Google Analytics account. This will redirect you to your account with Google where you will be informed there is a 3rd party app (your new plugin) requesting permissions to access your account.
Click ‘Allow’ if you want the new plugin to help you with your Google Analytics data.
While MonsterInsights is popular, several other plugins can link Google Analytics to WordPress just as easily:
- Google Site Kit. Google’s own plugin connects Analytics, Search Console, AdSense, and PageSpeed Insights in one dashboard, so you can see traffic, search keywords, and performance scores without leaving WordPress.
- Analytify. Adds a clean, GA4-ready reporting panel inside your admin area and supports enhanced eCommerce, event tracking, and campaign comparisons.
- Jetpack Stats. Bundles lightweight traffic stats with security, backups, and performance tools—handy if you already use Jetpack for other features.
- GA Google Analytics. A no-frills plugin that simply inserts the GA tracking code. Ideal when you want the lightest possible footprint.
- WPCode. Let’s you paste the measurement ID (or any snippet) into headers or footers without touching theme files, and stores your code safely even if you switch themes.
That’s it! Now you know how to put Google Analytics on a WordPress website.
Verifying and troubleshooting your Google Analytics installation
Getting the code in place is only half the job. Make sure it works so you can trust the numbers you see.
- Trigger the tag: Open your site in a new browser tab or an incognito window. Moving in private mode avoids any cache or login that might block tracking.
- Check Realtime reports: In Google Analytics, go to Reports → Realtime. If your visit shows up within a few seconds, the tag is firing.
- No data? Run through these fixes:
- Confirm the tracking code or Measurement ID is on every page. A missing or duplicated snippet will stop data from sending.
- Disable any ad-blocker or tracking-blocker extensions and test again.
- Make sure the site URL in your GA property matches your live domain, with no extra “www” or typos.
- Look for multiple GA tags in your source code. Using two different plugins or hard-coding and a plugin together can cancel each other out.
- Confirm the tracking code or Measurement ID is on every page. A missing or duplicated snippet will stop data from sending.
- Use Google Tag Assistant: Install the free Tag Assistant Chrome extension, reload your page, and click the extension icon. It lists every Google tag it detects and flags problems like missing parameters or blocked requests.
Fix the issue that Tag Assistant or Realtime highlights, refresh, and repeat the steps until your visit appears. Once you see your own page views, you know Analytics is ready to track real visitors.
Setting up e-commerce tracking
Running an online store? Turn Google Analytics into your revenue dashboard by adding e-commerce tracking. Here’s how to connect WooCommerce sales data with your GA4 property.
- Enable enhanced e-commerce in Google Analytics.
- In GA4, go to Admin → Data settings → Data collection and make sure Enhanced measurement is on.
- In GA4, go to Admin → Data settings → Data collection and make sure Enhanced measurement is on.
- Choose a WooCommerce integration method.
- MonsterInsights eCommerce Addon. Install MonsterInsights, activate the eCommerce addon, then switch on Use Enhanced eCommerce under Insights → Settings → eCommerce. MonsterInsights will push product views, add-to-cart events, and purchases to GA4 automatically.
- Google Analytics for WooCommerce plugin integration. Install the plugin from the WordPress repository, enter your Measurement ID, and tick Enhanced eCommerce in the plugin settings. This lightweight option sends core events without the extra MonsterInsights reports.
- MonsterInsights eCommerce Addon. Install MonsterInsights, activate the eCommerce addon, then switch on Use Enhanced eCommerce under Insights → Settings → eCommerce. MonsterInsights will push product views, add-to-cart events, and purchases to GA4 automatically.
- Publish and test: Make a test purchase in an incognito window. Open Reports → Monetization → E-commerce purchases in GA4 to confirm the order appears.
With e-commerce tracking live, you can see:
- Product performance. Spot best-sellers, low performers, and average order value.
- Shopping behavior. View add-to-cart, remove-from-cart, and checkout initiation counts.
- Checkout analysis. Identify drop-off points in multi-step checkout funnels.
- Conversion rates. Compare how traffic sources and campaigns translate into revenue.
Use these insights to fine-tune product pages, streamline checkout, and boost sales without guessing.
Privacy considerations for Google Analytics
Using Google Analytics means you’re collecting visitor data, so you need to follow privacy laws such as the GDPR (Europe) and CCPA (California). Keep these points in mind:
- Update your privacy policy: Tell visitors you use Google Analytics, what data is collected, and how long you keep it. Add a link to Google’s own privacy statement and explain how users can opt out.
- Anonymize IP addresses.
- GA4. IP addresses are dropped automatically—no extra step needed.
- Universal Analytics. Add anonymize_ip: true in your tag (or switch it on in MonsterInsights) so only shortened IPs are stored.
- GA4. IP addresses are dropped automatically—no extra step needed.
- Set data-retention limits: In GA4, open Admin → Data settings → Data retention and choose 2 or 14 months for event data. Shorter retention helps reduce risk.
- Add a cookie-consent banner: Use a plugin like CookieYes, Complianz, or Jetpack Consent to let users accept or reject analytics cookies before they load.
- Offer an opt-out: Link to the Google Analytics Opt-out Browser Add-on or provide a one-click opt-out script on your site.
- Use MonsterInsights EU Compliance (optional): Enable the EU Compliance addon to turn on IP masking, disable User-ID, and respect the “Do Not Track” header automatically.
Following these steps keeps your analytics useful while respecting your visitors’ privacy.
Making the most out of Google Analytics
Whether you’re trying to start a new fan-club or start a new online business, you’ll want to make the most out of Google Analytics.
Narrow Focus — It’s easy to get distracted by the many, many metrics offered by Google Analytics. Have a set of just 5-10 indicators that are key to accomplishing your goals. Focus on those.
Regular Review — You’ve invested your valuable time into identifying your key metrics and designing custom reports for them. Now, remember to read the reports. You’ll want to review them weekly. Review daily if you’ve recently updated your site or launched a new campaign.
Make Changes — You’ve identified your KPI, you read the reports based on them, now use them. Have you seen almost no change in your metrics since your latest AdWords campaign launched? Try changing your campaign keywords. Google Analytics can be a roadmap to success. When you realize you’re driving down the wrong road, you should change roads.
Google Analytics is incredibly powerful, it’s free, and it’s super easy to install Google Analytics on your WordPress site. What are you waiting for?
Getting started adding Google Analytics to WordPress
While you focus on getting Google Analytics set up on your WordPress website, we’ll worry about everything else. That’s the beauty of managed WordPress hosting. Check out our hosting plans to get started today.
Liquid Web has been leading the industry in WordPress hosting for decades. And if you select managed WordPress hosting, our team of experts will manage server IT for you — so you can focus on growing your brand.
Click below to explore options or start a chat with one of our WordPress hosting experts now to get answers to your questions and further guidance.
Additional resources
Comprehensive guide to securing WordPress with ModSecurity
→
This guide provides a comprehensive overview of how to use ModSecurity to enhance the security of your WordPress site.
Three Ways To Get Google Analytics Connected To Your WordPress Site →
Keep reading to discover the three ways to connect WordPress and Google Analytics.
Why security matters for WordPress enterprise hosting
→
Use the blog as your guide to attacks to watch out for, security best practices, and steps to improve the WordPress protection you already have.

Michael Pruitt is a Support Systems Administrator for Nexcess. He brings over a decade of experience to his current role. When not working, Michael can be found officiating roller derby bouts.