

 Ronald Caldwell
 Learning how to change your web hosting provider can be a hassle, especially if you’re worried about downtime, data loss, or disrupting your email services. These issues can affect your website’s performance, business operations, and even search engine rankings.
But by following the right steps, you can ensure a smooth transition without losing any critical data or facing unexpected costs.
This guide provides actionable solutions to help you move your website to a new host without a hitch. We’ll walk you through the process of switching hosts safely, keeping your domain and emails intact, and managing costs effectively.
Let’s dive into what you need to know to change your web hosting provider without the headache.
Key points
- Web hosting impacts performance: The right host ensures fast loading times, uptime guarantees, and strong server performance, enhancing your user experience and search engine optimization (SEO).
- Control panel and support: A reliable hosting provider simplifies site management with an intuitive control panel and excellent customer support.
- Backup and DNS updates: Always back up files and update DNS settings during migration to prevent data loss or downtime.
- Email migration: Ensure you transfer email accounts and update DNS records to avoid service disruptions.
- Minimize SEO impact: Choose SEO-friendly hosts and test your site thoroughly before finalizing the migration.
Here’s what you’ll learn:
- Why your web hosting provider matters
- How to change your web hosting
- Managing data loss and costs when switching web hosting providers
- Does changing hosts affect SEO?
- Factors to consider when switching web hosting providers
- Final thoughts: How to change your web hosting provider
Why your web hosting provider matters
Your web hosting provider can affect your website’s performance, search rankings, and user experience.
A reliable web hosting service ensures fast loading speeds, uptime guarantees, and strong server performance. These all contribute to better search engine rankings and happier users.
But not all hosting companies are created equal.
You may have noticed that your current host’s performance isn’t up to par, and you’re considering a move.
Knowing how to switch hosts without affecting your site can help you avoid potential pitfalls and improve your site’s overall functionality and reliability.
Can I transfer my website to another host?
Yes, you can transfer your website, including WordPress websites, to a new hosting provider.
Most hosting companies offer migration support for a seamless experience. Some offer migration plugins to streamline the process, while others have specialists to assist with manual migrations. This can be essential for complex websites.
Whether you’re moving to VPS hosting or another hosting type, migrating a site typically involves:
- Creating backups.
- Exporting your website’s database.
- Updating your nameservers to point to the new host.
What happens to your old hosting plan after a transfer?
Once your website migration is complete, you can cancel your old hosting plan. But before doing that, ensure all essential components are working on the new hosting account.
You might even be able to claim money for unused time on your old hosting contract. For example, Nexcess, a managed WordPress hosting solution offered by Liquid Web, offers up to $1,000 to cover the cost of your old contract.
Just make sure the move to your new host is complete before canceling the old one.
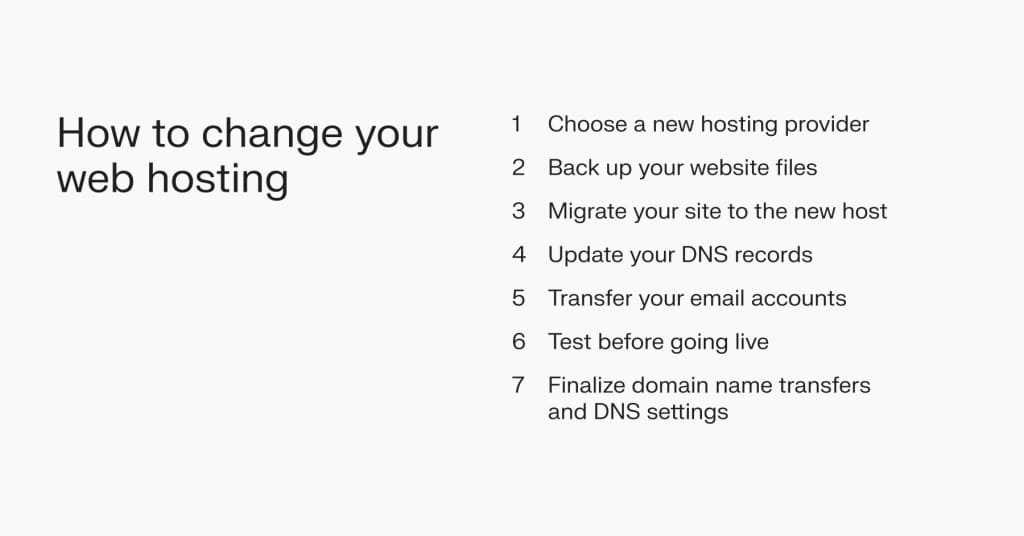
How to change your web hosting
- Choose a new hosting provider.
- Back up your website files.
- Migrate your site to the new host.
- Update your DNS records.
- Transfer your email accounts.
- Test before going live.
- Finalize domain name transfers and DNS settings.
Switching web hosting providers might seem complex at first glance, and it can be tough if you’re doing it alone.
But a host like Liquid Web simplifies the experience by providing free migration services and expert support.
Now, here’s a step-by-step breakdown of how to move your website to a new host.
1. Choose a new hosting provider
The first step is choosing a new web hosting provider. Look for a company with excellent server performance, solid uptime guarantees, and customer support that suits your site’s needs.
It’s also crucial to ensure the new server can handle your site’s traffic and performance requirements.
Find your perfect hosting
Explore Liquid Web’s range of servers and web hosting options, ranging from cloud VPS to GPU servers.
2. Back up your website files
Before starting the transfer, create a manual backup of your website files. Use an FTP client like Filezilla to download the files, including wp-config.php and config.php files, from the root directory of your old host.
Also, don’t forget to back up your MySQL database, ensuring you have all website data stored safely.
This backup acts as a safeguard, letting you revert to the old host if something goes wrong during migration.
Not sure what all of that means? Migrate to Liquid Web, where we can assist with every step of the migration process.
3. Migrate your site to the new host
Many hosts offer built-in migration services. But if you prefer a hands-on approach, you can transfer files manually.
This process often involves:
- Setting up a new database in your new hosting account.
- Configuring your database name.
- Importing your MySQL database using tools like phpMyAdmin.
For beginners, some companies even provide detailed, step-by-step guides to make the transition easier.
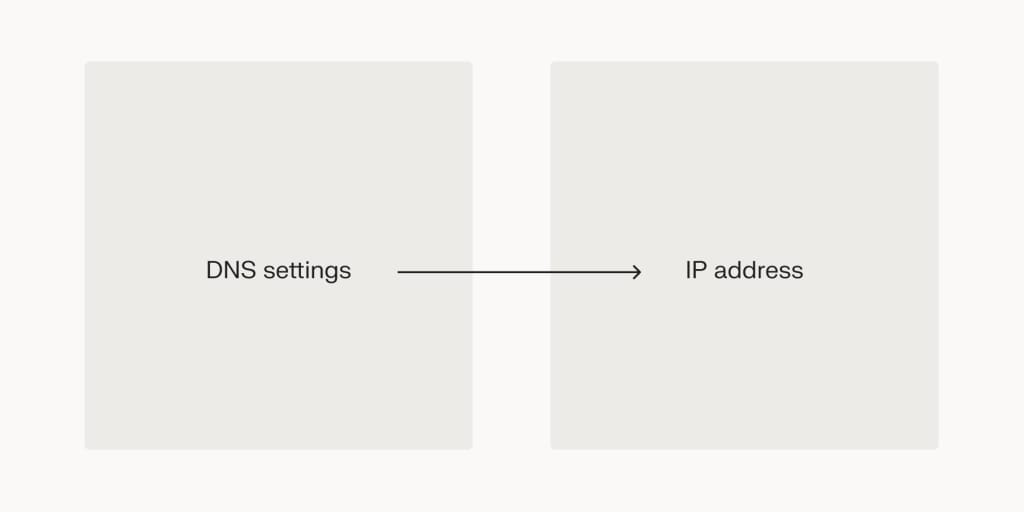
4. Update your DNS records
After transferring website files, update your nameservers to point to the new server’s IP address.
Log in to your domain registrar to update DNS settings to avoid broken links and downtime. Your new domain location will then take over, enabling users to access your site from the new host.
5. Transfer your email accounts
If you’re hosting email on the same server, remember to transfer those accounts too.
You can manually set up each email address or use a migration tool if available. Make sure to update your DNS records, including MX records, to reflect the new email hosting location.
6. Test before going live
Before making the new site live, test your setup using a temporary domain or the server’s IP address. In some cases, your new host may provide this test link for you.
Check for any slow loading times, caching issues, broken internal links, or other problems that could impact the user experience.
Testing helps you identify and fix issues with your new site before users access it.
7. Finalize domain name transfers and DNS settings
Once you’re satisfied that everything works correctly on the new server, finalize the domain name transfer and DNS updates with your domain registrar.
This step is vital for a smooth, uninterrupted transition. Some minor downtime may occur, but it should stabilize quickly, minimizing any potential impact on your search engine rankings.
Managing data loss and costs when switching web hosting providers
Changing web hosting providers can be intimidating, especially when you’re concerned about data loss and unexpected costs.
But careful planning and backing up your data can minimize disruptions to your business.
How to change your web hosting provider without losing data
Begin by creating a manual backup of your site files and MySQL database. Use an FTP client to download files and ensure all necessary exports are complete. Once the backup is secure, transfer the files to your new host.
Configure the wp-config.php and config.php files in your file manager, and import the MySQL database to match the old site setup.
Updating your DNS records to point to the new website hosting service helps you avoid prolonged downtime. Schedule the migration during low-traffic times to minimize disruptions.
How to change web hosting without changing your domain
To switch hosts without changing your domain, separate your domain registrar from your hosting provider.
After transferring files to the new host, update the domain’s DNS settings to point to the new IP address. This way, the new site’s URL remains consistent, and your users experience a seamless transition.
How to switch web hosting without losing your emails
Emails are crucial for business operations, so ensure you back up all accounts before migrating.
Use a control panel like cPanel to export and import email addresses easily.
Update MX records in your DNS settings to ensure emails transition without interruptions.
Cost of migrating your website to a host
The cost of migration varies based on your host and plan. Some providers include migration for free, while others charge for services, especially for larger, more complex sites.
Hiring a specialist can add to the expense, but it may be worth it for a seamless process.
Liquid Web offers free migration services on many VPS, dedicated server, and cloud server solutions, which can offset migration costs.
How long does it take to move your website to a new host?
The migration process can vary. It can take a few hours for smaller sites to a couple of days for complex sites, particularly if they involve an SQL database migration.
Planning the transfer time will help you schedule it effectively to minimize downtime.
Does changing hosts affect SEO?
Yes, changing hosts can affect your SEO if you don’t do it correctly. Downtime, slow loading times, or broken links during the move can hurt your search rankings.
But with proper planning, seamless migration, and strong server performance, you can switch hosts without harming your SEO.
While how you migrate to a new location affects SEO, server performance on the new host also plays a large role. A new hosting service that’s faster and more reliable can improve your rankings, while a slower server might do the opposite.
Why having an SEO-friendly web hosting provider matters
A reliable host is essential for SEO.
Slow loading times, frequent downtime, or poor server performance can harm your rankings. But an SEO-friendly host with optimized infrastructure supports fast loading and a better user experience.
Using an SEO-friendly host can improve search engine rankings and user retention.
How to avoid affecting SEO when changing web hosting providers
Both you and your host have roles to ensure an SEO-friendly migration.
Your host should guarantee strong server performance and uptime. Your job is to back up your database, update DNS records, and test for performance issues before going live.
Factors to consider when switching web hosting providers
How should you choose a new web hosting company? And what best practices should you consider during migration to ensure a smooth transition?
How to choose a new host
When choosing a new host, consider the following:
- Server performance: Ensure the host offers strong uptime and fast speeds.
- Customer support quality: Look for 24/7 support options.
- Hosting plan options: Make sure the plan matches your needs.
- Migration services: Choose a provider that offers built-in migration tools.
- DNS settings: Ensure easy updates for DNS.
- Email accounts: Verify email migration options.
Best practices for transferring your web hosting to a new provider
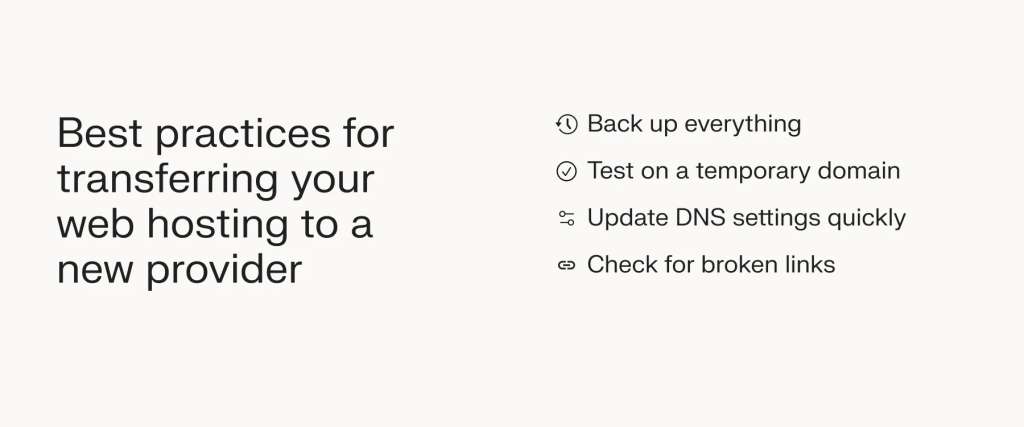
For a successful transfer:
- Back up everything: Keep a backup of all files, databases, and email addresses.
- Test on a temporary domain: Verify functionality before going live.
- Update DNS settings quickly: Minimize downtime by making DNS changes promptly.
- Check for broken links: Ensure internal links are functional.
Following these steps should help you switch hosting providers without a hitch.
Hosting change FAQs
Final thoughts: How to change your web hosting provider
Switching your web hosting provider without downtime is crucial for maintaining your website’s performance and user experience.
But the migration’s success depends on your new host’s reliability and support.
Whether you’re transferring an ecommerce, WordPress, or other website, Liquid Web offers free migration services and expert support to ensure a smooth transition.
Contact an expert today to make your website migration hassle-free and keep your business running without interruptions.