


Google Analytics
The Google Analytics add-on for Give allows you to seamlessly collect e-commerce data related to donations on your Give-powered donation website. The following article will walk you through the steps to get connected, so that data flows from your site to Google Analytics.
Getting Started with Google Analytics and Give
In order to start tracking your donation and donor activity in Google Analytics with Give you’ll need the following:
- Give installed and activated on your site.
- A plan that includes the Google Analytics add-on for Give.
- An account already set up with Google Analytics.
- Google Analytics already connected to your site.
Here are instructions on installing and activating Give Add-ons.
Important: Give’s Google Analytics add-on assumes Google Analytics is actively operational on your site, connected by some other means. There are a variety of plugins available in the plugin directory, or you can manually add the tracking script using a code snippet, or your theme’s settings for adding header or footer scripts. The Kadence theme’s Pro Bundle, for example, has a method for adding scripts to the header or footer of your site. You should insert the script into the header. Here’s what that looks like in the Customizer settings for Kadence.

Once your site is connected to Google Analytics, you will see real-time data in your Google Analytics account dashboard.
Setting Up your Google Analytics Account
To function properly, the add-on has a number of requirements that are easy to check for and implement.
Connecting to Google Analytics 4
Once you are set up with Google Analytics on your site, install and activate the Google Analytics add-on for Give. Then, navigate to the settings at Give > Settings > Google Analytics.
Give requires two pieces of information to successfully send data to the proper spot in Google Analytics: the Web Stream Measurement ID and the Measurement Protocol API Secret.
To find your Web Stream Measurement ID, navigate from your Google Analytics dashboard to Admin > Data Streams > [your stream] > Measurement ID.

Copy and paste that ID into your Give settings.
Your Measurement Protocol API Secret is located in the Google Analytics dashboard at Admin > Data Streams > [your stream] > Measurement Protocol API Secrets
If you’ve not created one already, select to create one, and then paste that value into your Give settings.

The remainder of the settings on the Give side are optional, and allow for tracking of test donations, refunds, and other values.
Recurring Donations And Google Analytics
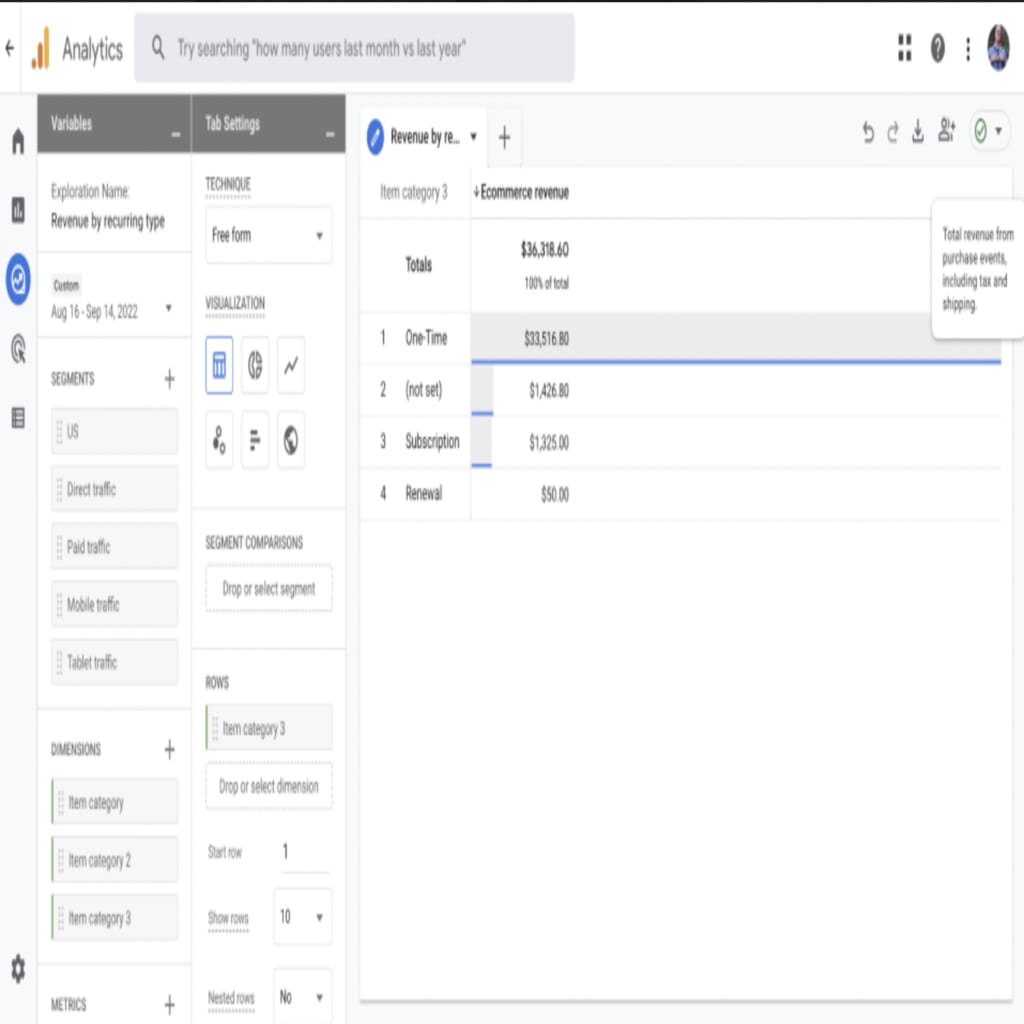
One of the most helpful things you can do in tracking donation revenue is to be able to distinguish between one-time donations, the first donation of a subscription, and all subsequent renewals on that subscription.
If you are using Give’s popular Recurring Donations add-on, this is handled automatically for you using Item Categories. Give saves one of three categories for Item Category 3: One Time, Subscription, and Renewal. In Google Analytics, you can build a report for Item Category 3, and analyze that data over time.
Building Custom Donation Reports in Google Analytics 4
Google Analytics 4 has robust ways of building out reports that allow you plan your marketing and outreach campaigns using real data from previous campaigns.
Here’s the complete list of data sent to Google:
- Item Id → Form ID
- Item Name → Form Title
- Item Brand → “Fundraising”
- Affliliation → Site Title
- Item Category → “Donations”
- Item Category 2 → Payment Gateway
- Item Category 3 → One time/Recurring/Renewal (requires Recurring Donations to be active on the site)
It also includes four Give-specific UTM parameters:
- give-campaign
- give-content
- give-medium
- give-source
To build a Custom Report within GA4, navigate to the “Explore” tab, and you can use the interface there to build out a custom report. The below example uses a “Free Form” report.
Select “Free Form” and then click the plus icon next to the “Dimensions” section on the left sidebar. Search for “Item Category” and then select and import the Item Category, Category 2, and Category 3.
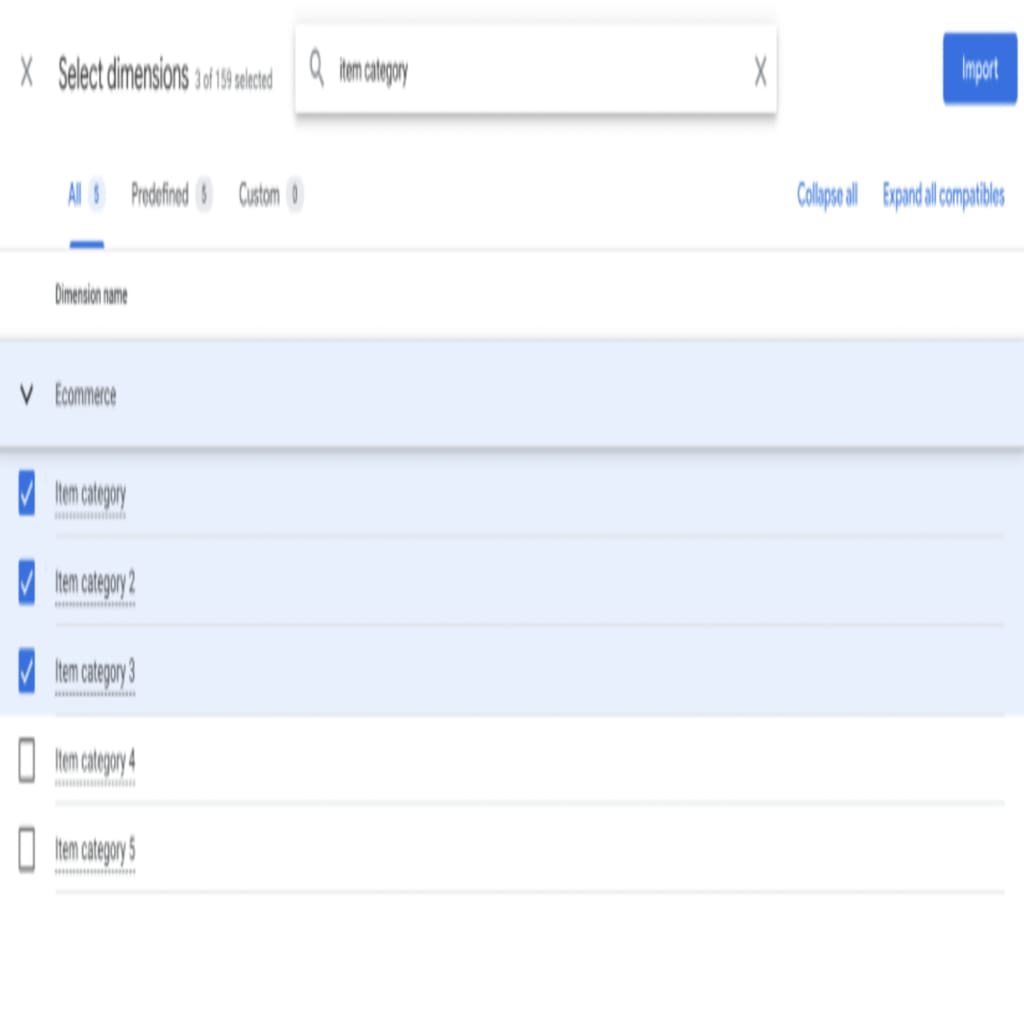
Once those are added to the list of available dimensions, you’ll similarly want to add Metrics. This example uses Ecommerce Revenue to build a simple report showing the difference in revenue over the given time period between one-time donations, the first donation on a subscription, and renewal donations.
Connecting to Legacy Google Analytics
To connect to your Universal Analytics account, keep in mind that you still have to have some other mechanism for the site to be previously connected to Google Analytics. Once you’ve done that, add in the tracking ID found in your Property settings at Admin > Property > Property settings to the Give settings page at Give > Settings > General > Google Analytics.
The additional options on that screen allow for customizing specific data that is tracked, and all of them are optional.
Data collected in Universal analytics will show up in Conversions > Ecommerce > Overview within your Google Analytics dashboard.