How to use the Nexcess support ticketing system
Knowing how the Nexcess support ticketing system works and how to use it will be covered in this article. Understanding the various support categories and ticket statuses will also be included.
Submitting a support ticket to the Nexcess support team to ask for assistance is straightforward. Understanding how our ticketing system operates can help assist with this task.
We will start by providing an overview of the Nexcess Client Portal and support tickets. Then, we will discuss the different types of support requests and how to check the status of open tickets.
Overview
Once you’ve registered an account with Nexcess, you’ll be able to access your sites-portal.liquidweb.com portal. Users can perform tasks like creating support tickets and checking the status of support tickets, sharing important information like private documents, and accessing billing and account information through a secure online platform.
The Nexcess Client Portal gives our customers the ability to view and manage their websites that belong to their current web hosting plan or plans with us. New users can use the Sign Up option to set up a Nexcess account:

On the sites-portal.liquidweb.com Portal login page, you can enter your Nexcess login credentials to access the portal:

To manage the sites that Nexcess hosts for you, you must have access to the sites-portal.liquidweb.com Portal. On the Nexcess login page, click the Forgot Password? link if you need to change your password.
Creating a support ticket
To create a support ticket, you must go to the Support tab of your Nexcess Client Portal after logging in:

Once you click +Ticket button, a screen appears where you can enter the relevant ticket details:
- Department: Select either Support, Billing, or Sales based on your needs.
- Subject: Enter the subject of the support request. For example, it is a “Disk space upgrade request.”
- Service: Select the plan or service that corresponds to the support request.
- Recipients: Enter your contact email address to receive updates on your support ticket.
- Comment: Provide information about your support request.
- Category: Enter the category of your support request.

Once you enter the requested information, click the Add button to create the ticket.
This Support Case will be received in our support ticketing system. The Support Case is visible to every Support technician working that shift. Therefore, any Nexcess support technician can be assigned the support ticket and begin working on it immediately.
Our support team responds to most tickets as soon as possible, every day and at any time.
the Nexcess billing and sales teams respond to the Cases Monday through Friday, 9 AM to 5 PM Eastern Time (ET) in the United States, excluding holidays,
Checking a support ticket’s status
You can check the status of each support ticket from the Support tab:

Viewing a support ticket’s details
To view a ticket, either click on the ticket ID or select the menu toggle represented by the three dots and click View:

You can reply, add recipients, create replies, close the ticket, rate your experience, send secure data, and attach files when viewing a ticket. When providing any information, remember to click Reply.
Details > Chat Follow-Up user interface elements for a support ticket

Details > Shared Password user interface elements for a support ticket

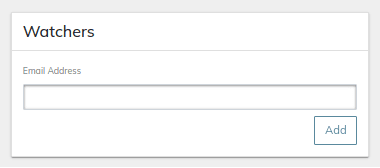
Details > Watchers user interface elements for a support ticket
Details > Attachments user interface elements for a support ticket

By responding to a closed ticket in the portal or by email after it has been closed, tickets can be reopened.
You can read the article How to send secure data to Nexcess staff to learn more about how to send data securely.
Adding a Quick Comment to a support ticket
To make a quick comment to a ticket, select the menu toggle of the corresponding ticket and click on Quick Comment:

Type your response in the Quick Comment field, then click on Comment:

Secure Data Share
Share sensitive data with the Support team via our “Secure Data Share” feature.
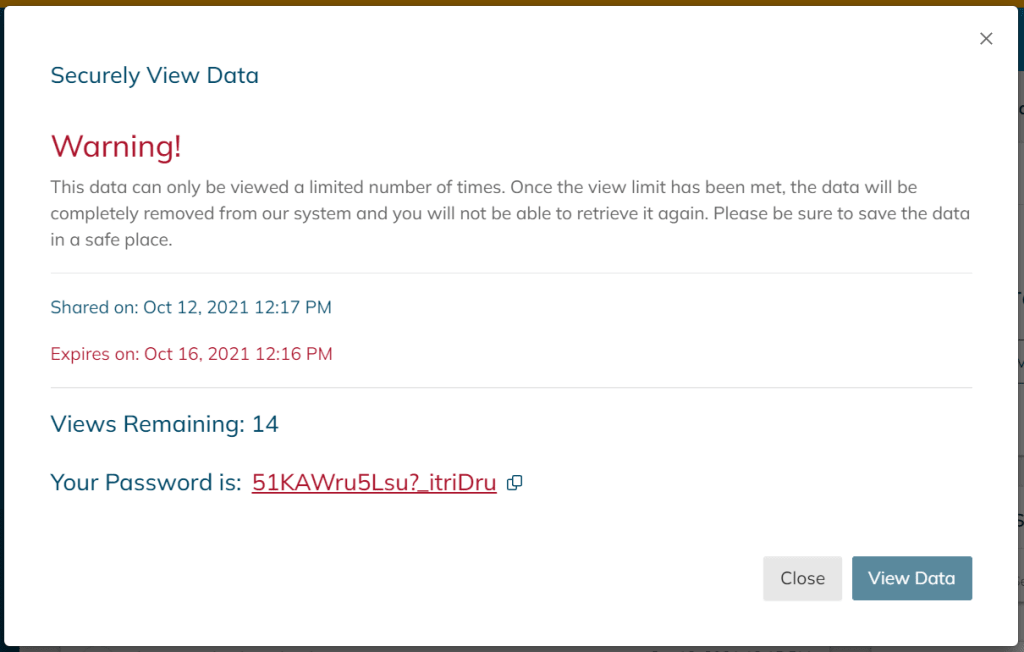
View shared secure data
Click View when ready.

Click on View Data to view the data shared and then you will be able to copy to your pasteboard.
ATTENTION: We value your security. Please change this password as soon as possible so it is known only to you. See How to create a secure password for more information.
Sending secure data to the Nexcess Support Team
- The Shared Password window is located on the right side of the page under the Feedback section. Enter the password or other data you wish to share with the Nexcess Support Team, and click on the Create New button:
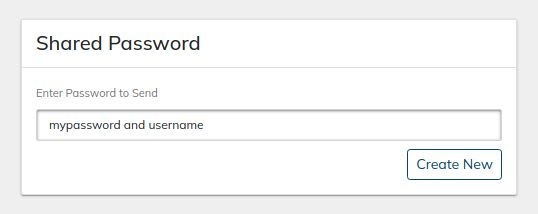
- A new shared secret will appear under the Case details after submission. While multiple shared secrets can be attached to support Cases, you cannot remove or modify the secured data after submission.
- Your Case will automatically change its status to Open, letting the Nexcess Support Team know that an update has been received. A Support technician will contact you shortly with further information.

Creating a support ticket via email
Tickets created by email will automatically get an authentication email to confirm authorization and attach the ticket to the account. When you click the link, the sites-portal.liquidweb.com Portal will prompt you to log in so you can attach the ticket to your Nexcess account.
If the ticket is not authenticated, you must either use the authentication link in the email sent to you or send your Account ID and PIN via email to continue with your support request.
We require all requests to be authenticated to ensure that only people with your permission can access your account and make changes. You can avoid taking this extra step in the future by submitting a ticket through your sites-portal.liquidweb.com Portal.
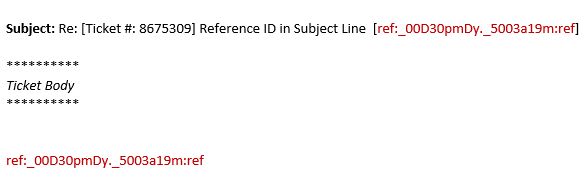
Tickets that have been opened will have email responses attached to them. A reference number will be added to the email’s subject line and to the body content of the email you receive with your ticket. For our system to know where to append the update, kindly leave that reference number in place:
Lifecycle of a Nexcess support ticket
Nexcess support ticket lifecycles should usually include the following phases:
1. Support ticket creation
A new support ticket is created:
- If the customer created it, it is placed in the “New” queue and awaits our initial response in the Nexcess support ticketing system.
- If the issue communication started as an incoming chat or phone call from the customer, but the work requested needed to be clarified and documented in a formal Nexcess support ticket, then corresponding support ticket will be created by the Nexcess staff.
- The chat or call support technician will add the details in the ticket as a note and place the ticket in the “Handoff” queue, waiting for a support technician who isn’t in chat session to pick it up and push the triage and investigation steps forward.
2. Initial support ticket activity
The ticket experiences an initial spike in activity. At this time, we need to.
- Gather relevant information before proceeding with the ticket.
- Obtain the steps required to trigger the problem.
- Determine whether the request is the best effort in nature and inform the customer of this.
- Establish the first course of action for resolving the problem the customer has raised.
3. Support ticket handoff at Nexcess
If any support ticket isn’t resolved by the end of the first support technician’s shift, the support technician will place the ticket in the “Handoff” queue, and the supervisor will work to find another technician from the upcoming shift to assign it.
4. Support ticket queue
The ticket will occasionally go unnoticed and wait in the “Ongoing” queue. A client may call or log in to chat about the ticket during this time. If this occurs, the chat or call technician who answers the call or chat will need to update our support technician’s channel or the supervisor directly. The supervisor will work to find another technician from the shift to assign it or a support technician who isn’t in chat to pick it up and push it forward.
5. Support ticket continuance
The technician who picks up the ticket must determine whether the customer’s response to a very old ticket actually refers to the same problem. If not, the technician must inform the client that they will open a new ticket to deal with the issue.
6. Support ticket status changes
The status of the ticket changes from “New” or “Open” to “Work in Progress” when a support technician begins to work on it.
7. Customer communication regarding support ticket status changes
We will inform the customer and set the status of any support ticket to “Waiting on Customer” if we require any additional information or confirmation from the customer.
8. Support ticket technical investigation and escalation at Nexcess
We will open an internal ticket for our Development or SysOps teams if any ticket requires their assistance with regard to a deeper level of technical investigation.
We will notify the customer and change the ticket’s status to “Waiting Other” for the time being. When our SysOps or Development teams provide an update, we update the appropriate Nexcess support ticket, changing its status to “Waiting on Customer” if the customer needs to provide any information or to “Closed” if the issue has been resolved.
9. Support ticket closure
We will set the status of any support tickets to “Closed” once the problem or request has been addressed.
Frequently Asked Questions (FAQ) about sending secure data
1. What information can I submit?
You can submit sensitive information of any kind that will benefit the investigation or help the Nexcess Support Team perform a task on your behalf. Most of the time, it will be your login credentials or any other authentication details.
2. Where is secure data stored, and how long will It be available for the Nexcess Support Team?
Once submitted, each one-time secret is securely stored in the Nexcess system and can be opened a limited number of times. This procedure helps us protect your information while ensuring that the Nexcess Support Team can use it more than once during the troubleshooting process. Each shared secret can be viewed fifteen times in total, after which it will be removed from the system entirely.
3. Can I send secure data from the Nexcess Client Portal during a chat or phone call?
Yes, you can submit a shared secret anytime. However, spelling a password over the phone is very time consuming, especially if it is long and contains many different characters. Sharing it in a chat session or by email also does not guarantee a secure data transfer.
Even if you are chatting with the Nexcess Support Team staff at that moment or discussing the issue over the phone, sending secure data via the Nexcess Client Portal is the best way to share any sensitive information. You can continue working on the issue once the Nexcess Support Team receives and opens the secret.
4. Can I remove or modify the secure data I submitted?
No, once you submit secure data from the Nexcess Client Portal, you cannot remove or modify it.
5. Can I send secure data to Nexcess in a support ticket more than once?
Yes, you can create a new shared secret and submit any additional sensitive information with a support ticket, even if you already had secure data attached to it before.