Nexcess: Managing Dev & Staging Environments
First, let us discuss what the staging environment is and its significance in website development and management.
What Is a Staging Environment?
A staging environment or staging site is a copy of your production website and is the last step in the deployment process before changes are deployed to your live production website that is visible to the general public.
The main aim of this staging environment is to catch and fix any mistakes or bugs before the changes are published. Thus, changes can be released to your live website without introducing errors.
Testing new changes on a staging environment before deploying them to your live website also reduces the risk of any errors or issues that will affect your users. This cautious plan for ensuring a bug-free production environment effectively means happier users and more uptime for your website.
The development environment and the staging environment are different from each other in their purpose and use in the majority of web development implementations.
However, here in the managed applications division of Nexcess, we treat both in the same way — as test environments for admins to create and verify the working of site before it is published to the live production environment.
Advantages of Using a Staging Environment
There are many advantages of a staging environment with site development. You can use it when you want to:
- Switch themes
- Add or remove plugins
- Change code
- Test major software updates
- Reorganize your website
- Upgrade functionality
After confirming the result in the staging environment, you can deploy the same software code to the live site.
Getting Started With Nexcess Staging Environments
Nexcess offers one free staging environment for each live site under managed WordPress and managed WooCommerce plans only. There is another option for users to create a development environment under the live site for these two packages. But that feature comes with an additional cost.
While for other Managed Applications packages like Managed Magento and Drupal, we provide only a development environment option, and that comes with an extra cost (see the Nexcess Dev Sites Pricing Model).
However, with flexible cloud plans, there is no option to create staging/development environments. Because under a flexible cloud plan you can install any custom site, it is not possible to spin up a staging/development environment for it.
In this article, we will guide you on how to set up a staging environment if you are using of managed WordPress or managed WooCommerce. First, log into sites-portal.liquidweb.com and select the Plans option:
Then locate your required plan containing the site under which you wish to create the staging environment. To the right of the site name you can find an option called Environments. Click that option:
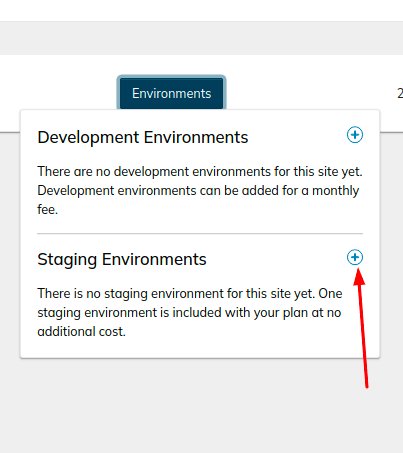
Upon clicking on the Environments option, the user interface will list two subsequent dropdown options for development environments and staging environments.
To the right of the Staging Environments option, you can find a Plus (+) button. Click on it.
Upon clicking Plus (+), the user interface will display the screen shown below. Make sure you check the checkboxes for “Copy my data to the staging environment” and “Do not anonymize data” as shown in the following screenshot.

And after that, click the Create option. The staging site is created, which is a clone of your live production site. Then, once again, click the Environments (1) option to find your created staging site.
By clicking on the domain name, you will be taken to its management screen. Once there, click on the Access option to find the corresponding SSH/FTP login details.
Using the SSH/FTP details for the staging environment, you can manage the staging site.
Getting Started With Nexcess Development Environments
Above we discussed how to set up a staging environment, and here will see how we can set up a development environment.
In this case, we are taking an example of a site that is created under a Managed Magento Plan. However, the steps are the same for all other plans, including Craft CMS, Drupal, etc.
But as mentioned earlier, Nexcess does not offer development or staging environment feature for sites managed under flexible cloud plans. To create a development environment, following these steps.
Log in to your Nexcess Client Portal, select the Plans option, and locate your required plan containing the site under which you wish to create the development environment.
To the right of the site name, you can find the Environments option. Click on that option.
The user interface will display the Development Environments option. To the right of that Development Environments option, you can find a Plus (+) button. Click on it.
Upon clicking the Plus (+) button, you can select the preferred Development Environment Package and make sure you check the checkboxes for “Copy my data to the Development environment” and “Do not anonymize data.”
Then, click the Create option to complete the process. The development site will be created after a few minutes. You can find its details via the Environments(1) option of the live site.
Click on it, and then click the View option.
Then, within the left menu you can see the Access option. Click Access to obtain your development site SSH/FTP login credentials. When those in your possession, you are free to manage the site accordingly.