How to Configure Your GitHub Account with Nexcess
What are the Differences Between Git & GitHub & GitLab?
Git is open source version control software. You can use to maintain change history while you keep changing your code. Its distributed functionality is helpful if more people are involved in the same project.
– https://en.wikipedia.org/wiki/Git
GitHub is a code repository where you keep copy of your code (with change history) so that people can access your code anytime without having to come to your computer. It is maintained by GitHub, Inc., a subsidiary of Microsoft since 2018.
– https://en.wikipedia.org/wiki/GitHub
GitLab is the same as GitHub, but maintained by different group, GitLab Inc.
What are the Advantages of Using Git & GitHub for WordPress Development?
First of all, Git and GitHub make it easy for multiple developers to collaborate on the same project.
Using GitHub for WordPress development allows your team to absolute power over every aspect of your projects. Using Git’s version control features, your team gets access to each change, enabling you to easily revert to earlier versions of your files.
Configuring Your Nexcess Account with GitHub
To configure that Nexcess Account with your Git Account, you will need an active plan with Nexcess and SSH access enabled on the account.
To access the Nexcess Account, you must log in to your Nexcess Portal.
Access to the GitHub Account
To access the GitHub account with your plan, you need to generate a SSH key on your Nexcess Account.
Accessing the SSH Credentials in Your Nexcess Account
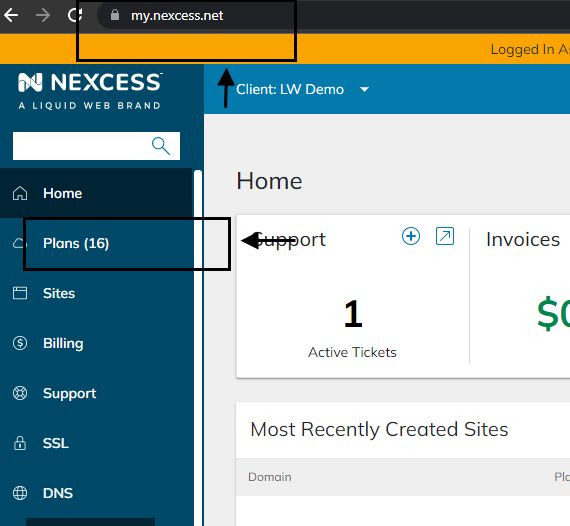
Your SSH details of the account can be found under Plan > Credential > Secure Shell. Follow these steps to access the SSH credentials in your Nexcess Account.
Accessing the SSH Credentials in Your Nexcess Account – Step 1
Log in to your Nexcess Portal.
Accessing the SSH Credentials in Your Nexcess Account – Step 2
Navigate to the plan option as shown below screenshot:
Accessing the SSH Credentials in Your Nexcess Account – Step 3
Select the plan on which you wish to connect to your GitHub Account:

Accessing the SSH Credentials in Your Nexcess Account – Step 4
Select the domain name on which you want to enable the GitHub connection:

Accessing the SSH Credentials in Your Nexcess Account – Step 5
You must create an SSH key on the website to connect to the GitHub Account. Navigate to the credential section to obtain the SSH details of the website:

Accessing the SSH Credentials in Your Nexcess Account – Step 6
Click on the SSH option shown in the above screenshot, which will take you to the account SSH details:

Accessing the SSH Credentials in Your Nexcess Account – Step 7
In the above step, you can obtain the SSH details of the website. If you no longer remember the SSH password, you can reset the SSH password using the Generate New password option. This option will generate a new SSH password for the account.
Access the Website Using the SSH Details
To access the website using the SSH details will vary by the Operating System (OS) you are using.
Windows – Access the Website Using the SSH Details
There are multiple methods to access the SSH either using a third-party tools like Putty if you are using a Windows system, or you can use the Terminal option if you are using a Mac or Ubuntu system.
Ubuntu or Mac Server – Access the Website Using the SSH Details
You can use the Terminal option if you are using a MacOS or Ubuntu OS system.
Terminal Option – Step 1
Open your Applications folder, then open Utilities and double-click on Terminal.
Terminal Option – Step 2
Now, use the SSH details displayed in the Secure Shell section to access the account:

Terminal Option – Step 3
Generate a new SSH key under the account with the following command:
ssh-keygen -t rsa -C no-reply@nexcess.net
This command will help to create a fresh SSH key under the account on the following path:
/home/user/.ssh/
Two files that will be created under the folder will be id_rsa and id_rsa.pub:

Terminal Option – Step 4
Now copy the id_rsa_pub file so we can upload the same to your GitHub Account:

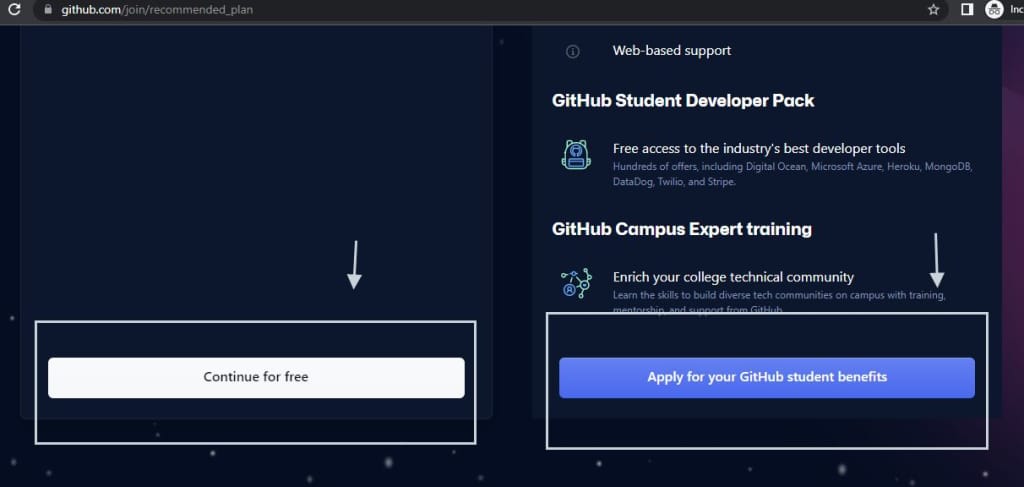
How to Create a New GitHub Account
If you don’t have an active GitHub Account, you can create a new one by accessing https://github.com/.
Creating a New GitHub Account – Step 1
Select the signup option.
Creating a New GitHub Account – Step 2
Enter a valid email address and click on the continue option:

Creating a New GitHub Account – Step 3
Enter password details for the GitHub Account and click on the continue option:

Creating a New GitHub Account – Step 4
Enter a valid username for the GitHub Account:

Creating a New GitHub Account – Step 5
Select the notification option as per your requirement:

Creating a New GitHub Account – Step 6
Verify the account by completing the puzzle details:

Creating a New GitHub Account – Step 7
Click on create account option to create a GitHub Account:

Creating a New GitHub Account – Step 8
Update the launch code sent to your email address used to create the GitHub Account:

Creating a New GitHub Account – Step 9
It will ask you a few account-related questions. Fill out the process and move to the next step:
Creating a New GitHub Account – Step 10
Fill out the project details and features you are interested in:

Creating a New GitHub Account – Step 11
Select the type of GitHub Account you want to create:
Uploading the id_rsa_pub Key in Your GitHub Account
To upload the id_rsa_pub Key file under your GitHub Account, follow the steps below.
Uploading the id_rsa_pub Key in Your GitHub Account – Step 1
Log in to your GitHub Account.
Uploading the id_rsa_pub Key in Your GitHub Account – Step 2
Navigate to the Setting option by accessing the top right corner of the GitHub Account, as shown in the below screenshot:

Uploading the id_rsa_pub Key in Your GitHub Account- Step 3
Select the Setting option and navigate to the SSH and GPG key section:

Uploading the id_rsa_pub Key in Your GitHub Account – Step 4
Select the New SSH key option in the top right section:

Uploading the id_rsa_pub Key in Your GitHub Account – Step 5
Add the id_rsa_pub key file details on the pop-up screen. Here you can define a key name and paste the pub file details:

Uploading the id_rsa_pub Key in Your GitHub Account – Step 6
After adding the Title and key details, click on Add SSH key option, which will help you to save the details on your GitHub Account:

Uploading the id_rsa_pub Key in Your GitHub Account – Step 7
Once the key has been added, you can see the key on the GitHub Account:

Configuring the Nexcess Account & GitHub Account Connection
To ensure the connection is working fine with your Nexcess Account and GitHub Account, follow the steps below.
Configuring the Nexcess Account & GitHub Account Connection – Step 1
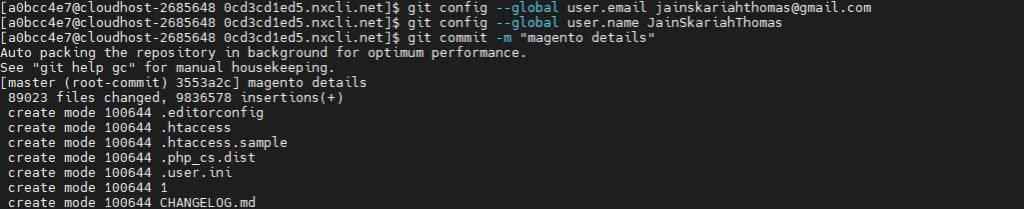
You must configure your GitHub Account email address and username details to complete the connection. This should be done by accessing the website using SSH details in the Nexcess Account.
Navigate to the domain name you want to connect to the GitHub Account. Once you have accessed the website document root directory, run the following command:
git config –global user.email “email address”
git config –global user.name “username”
Configuring the Nexcess Account & GitHub Account Connection – Step 2
Check that the connection to GibHub Account is working correctly from the Nexcess Account. Use the following command:
ssh -T git@github.com
If the connection works, it will key the following output:
[a0bcc4e7@cloudhost-2685648 ~]$ ssh -T git@github.com
Warning: Permanently added the RSA host key for IP address ‘140.82.112.3’ tothelistof known hosts.
Hi JainSkariahThomas! You’ve successfully authenticated, but GitHub doesnot provide shell access.
[a0bcc4e7@cloudhost-2685648 ~]$
Uploading the Content from Your Nexcess Account to Your Git Hub Account
To upload the content from your Nexcess Account to your GitHub Account, follow the steps below.
Uploading the Content from Your Nexcess Account to Your Git Hub Account – Step 1
SSH to the website and navigate to the account document root. Then, use the following command:
git init
The git init command will help to create a new repository:

Uploading the Content from Your Nexcess Account to Your Git Hub Account – Step 2
The git add command will add the changes made on the working directory to the staging area:
git add
Uploading the Content from Your Nexcess Account to Your Git Hub Account – Step 3
git commit
The project’s staged modifications are captured in a snapshot via the git commit command. You can think of committed snapshots as “safe” versions of a project because Git won’t modify them until you specifically instruct it to:
git commit -m “magento details”
Uploading the Content from Your Nexcess Account to Your Git Hub Account – Step 4
You can create, list, rename, and delete branches with the git branch command:
git branch
On your remote server, establish a new, empty Git repository using the git remove add command:
git remote add
To upload content from a local repository to a remote repository, use the git push command:
git push
For example, see the command set below:
git branch -M ‘main’
git remote add origin git@github.com:JainSkariahThomas/NexcessGit.git
git push -u origin ‘main’
This command set will push all the files from the Nexcess Account to the GitHub Account:

The Git Status Message will show if the branch is up to date or if any content is pending an upload to the master branch:

The GitHub Account will list the content as shown:
Why Your Hosting Provider Matters
We’ve optimized hosting for the industry’s leading commerce and content platforms. That means speed, security, scalability and support are built-in.
No one optimizes hosting for open-source applications better than Nexcess!
Recent Articles
- Enterprise Hosting – Scope of Support | Nexcess
- Transfer from SiteGround Hosting to Nexcess Hosting | Nexcess