
Create a Valheim dedicated server: Step-by-step tutorial
Ready to host a legendary Valheim realm that can rival Asgard itself? A Valheim Dedicated Server is your ticket to massive multiplayer mayhem in this Norse-inspired survival epic. You can run it from your PC or a remotely hosted server.
A Valheim dedicated server is a standalone server application that hosts your game world continuously, allowing players to connect anytime.
Ready to start exploring?
Ready to forge a Valheim world worthy of skaldic poems? Let’s fire up that server and make the gods envious!
Key things to know before we dive in:
- Valheim supports 1-10 player co-op survival gameplay.
- Private servers have a maximum capacity of 10 players.
- Server mods can increase player limits beyond 10.
- Character data travels between different Valheim worlds.
- Enemy difficulty scales with active player count.
Technical note: Valheim dedicated servers require ports 2456-2458 open for player connections.
System requirements for a Valheim server
Before diving into the installation process, ensure your system meets these specifications for optimal performance.
Minimum requirements
- Running a basic Valheim server doesn’t require enterprise-level hardware. Here’s what you’ll need to get started:
- CPU: A dual-core processor running at 2.8 GHz handles basic server operations.
- RAM: Allocate 4GB RAM for servers hosting 1-3 players.
- Storage: Reserve 5GB for server files and world data.
- Network: Upload speed of 2 Mbps supports stable gameplay.
Recommended requirements
- For a smoother experience with larger Viking crews, consider these upgraded specifications:
- CPU: A quad-core processor provides better performance for 4-10 players.
- RAM: Allocate 8GB RAM for servers hosting 4-5 players.
- RAM: Allocate 16GB RAM for servers hosting 6-10 players.
- Storage: Reserve 10GB to accommodate future updates and backups.
- Server RAM allocation directly impacts performance stability during extended gameplay sessions.
1. Log into the server
Log into your dedicated server to start the process. Windows Server 2016 and 2019 support Valheim dedicated server hosting.
2. Download Steam
Use this link to download the Steam installer from the official website and then click on the blue INSTALL STEAM button in the middle of the page.

Save the SteamSetup.exe file to your designated download location.
3. Install Steam
Run the downloaded SteamSetup.exe file and follow the installation wizard to install it onto your server.

Once installed, launch Steam and log in to your Steam account.
4. Install Valheim
Start Steam and open the LIBRARY tab. Use the search bar to search for Valheim and select it. Click the blue INSTALL button and follow the installation wizard to install it onto your server.
Note: this step is optional and only required if you intend to join and play the game from the dedicated server instead of your PC.
5. Install Valheim on your dedicated server
Use the search bar again to find Valheim Dedicated Server and select it. Click the blue INSTALL button and follow the Valheim Dedicated Server setup wizard to install it onto your server.

6. Configure your Valheim dedicated server settings
Use Windows Explorer to navigate to C:\Program Files (x86)\Steam\steamapps\common\Valheim dedicated server\.
Now open the start_headless_server.bat file with a text editor such as Notepad and observe the final line of code: valheim_server -nographics -batchmode -name “My server” -port 2456 -world “Dedicated” -password “secret” -crossplay.
Understanding each parameter helps you customize your Valheim world settings effectively:
- -name: Sets your server’s display name in the server browser.
- -port: Defines the connection port (default is 2456).
- -world: Specifies the world save file name.
- -password: Creates the server access password.
- -crossplay: Enables cross-platform play between PC and Xbox.
- Update the -name and -password values with your preferred server credentials.
- Remember, the -memory parameter allocates RAM in megabytes for improved performance.
Note: The -crossplay flag is still valid, but recent updates made it a bit buggy (esp. w/ PlayFab). You might need to disable it, depending on your setup.
7. Launch your Valheim server
Use the Steam library search bar one more times to find Valheim Dedicated Server and select it. Then, use the green LAUNCH button to run it.
Next, a command prompt window will appear, and after a few moments, you should see the following line: Session “Server Name” with join code ###### and IP ##.##.##.##:2456 is active with 0 player(s). Write down the join code for the final step. The join code format follows: ######.
8. Configure the firewall
If you fail to receive the Session is active message from the previous step, you will need to configure your server’s firewall by opening ports 2456 to 2458.
Valheim requires three ports for full functionality. Port 2456 handles the main game connection. Port 2457 manages Steam queries. Port 2458 processes Steam communication. Configure all ports as TCP/UDP for proper operation.
Your hosting provider can help with this if you find it overwhelming, so don’t hesitate to reach out for support. (Note: this step is optional and depends on your hosting provider’s, as well as your own, firewall configuration.)
9. Share the server’s credentials
If you want your friends to join the server, you need to provide them with two things: the password you configured in step 6 and the join code you received in step 7.

Friends wanting to join a game should take the following steps:
- Launch Valheim
- From the main menu, select “Join Game”
- Click on “Join IP”
- Enter the join code OR the IP address followed by the port (e.g., 123.45.67.89:2456)
- Enter the server password when prompted
- Your character will spawn in the new world!
10. Enjoy the game

Congratulations! You’ve reached the end of our Valheim Dedicated Server setup guide. Have fun running your very own dedicated Valheim server!
Remember, keep the server process running for continuous access.
To take your Valheim server to the next level, consider setting up automatic restarts or a service to keep the server online 24/7.
Pro tips:
- For better performance, especially with many players, consider allocating more RAM to the server by modifying the start script.
- Regularly backup your world files, located in C:\Users\[YourUser]\AppData\LocalLow\IronGate\Valheim\worlds_local\.
- Monitor server performance and adjust settings as needed for optimal gameplay.
Can you run a dedicated Valheim server?
Yes, you can run a dedicated Valheim server on various platforms. A dedicated server requires a Windows or Linux system with at least 4GB RAM and a dual-core processor. The server runs separately from the game client, allowing 24/7 world hosting. Players connect using the server’s IP address and password.
Running options include:
- Local hosting: Use a spare PC or your gaming computer.
- Remote hosting: Rent a VPS or dedicated server from providers like Liquid Web.
- Cloud hosting: Deploy on cloud platforms for scalability.
Valheim server administration tips
Managing your server effectively ensures a smooth experience for all Vikings in your realm.
Server shutdown
To properly shut down your Valheim server, you can use CTRL+C in the Command window. A better option is to use exit in console, to avoid corruption.
Server access management
Valheim provides several text files to control server access:
- adminlist.txt: Lists Steam IDs of players with administrative privileges.
- bannedlist.txt: Contains Steam IDs of banned players.
- permittedlist.txt: When enabled, only listed Steam IDs can join the server.
These files are located in the server installation directory. Add one Steam ID per line. Changes take effect immediately without server restart.
Admin console
Access the admin console by pressing F5 while in-game. This provides various administrative commands:
- kick [name/ip/userID]: Remove player from server.
- ban [name/ip/userID]: Ban player from server.
- unban [userID]: Remove player ban.
- save: Force world save.
- ping: Display current server latency.
How to manage Valheim server performance
RAM allocation settings
Proper memory management keeps your server running smoothly even during epic battles with trolls and dragons.
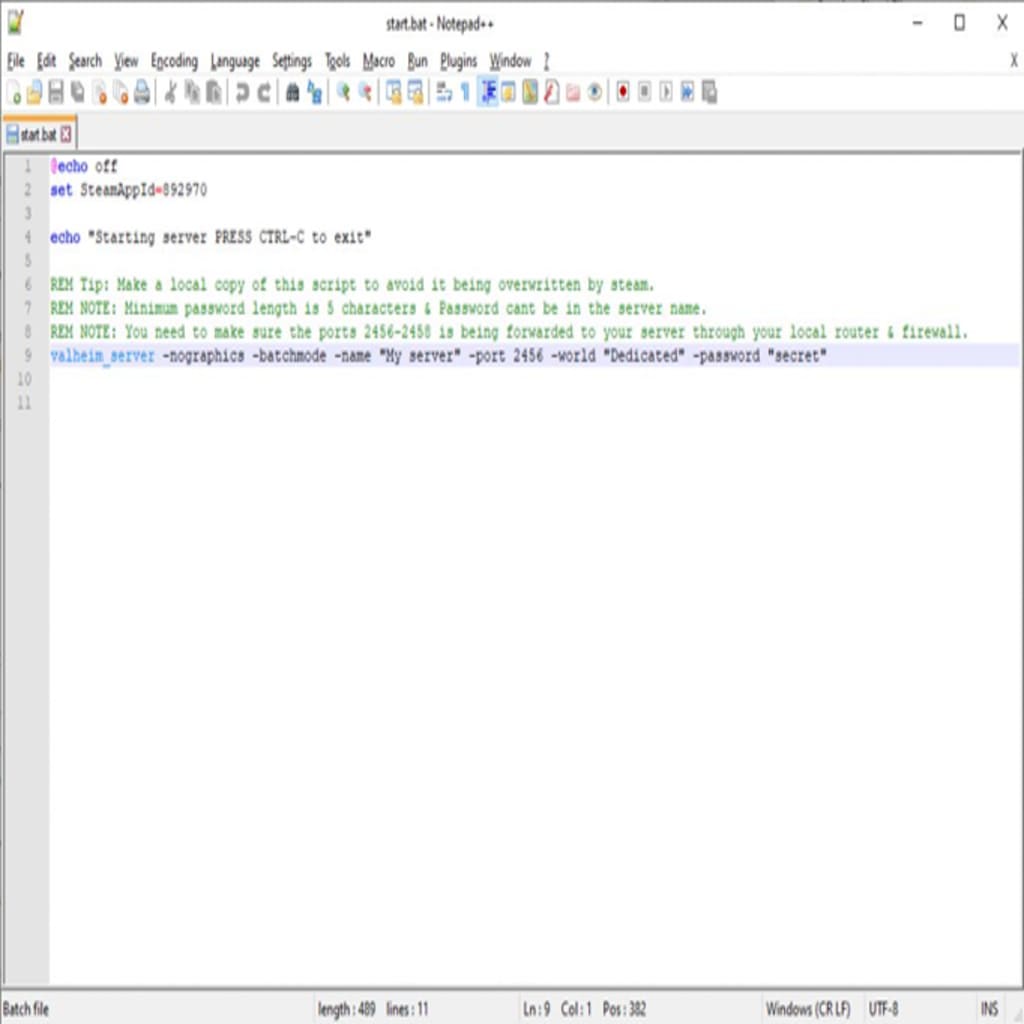
Modify the start script (start_headless_server.bat) to allocate more RAM:
@echo off
set SteamAppId=892970
echo "Starting server PRESS CTRL-C to exit"
valheim_server.exe -nographics -batchmode -name "My Server" -port 2456 -world "Dedicated" -password "secret" -crossplay -memory 4096
Memory allocation uses the -memory parameter followed by megabytes. The -memory parameter sets RAM allocation in MB. For 10+ players, allocate at least 4GB (4096MB).
World file backup
Locate world files in: C:\Users\[YourUser]\AppData\LocalLow\IronGate\Valheim\worlds_local\
Back up these files regularly:
[worldname].db (world data)

[worldname].fwl (world metadata)

[worldname].db.old (backup world data)

[worldname].fwl.old (backup metadata)
Automated backup scripts protect against data loss.
Save interval configuration
Add -saveinterval 1200 to your start script to set automatic saves every 1200 seconds (20 minutes). Lower intervals increase safety but may impact performance.
Server monitoring tools
Keep tabs on your server’s health with these essential monitoring solutions:
- Task Manager: Monitor CPU/RAM usage.
- Resource Monitor: Track network usage.
- Steam Server Query tool: Check server response time.
- Valheim Plus mod: Advanced server statistics and management.
Want to take your dedicated server to the next level?
Running a dedicated gaming server will bring you benefits, such as full control over who can access it as well as the ability to modify the game to your liking. Furthermore, setting up a Valheim Dedicated Server doesn’t have to be difficult as long as you use the right guide and pick a good hosting provider.
If you decide to host your game server remotely, a dedicated gaming server is a great option, as it provides exceptional security, performance, and full control over the software.
If you need a dedicated gaming server, Liquid Web has just what you need. Our dedicated servers are highly customizable, come with DDOS protection for gaming, and provide a 100% power and network uptime guarantee. Get in touch with us today, and we will help you set it up.
Click below to explore dedicated server options or start a chat with one of our experts to learn more.
Ready to start exploring?
Ready to forge a Valheim world worthy of skaldic poems? Let’s fire up that server and make the gods envious!
Additional resources
How to start selling Minecraft servers →
Turn a hobby into a side-hustle
Latency and rage-quitting →
Liquid Web’s industry study on latency and gaming
Dedicated vs. listen servers →
Pros and cons of each so you can decide what you need

Joseph Molloy is a Liquid Web Security Operations tech who spends his days cleaning up malware and doing his part to keep the Internet safe. He is interested in all things Linux and always looking for something new to learn. In addition, he enjoys cooking and playing guitar, is an avid horror and sci-fi reader, and is a fan of black metal music.