
◦ Comprehensive security
◦ 24/7 support
WordPress Guide → Post → Schedule
How to schedule a post on WordPress

Learning how to schedule a post on WordPress is one of the more useful skills for anyone running a blog or content site.
Instead of clicking Publish right away, you can choose a specific date and time in the future, and WordPress will automatically take care of the rest.
This guide covers exactly how to schedule a post on WordPress, how to manage scheduled content, what to do if scheduling doesn’t work, and the tools that can help you plan content further in advance.
Get fast, reliable hosting for WordPress
Power your site with the industry’s fastest, most optimized WordPress hosting
How to schedule a post on WordPress (step by step)
The process for how to schedule a post on WordPress takes about thirty seconds once you know where to look.
Here’s the step-by-step:
- Open your post in the WordPress editor. Go to Posts > Add New to create a new post, or click an existing draft you’d like to schedule.
- Look at the sidebar on the right. This is where the publishing controls live.
- Find the Publish section. It usually says Immediately next to the publish date.
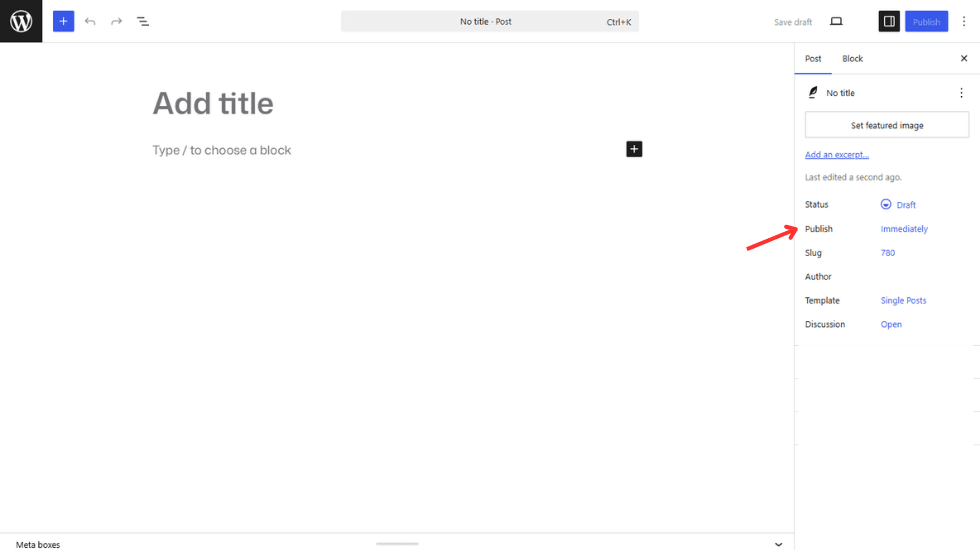
- Click the date or the word “Immediately.” A calendar and time picker will appear.
- Choose the future date and time when you want the post to go live.
- Click the blue Schedule button at the top. This replaces the usual Publish button once you’ve set a future date.

You’ll see a confirmation that your post is scheduled. WordPress will now publish the post automatically on the date and time you selected. You can close the editor or log out, and the post will go live without you needing to do anything else.
What time zone does WordPress use?
By default, WordPress uses the time zone set under Settings > General in your dashboard. Check this setting before scheduling your first post to make sure the time zone matches your local time or your audience’s time zone, whichever is more relevant for your content.
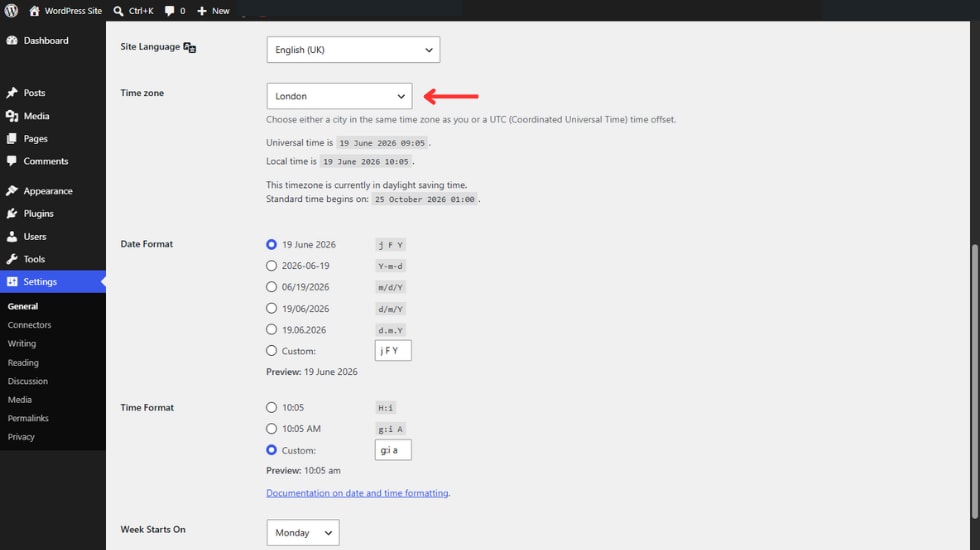
If your time zone is wrong, your scheduled posts will publish at the wrong times. Setting the correct time zone before you start scheduling is one of the simplest things you can do to avoid future confusion.
Managing scheduled posts
Once you have a few scheduled posts, you’ll need to manage them. Maybe a piece of information changes, and you need to update the post before it goes live. Maybe you want to reschedule for better timing or you decide to cancel a post entirely.
How to view scheduled posts
Finding your scheduled posts takes a few clicks:
- Go to Posts > All Posts in your WordPress dashboard.
- Click the Scheduled link at the top of the post list. (You won’t see this link if you don’t have any scheduled posts yet.)
- You’ll see all upcoming posts with their scheduled publish times.

How to edit or reschedule a scheduled post
You can edit a scheduled post at any time before it goes live. The process is the same as editing any other post:
- Click the post you want to change in your All Posts list.
- Make whatever edits you need to the content.

- To reschedule, click the scheduled date in the sidebar and choose a new date and time.
- Click Update to save your changes.
Your edits and the new schedule will apply to the post when it eventually publishes.
How to cancel a scheduled post or publish it now
If you change your mind about a scheduled post, you have two options.
To publish immediately:
- Open the scheduled post in the editor.
- Click the scheduled date in the sidebar.
- Change the date to the current date and time.

- Click Publish/Save to push the post live right now.

To cancel the schedule without publishing:
- Open the post in the editor.
- Change the post status from Scheduled to Draft (in the right sidebar, near the publish controls).
- Click Save Draft.

The post will sit in your drafts until you’re ready to schedule or publish it.
Scheduling posts in the WordPress Classic Editor
If you’re still using the Classic Editor instead of the block editor, the steps are slightly different, but the underlying functionality is the same:
- In the right sidebar, look for the Publish box.
- Click Edit next to “Publish immediately.”
- Use the date and time fields to set when you want the post to publish.
- Click OK, then click Schedule.
Your post will be scheduled and published on the date and time you set, just like in the block editor.
What happens when a post is scheduled?
WordPress uses an internal system called WP-Cron to manage scheduled tasks, including publishing scheduled posts. When someone visits your site, WordPress checks for any scheduled posts that should have been published by now and publishes any that are due.
This means scheduled posts depend on your site getting at least some traffic to trigger the cron system. If your site has very low traffic (especially overnight or during off-peak hours), scheduled posts may be delayed by a few minutes or longer until someone visits the site and triggers the cron job.
For most sites, this delay is minor and not a problem. For sites where exact publication timing matters, there are ways to set up a more reliable cron system (covered in the troubleshooting section below).
Troubleshooting scheduled posts that don’t publish
If your scheduled posts aren’t going live as expected, there are usually a few common causes.
Common reasons scheduled posts don’t publish
- Low traffic, no cron trigger. Your site isn’t getting visitors when the post is supposed to publish, so the WordPress cron system isn’t being triggered.
- Server time out of sync. Your web host’s server time doesn’t match the time zone WordPress is using.
- Plugin or theme conflict. Something in your plugin or theme stack is interfering with post scheduling.
- Memory limit issues. WP-Cron sometimes fails silently if your PHP memory limit is too low.
Common fixes for these issues
- Install a cron monitoring plugin. A plugin like WP Crontrol lets you see exactly what scheduled tasks WordPress is trying to run, when they last ran, and whether any are failing. This is the fastest way to diagnose cron issues.
- Set up a real cron job through your hosting provider. Many hosting providers let you set up a server-level cron job through cPanel or your hosting dashboard. This triggers WP-Cron at regular intervals (every 5 or 15 minutes, for example) regardless of whether anyone is visiting the site. For sites where timing matters, this is the most reliable solution.
- Check your time zone settings. Go to Settings > General and confirm the time zone is correct. If you’ve recently moved or changed your audience’s location, this is a common source of timing issues.
- Disable plugins one by one. If you suspect a plugin conflict, deactivate your plugins one at a time and try scheduling a post after each one. Once the issue stops appearing, you’ve found the culprit.
- Contact your hosting support team. If you’ve tried everything above and your WordPress scheduled posts still aren’t publishing, your hosting provider’s support team can often spot server-level issues that are harder to diagnose from inside WordPress.
Plugins and tools for content scheduling
If you want more control over your publishing schedule than WordPress’s built-in features offer, several plugins and external tools can help.
Editorial Calendar
Editorial Calendar is a free plugin that shows all your scheduled posts in a calendar view. You can drag and drop posts to reschedule them quickly, which is much faster than editing each post individually. Worth noting: this plugin hasn’t received recent updates as frequently as some alternatives, so check the WordPress.org listing for current status before installing.
SchedulePress
SchedulePress lets you schedule drafts, manage missed schedules (posts that should have been published but weren’t), and automate publishing workflows. It’s particularly useful if your site has had problems with WP-Cron reliability, since it handles missed schedules gracefully.
Nelio Content
Nelio Content includes an editorial calendar, team collaboration features, and social media scheduling alongside the publishing schedule. It’s a fuller content calendar solution suited to teams that publish frequently and want everything in one place.
Third-party tools
Tools like Buffer or Zapier can connect your WordPress site to external content calendars or social media accounts, helping you automate the parts of publishing that happen outside WordPress itself. If you’re scheduling content for both your blog and your social channels at the same time, these tools can save significant time.
FAQs about scheduling WordPress posts
Common scheduling questions that go beyond the basics covered above.
The scheduled option appears when you click on the date in the Publish section of the post editor sidebar. If you don’t see the sidebar at all, click the Settings icon in the top-right corner of the editor (it looks like a square with two uneven columns) to open it. If the publish date isn’t clickable, you may need to check whether you have permission to publish posts on the site.
Your scheduled posts will publish at the wrong times. WordPress uses the time zone set in Settings > General, so if it’s set to the wrong zone, every scheduled post will be off by the difference between your actual time zone and the one WordPress is using. Always confirm your time zone is correct before scheduling any posts.
The Gutenberg block editor is the default WordPress editor as of WordPress 5.0 (instead of the classic editor), so the standard scheduling process described in this guide applies. In short: click the date in the Publish section of the right sidebar, choose your future date and time, then click the Schedule button.
Yes. Pages support the same scheduling functionality as posts. The process is identical: open the page in the editor, click the date in the Publish section, choose a future date and time, and click Schedule.
Yes. WordPress lets you set the publish date to a past date. In the Publish section, click the date and choose a date that has already passed. When you click Publish, WordPress will treat the post as if it had been published on that earlier date. This is useful for things like travel blog entries written after the trip or migrating content from an older site while preserving its original dates.
Learn how to schedule posts in WordPress
Scheduling posts in WordPress is a small feature with big implications for how you run your content strategy. Once you know how to schedule a post on WordPress, you can write in batches, plan ahead for time off, publish automatically during peak traffic hours, and maintain the consistent posting cadence that drives meaningful traffic growth.
The built-in scheduling features are enough for most site owners. If you publish frequently or work with a team, a dedicated content calendar plugin like Editorial Calendar, SchedulePress, or Nelio Content adds drag-and-drop scheduling, missed-schedule handling, and team collaboration on top of what WordPress provides by default.
If you’d like a hosting environment optimized for WordPress workflows, including reliable cron handling for WordPress scheduled posts, Liquid Web’s managed WordPress hosting includes server-level reliability features that help WP-Cron run smoothly even on lower-traffic sites. Combined with the scheduling and content management features built into WordPress, you’ll have everything you need to keep a consistent publishing schedule.
Additional resources
What is WordPress? →
A complete beginner’s guide to WordPress.org
How to export WordPress posts →
Learn about different WordPress post formats and how they help structure and style your content effectively.
Beginner’s Guide to WordPress themes →
Learn how they work, what to look for, how to choose, and more