
◦ Comprehensive security
◦ 24/7 support
WordPress Guide → SEO → Meta Tags
How to add meta tags in WordPress

Key takeaways:
- WordPress doesn’t generate meta descriptions, robots directives, or Open Graph tags by default, so you need to add them yourself.
- An SEO plugin like Yoast SEO, Rank Math, or All in One SEO is the simplest way to manage meta tags.
- Google stopped using meta tags as a ranking factor years ago, but a well-written meta description still affects whether people click through to your site.
- After adding meta tags, verify them using View Page Source, Google Search Console, or a social share debugger.
If you’re using WordPress, you may come across meta tags when editing or posting to your site. To break it down, meta is an underlying description while tags are customized for all types of content defined in the page’s source code. In simpler terms, meta tags help Google find your site.
When search engines index your website, they collect information from the title, headings, content, and meta tags. Search engines compare the language in each of these sections and rank the website depending on how the information matches.
WordPress doesn’t support meta tags by default, but meta tags can be added manually using theme template files or through WordPress plugins.
Get fast, reliable hosting for WordPress
Power your site with the industry’s fastest, most optimized WordPress hosting
What are WordPress meta tags?
Meta tags are HTML elements that provide information about the contents of a webpage to search engines and browsers that are then displayed in search engine results. When search engines index your website, they collect information from the title, headings, content, and meta tags. Search engines compare the language in each of these sections and rank the website depending on how the information matches.
WordPress doesn’t support meta tags by default, but meta tags can be added manually using theme template files or through WordPress plugins.
Google confirmed in 2009 that it ignores the meta keywords tag entirely, and has separately confirmed that meta descriptions are not used as a ranking signal. Title tags, however, are still a ranking factor.
And even where meta tags don’t affect rankings directly, they still affect what users see in search results. A well-written meta description can improve your click-through rate, which brings more traffic from the same ranking position.
Let’s look at three ways to add meta tags to WordPress: using an SEO plugin, using a lightweight meta tag plugin, and editing theme files manually.
Which meta tags matter for WordPress SEO
Not every meta tag carries the same weight. Here’s a quick breakdown of the ones worth your attention.
Title tag. The page title shown in search results and browser tabs. Unlike most other meta tags, the title tag is still a Google ranking factor. It’s also the most visible piece of metadata on your site. For best results, use your focus keyword in the page title and keep it under 600 pixels.
Meta description. A brief summary of the page content that appears in search results. Google doesn’t use it as a ranking factor, but a clear, accurate description can make the difference between someone clicking your result or scrolling past it. Keep it under 960 pixels.
Wait, pixels? Yes. You’ll usually read advice about keeping page titles under 60 characters and meta descriptions under 160 characters, and that’s pretty close. The actual limit on the screen, though, is pixels, not characters. 60 Ws takes up a lot more screen space than 60 ls. Use a tool like Mangools’ SERP simulator to make sure your meta tags are actually going to fit.
Robots meta tag. Instructions telling search engines how to handle the page. Use noindex to keep pages like admin dashboards, staging environments, or thank-you pages out of search results. Use nofollow to tell crawlers not to follow outbound links on a page.
Open Graph and Twitter Card tags. These control how your content appears when someone shares a link on Facebook, LinkedIn, or X. Without them, social platforms will pull whatever text and image they find first, which often looks bad. Most SEO plugins generate these automatically.
Canonical tag. Tells search engines which version of a page is the original when duplicate or near-duplicate content exists. Useful if you publish similar content across multiple URLs or run paginated archives.
Method 1: Using an SEO plugin (recommended for most sites)
If you are looking for a quick and easy way to add meta tags to your WordPress website, you can use WordPress plugins.
An SEO plugin gives you a per-post, per-page interface for managing meta titles, descriptions, Open Graph data, and robots directives, all without touching code. It may also generate sensible defaults for pages you haven’t manually edited yet.
Here are three plugin options for adding meta tags to WordPress.
Yoast SEO
- Go to Plugins > Add New in your WordPress dashboard.
- Search for Yoast SEO. Click Install Now, then Activate.
- Run through the Yoast configuration wizard to set your site-wide defaults (site name, title separator, default description format).
- Go to Pages or Posts and open the page or post where you want to add meta tags.
- Scroll down to the Yoast SEO box below the content editor.
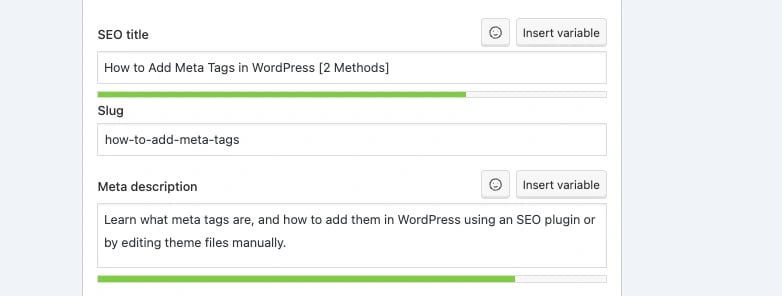
- Yoast includes fields like focus keyphrase, SEO title, slug, and meta description.
- The focus keyphrase is the search term that you want your page to rank for.
- The SEO title is the page title. For better results, use your focus keyword in the page title and keep it under 600 pixels.
- The slug is a part of your URL that describes the content of a page or post.
- The meta description appears under the page or post title on Google and provides information about the content.
- Save or publish the post.
Yoast also handles Open Graph tags, Twitter Card tags, and robots directives. You can configure these under the Social and Advanced tabs in the Yoast meta box.
To set site-wide defaults, go to SEO > Search Appearance in the Yoast settings. This is where you define fallback title and description templates that apply across all posts, pages, or custom post types.
Rank Math
Rank Math offers more features in its free tier than most competitors, including multiple focus keywords per post, built-in schema markup, and Google Search Console integration.
- Go to Plugins > Add New, search for Rank Math, and activate it.
- Complete the setup wizard to configure global defaults.
- Open any post or page and click the Rank Math button at the top right of the editor.
- Enter your SEO title, meta description, and focus keyword.
- Use the Social and Advanced tabs for Open Graph settings and robots controls.
- Click Update or Publish.
All in One SEO
You can find the All in One SEO section under any post or page once you activate the plugin. Fields such as post title, meta description, and focus keyphrase need to be filled out as per your requirements in the All in One SEO (AIO SEO) settings.
- Go to Plugins > Add New, search for All in One SEO, and activate it.
- Follow the setup wizard to configure your site defaults.
- Open any post or page and scroll down to the AIOSEO Settings box.
- Enter your SEO title and meta description.
- AIOSEO provides a preview of how your meta tags will appear in search results.
- Click Update or Publish to save.
All three plugins handle the core meta tag types well. The choice comes down to which interface you prefer and whether you need specific extras like Rank Math’s schema support or Yoast’s readability analysis.
Method 2: Manually editing theme files
This method is best suited for developers or for adding a single static meta tag across an entire site. It gives you full control but requires more care.
Before you start:
- Back up your site. Any mistake in a theme file can break your site’s front end.
- Use a child theme. Changes to a parent theme’s files will be overwritten the next time the theme updates. If you haven’t set up a child theme yet, do that first.
- Check your theme type. Block themes (like Twenty Twenty-Four) often don’t include a
header.phpfile. If you’re on a block theme, skip to the functions.php method below.
Classic theme approach (header.php)
To add meta tags in WordPress without a plugin, you’ll need to open the header.php file. This can be opened using File Manager or a Secure File Transfer Protocol (SFTP) client.
- Connect to your site via SFTP or your host’s file manager.
- Navigate to
wp-content/themes/your-child-theme/. - Open the
header.phpfile. - Find the
<head>section. Add your meta tags before the closing</head>tag:
<meta name="description" content="A brief description of your website's content." />
<meta name="robots" content="index, follow" />
Save the file and upload it back to your server. Keep in mind that these tags will apply to every page on your site. They won’t change per post or per page unless you add conditional PHP logic.
Block theme / functions.php approach (wp_head hook)
If your theme doesn’t have a header.php file, or you prefer not to edit it directly, you can hook into wp_head from your child theme’s functions.php:
php
function add_custom_meta_tags() {
    echo '<meta name="description" content="A brief description of your website." />' . "\n";
}
add_action('wp_head', 'add_custom_meta_tags');
This outputs the meta tag in the <head> section of every page, just like editing header.php would.
Conditional tag query for dynamic descriptions
If you want different meta descriptions for single-post views versus your blog index, you can use a conditional query in either header.php or your functions.php hook:
php
<meta name="description" content="<?php if ( is_single() ) {
    single_post_title('', true);
} else {
    bloginfo('name'); echo ' - '; bloginfo('description');
}
?>" />
This shows the post title as the description on individual posts and falls back to the site name and tagline on multi-post views.
How to verify your meta tags are working
Adding meta tags is only half the job. You also need to confirm they’re rendering correctly and that search engines can see them.
View Page Source. Visit any page on your site in a browser and press Ctrl+U (Windows) or Cmd+Option+U (Mac). Search the source code for <meta name="description" or whatever tag you added. If it’s there, it’s working.
Google Search Console. Use Google Search Console (GSC) to see how Google reads and displays your meta information in search results. The URL Inspection tool is especially useful for confirming that Google has picked up recent changes.
Screaming Frog SEO Spider. Screaming Frog can audit meta tags across your entire site. It’s useful for catching missing meta descriptions, titles that are too long, or duplicate meta content that needs fixing.
Social share debuggers. Use Facebook’s Sharing Debugger and X’s Card Validator to confirm that your Open Graph and Twitter Card tags are rendering correctly. These tools show you exactly what image, title, and description will appear when someone shares your link.
SEOquake browser extension. SEOquake provides quick meta tag analysis for individual pages without leaving your browser.

Common mistakes to avoid
Duplicate meta descriptions. Writing the same description for every page, or running two SEO plugins that both output description tags, creates duplicate meta content. Pick one source of truth for each tag type and stick with it.
Exceeding pixel limits. Remember to keep meta descriptions under 960 pixels and focus on writing compelling summaries that accurately represent your pages. Titles should stay under 600 pixels. Anything longer gets cut off in search results.
Adding meta keyword tags. Google has ignored the keywords meta tag for over 15 years. Including it won’t help and can make your site look like it’s using outdated SEO tactics.
Forgetting robots directives. Pages like admin panels, staging environments, internal search results, and thank-you pages shouldn’t appear in Google. Set noindex on these pages using your SEO plugin’s Advanced tab or a manual robots meta tag.
Not using a child theme for manual edits. If you edit header.php or functions.php in your parent theme directly, the next theme update will wipe your changes. Always work in a child theme.
WordPress meta tag FAQs
Getting started with WordPress meta tags
Meta tags give search engines and social platforms the context they need to represent your content accurately. A clear title tag and description won’t move your rankings directly, but they will affect whether people actually click through to your site from search results.
If you’re starting from scratch, install an SEO plugin like Yoast SEO or Rank Math, run through its setup wizard, and then work through your highest-traffic pages first, setting custom titles and descriptions for each one.
And if you’re looking for scalable WordPress hosting with excellent support, consider Liquid Web’s wide range of WordPress hosting solutions with built-in performance optimization tools. Fast page loads and reliable uptime make sure that once visitors click through from search results, they get a good experience on the other side. Explore Liquid Web’s WordPress hosting options to find a plan that fits your site.
Additional resources
Easy SEO for WordPress →
A guide to getting started, with 7 simple tasks that anyone can implement
5 best SEO plugins for WordPress →
Did you know that there are also other well viable options on the market as well? SEO Optimization tool Rank Math has built a huge and successful community in a short period.
How to find the best hosting for SEO →
The WP Toolkit includes many valuable features for updates and security

Amanda Valle is Global Director of Organic Search at Liquid Web and a seasoned SEO, user acquisition, digital marketing leader. She has 20+ years of experience in digital marketing, SEO, and content marketing, and holds certifications from SEMrush and Google Analytics. When she’s not driving revenue, she enjoys spending time with her girls.