
◦ Comprehensive security
◦ Support
WordPress Guide → Admin → Limit Admin Access
How to limit WordPress admin access

Do you want to allow user registration on your WordPress website or give blog writers access so they can make changes? You aren’t alone.
But you don’t want just anyone to have access to all parts of your website, right?
Get fast, reliable hosting for WordPress
Power your site with the industry’s fastest, most optimized WordPress hosting
Restricting access to the WordPress administration panel/dashboard
To ensure only authorized users can make changes to your website, you need to restrict access to your WordPress Administration Panel (also known as the WordPress Administration Dashboard).
Keep reading to learn how to restrict WordPress Administration Panel access and find out the benefits of access restriction.
Overview of WordPress administration
You’ll see the WordPress Administration Panel being referred to wp-admin, the WordPress back end, or the admin dashboard. Whatever you prefer to call it, this panel is your go-to for managing everything on your WordPress website.
For example, you use this panel to adjust your website’s appearance, add or modify website content, and install webpage components (for example, plugins).
You can access your WordPress Administration Panel/Dashboard or login page by typing your domain name into your web browser and then adding /wp-admin to the website’s URL:
https://yourdomain.com/wp-adminIf you want to go straight to your WordPress Administration login page, you can add /wp-login.php to your URL:
https://yourdomain.com/wp-login.phpHere’s what the WordPress Administration login page looks like:

You’d need to find your login and password if you forgot to click Remember Me during your first login. Your login details could be written on a scrap of paper hidden under an old coffee cup. No judgment here.
Once you log in, you can begin to navigate the various sections of the WordPress Administration Panel. If you prefer to avoid surprises, here’s the lowdown on these sections.
The admin toolbar
When you log in to your website, you should see a black horizontal bar at the top of the page. This element of the user interface is called the admin toolbar:
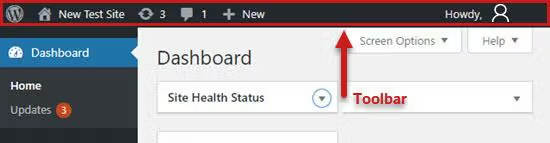
This toolbar contains valuable shortcuts to WordPress features you’ll frequently access. For example, this toolbar can take you to:
- The WordPress homepage
- WordPress installation, theme, and plugin updates
- Your website’s title that functions as a link to your homepage
- The comments page that shows how many comments await moderation
- Your user profile
The dashboard
The dashboard offers an overview of what’s going on with your WordPress website. Here, you can look at website activity and general statistics, for example, the number of comments:
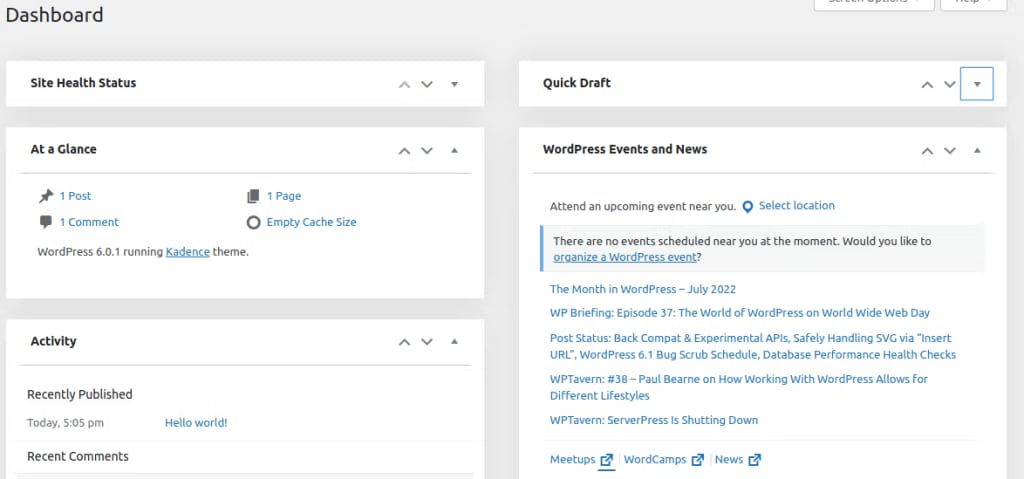
By default, these boxes will appear on your dashboard:
- Site Health Status: This widget lets you monitor your website’s speed, performance, and security.
- Quick Draft: This tool lets you view recent post drafts and instantly save new drafts.
- At a Alance: This box shows your current theme and the version of WordPress.
- WordPress Events and News: This widget displays the newest WordPress developments and upcoming events.
- Activity: By clicking here, you can get a glance at recent activity on your website, such as recently published posts and comments.
The admin sidebar
You’ll find the admin sidebar on the left-hand side of your user interface. This sidebar lets you navigate to all your website’s admin areas:

This sidebar’s standard functionalities include the following:
- Posts: Write, edit, delete, or publish articles.
- Media: Upload, manage, browse, edit, and search media files (for example, images).
- Pages: Create, manage, and view static pages.
- Comments: Monitor visitor comments.
- Appearance: Manage widgets and menus.
- Plugins: Install and run website plugins.
- Users: Change user roles and add users to your site.
- Tools: Manage, import, and export personal data.
- Settings: Modify your site’s main settings.
About your WordPress administration and the WordPresss admin username login account
By default, your WordPress admin username and login URL are the same for each installation. So if you’re still using the default settings, a malicious attacker only needs to guess your password.
Remember to change your default login details to ensure you don’t give attackers easy access.
Benefits of restricting WordPress administration panel/dashboard access
You could have many reasons for wanting to limit access to your WordPress Administration Panel.
You might want to give writers restricted access if your website includes a blog. For example, you can let writers post and modify content without allowing them change other settings (for example, themes and plugins).
If you allow website subscribers, you’ll want to prevent them from viewing any part of your WordPress Administration Panel/Dashboard. This way, they can’t change any vital components.
How to restrict WordPress Administration Panel access
The following methods allow you to restrict access to your WordPress Administration Panel/Dashboard:
- Method #1: Restrict WordPress Administration Panel access with .htaccess
- Method #2: Restrict WordPress Administration Panel access using the Apache configuration file
- Method #3: Restrict WordPress Administration Panel access using the NGINX configuration file
- Method #4: Restrict WordPress Administration Panel access by changing user roles and permissions
- Method #5: Restrict WordPress Administration Panel access using code
- Method #6: Restrict WordPress Administration Panel access with a plugin
Method #1: Restrict WordPress administration panel access with .htaccess
Do you need to let just a few users access your WordPress Administration Panel? In that case, you can restrict access to specific IP addresses by changing your .htaccess file.
This action will prevent people with unknown IP addresses, such as hackers, from accessing the back end of your WordPress website. Do a complete backup before making any changes to this file.
Add the following code in the wp-admin/.htaccess file to restrict access.
For Apache 2.2
AuthUserFile /dev/null
AuthGroupFile /dev/null
AuthName "WordPress Administration Panel Access Control"
AuthType Basic
# ALLOW USER BY IP
<LIMIT GET>
order deny,allow
deny from all
allow from xx.xx.xx.xx
</LIMIT>
For Apache 2.4
AuthUserFile /dev/null
AuthGroupFile /dev/null
AuthName "WordPress Administration Panel Access Control"
AuthType Basic
# ALLOW USER BY IP
<Limit GET POST>
Require all denied
Require ip xx.xx.xx.xx
</Limit>
Don’t forget to replace xx.xx.xx.xx with the IP address or addresses you want to give admin panel access to.
Method #2: Restrict WordPress administration panel access using the Apache configuration file
You can add this code to the Apache configuration file to give WordPress Administration Panel access to trusted IP addresses.
<location /wp-admin>
allow from xx.xx.xx.xx
deny from all
</location>
<location /wp-login.php>
allow from xx.xx.xx.xx
deny from all
</location>
If you want to deny access to any IP address, paste this code into your Apache configuration file:
<location /wp-admin>
deny from xx.xx.xx.xx
allow from all
</location>
<location /wp-login.php>
deny from xx.xx.xx.xx
allow from all
</location>
Replace xx.xx.xx.xx with the IP address you want to deny admin panel access to. Reload Apache to ensure these changes are applied.
Method #3: Restrict WordPress administration panel access using the NGINX configuration file
Enter this code in your NGINX configuration file to give a particular IP address access to your WordPress Administration Panel:
location /wp-admin {
allow xx.xx.xx.xx;
deny all;
}
location = /wp-login.php {
allow xx.xx.xx.xx;
deny all;
}
Adding this code to your NGINX configuration file will deny access to an IP address of your choice:
location /wp-admin {
deny xx.xx.xx.xx;
allow all;
}
location = /wp-login.php {
deny xx.xx.xx.xx;
allow all;
}
Again, replace xx.xx.xx.xx with the IP address you want to keep out. Remember to reload NGINX to ensure these changes are applied.
Method #4: Restrict WordPress administration panel access by changing user roles and permissions
User roles manage the permissions for what a user can and can’t do on your WordPress website. The website administrator assigns roles to users. For example, writers and editors are given different roles on WordPress (for example, monitor comments, create pages, and write blogs).
The most restricted role is Subscriber, so it’s a good idea for you to assign all new users this role. Subscribers can only use your front-end features (for example, commenting) and update their profiles.
To set the default role for new users, you can go to Settings > General on your WordPress Administration Panel menu. You’ll see New User Default Role:

If you want to change the role of an existing user, go to Users > Find User. Click on Edit and select the role you wish to assign to that user:

Once you choose the role, click Save changes.
Here are the default user roles:
- Administrator: Complete access.
- Editor: Can edit website posts, settings, and comments.
- Author: Can only write blog posts and edit their own posts.
- Contributor: Similar to an author, but they can’t publish anything without an author’s or editor’s approval.
- Subscriber: Can only read and comment.
Method #5: Restrict WordPress administration panel access using PHP code
You also can add this PHP code to the functions.php file of your child themes to restrict WordPress Administration Panel access:
add_action( 'init', 'blockusers_init' );
function blockusers_init() {
if ( is_admin() && ! current_user_can( 'administrator' ) &&
! ( defined( 'DOING_AJAX' ) && DOING_AJAX ) ) {
wp_redirect( home_url() );
exit;
}
}
This code makes it so only administrators can access the back end of your WordPress website. Other users are redirected to the website’s homepage.
The above code is only active when someone is logged in to the dashboard. It isn’t applied to users who aren’t logged in (users must be logged in to access your dashboard).
Method #6: Restrict WordPress Administration Panel access with a plugin
You also can use a WordPress plugin to restrict user access. There exists a good number of options in this category of plugins. We will discuss just one of the most popular ones.
Using the Remove Dashboard Access plugin for WordPress
You can use the Remove Dashboard Access plugin to restrict user access. After you install the plugin, you can choose who has access to your WordPress Administration Panel in the Dashboard access controls section (for example, administrators only or authors and editors).
If your preferred access restrictions aren’t listed, you can take greater control of access using the Advanced option:

This plugin also lets you:
- Choose a redirect URL for forbidden users.
- Grant all users the ability to change their profile.
- Add a personalized login message.

Get started securing your WordPress site
Now you know how to secure your website by restricting access to your WordPress Administration Panel/Dashboard.
Website security really starts with secure hosting, even for WordPress sites. Liquid Web’s specialized hosting for WordPress includes complimentary SSL certificates, regular PHP updates, and the highly trusted Solid Security Pro plugin—free with every plan.
Additional resources
How to use your WordPress admin login page →
How to find, use, and troubleshoot your admin page
Comprehensive WordPress security checklist →
18 security tasks anyone can do to make your site more secure
Easy WordPress website maintenance tips →
7 simple steps to keep on regular rotation

Mohammed Noufal is a B.Tech graduate with a decade of experience in server administration and web hosting. He is a father to two daughters and finds fulfillment in their growth. In his free time, he enjoys blogging, sharing experiences, and listening to music.