
 Maddy Osman
 Sometimes, your website needs a bit of a refresh. Maybe you’ve outgrown old content, or a page isn’t quite ready for prime time. Whether you’re dealing with outdated information, preparing a new marketing campaign, or simply cleaning house, knowing how to unpublish WordPress pages the right way is essential.
Unpublishing doesn’t just mean hitting “delete” and moving on. Instead, it’s about strategically managing your content to protect your site’s user experience and SEO value. After all, a broken link or poorly handled removal can confuse visitors and hurt your rankings.
Don’t worry, though. This guide will walk you through the best practices for unpublishing pages, posts, or even your entire WordPress site.
Key points
- You can unpublish individual WordPress pages by setting them to “Draft” or “Private,” or hide multiple pages in bulk using WordPress’s built-in bulk edit feature.
- You can protect sensitive content by making pages private or password-protected. For advanced control, consider membership plugins for restricted access.
- Liquid Web’s free staging sites allow you to test updates, preview changes, and avoid unpublishing errors by ensuring everything works before going live.
Quick methods to unpublish WordPress pages
WordPress offers a variety of user-friendly options to unpublish pages and posts. Here’s a blueprint for three quick and effective methods of how to do that:
Method 1: Unpublishing a single page or post
If you just need to remove a single page from your WordPress site, you can do so in a few clicks:
- Log in to your WordPress dashboard.
- In the left-hand menu, click on Pages (or Posts if you’re working on a blog post).
- Find the page you want to unpublish, hover over the title of the page/post, then click Edit.

- Under Status & Visibility, switch the status from Published to Draft.

- Click the blue Update button to save the changes.
And just like that, your page is no longer visible to the public, but it’s still stored safely for future edits or re-publishing.
Method 2: Unpublishing multiple pages or posts in bulk
If you need to hide multiple pages or posts at once, WordPress has a bulk editing feature that simplifies the process:
- Just like in method 1, access the Pages or Posts list and check the box next to each page or post you’d like to unpublish.
- At the top of the list, click the Bulk Actions dropdown menu, select Edit, then click Apply.

- In the bulk edit options, set the Status to Draft.

- Click the Update button to apply the changes.
This method is perfect for tidying up your site quickly without the need for plugins or advanced tools.
Method 3: Making a WordPress page or post private
Sometimes, you might not want to completely unpublish a page or post but restrict who can view it. WordPress allows you to make a page private or password-protected, which is ideal for members-only content or drafts you’d like to share selectively. Here’s how:
- Open the page editor for the page you want to protect.
- In the Status & Visibility panel on the right, select Private, then click Update.

Now, only logged-in admins or editors will be able to view the page.
And, to add password protection:
- In the same Status & Visibility settings, select Password Protected.
- Enter a password in the field that appears, then click Update.
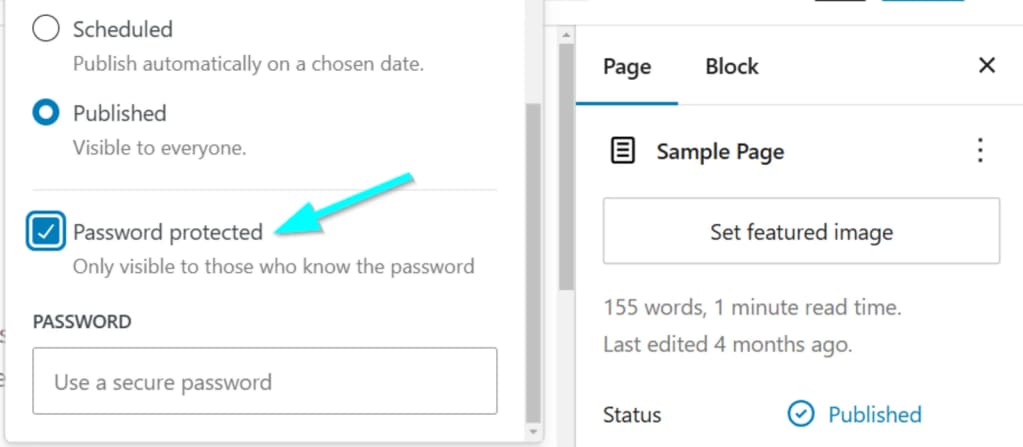
Your visitors will need to enter the password to access the page after that, which is great for sharing content with a select audience without unpublishing it entirely.
If you need more control, consider a membership plugin like MemberDash, MemberPress, or Paid Memberships Pro. These plugins allow you to create exclusive content areas, restrict access by user role, and manage subscriptions.
How to unpublish an entire WordPress site
Sometimes, you may need to take down your entire WordPress site temporarily or permanently. Whether you’re redesigning, fixing technical issues, or stepping back from a project, there are several methods to unpublish your site safely.
Method 1: Put your site into maintenance mode
Using a maintenance mode plugin is one of the easiest ways to unpublish your WordPress site temporarily. This approach displays a maintenance or “coming soon” message to visitors while keeping your backend intact for editing.
To do that:
- From your WordPress Dashboard, go to Plugins > Add New, search for “Maintenance Mode” or “Coming Soon” plugins, and install one (e.g., SeedProd or WP Maintenance Mode).
- After installation, activate the plugin and navigate to its settings.
- Using the plugin, create a custom maintenance page with a message like “We’ll be back soon” or “Site under construction.”
- Turn on the maintenance mode toggle in the plugin settings.
Now, visitors will see your maintenance page, while you can work behind the scenes.
You can also do that manually without a plugin. Here’s how:
- Use an SFTP client (e.g., FileZilla) or your hosting control panel’s file manager to access your WordPress site’s files.
- In the root directory of your WordPress installation (where wp-config.php is located), create a new file named .maintenance.
- Open the .maintenance file and add the following code:
<?php
$upgrading = time();
?>
This will trigger WordPress’s maintenance mode, displaying a simple message to visitors.
- Visit your website, and you should see a “Briefly unavailable for scheduled maintenance” message.
- When you’re ready to take your site out of maintenance mode, simply delete the .maintenance file.
Method 2: Deleting your site from your hosting dashboard
If you no longer need your WordPress site, you can delete it entirely from your hosting provider’s dashboard. This method removes the site from the internet and frees up server resources.
Here are the steps:
- Access your hosting control panel (e.g., Liquid Web, cPanel, or Plesk).
- Find the site you want to remove in the list of hosted websites.
- Select the option to delete the site or hosting instance.
⚠️ Warning: Deleting your site is irreversible unless you have a backup. Make sure to create a full site backup before proceeding.
Method 3: Remove files via SFTP
For those comfortable with a more technical approach, you can manually unpublish your site by deleting its files using an SFTP client:
- Use an SFTP client like FileZilla to log in with your hosting credentials.
- Locate the folder where your WordPress files are stored (usually named /public_html).
- Select all the files in the directory and delete them.
Once the files are deleted, your site will no longer appear online.
Prevent publishing mistakes with Liquid Web staging sites
Unpublishing WordPress pages or your entire site can be a hassle, especially if it’s due to a publishing error. What if you could catch mistakes before they go live? With Liquid Web’s free staging sites – available through the managed WordPress hosting plans – you can do exactly that!
A staging site is like a sandbox version of your website. It’s a private, exact replica of your live site where you can make changes, test new content, and preview updates without affecting your live audience.
Liquid Web’s staging sites help with:
- Testing content and features before publishing: Whether you’re adding new pages, redesigning layouts, or installing plugins, testing in a staging environment ensures everything works perfectly. This helps you avoid errors that might force you to unpublish content later.
- Eliminating risky updates: WordPress updates – for themes, plugins, or the core software – can sometimes cause compatibility issues. With staging sites, you can safely test updates before applying them to your live site.
- Collaborating without interruptions: Staging sites make it easy for team members or clients to review content changes without exposing incomplete work to the public.
It only takes just a few clicks to create a staging site with Liquid Web’s managed WordPress hosting. You’ll be able to freely edit, test, and preview new changes without impacting your live audience. Then, once you’re satisfied, you can sync the staging site with your live site to apply updates easily.
Take control of your WordPress content today
Managing your WordPress content doesn’t have to be overwhelming. From setting pages to “Private” to utilizing maintenance mode, the right approach ensures a smooth user experience while preserving your SEO value.
Liquid Web’s managed WordPress hosting takes it a step further by offering free staging sites. These staging environments let you test changes before they go live, reducing the need to unpublish content due to errors or unfinished updates. It’s the perfect way to keep your website professional, polished, and always visitor-ready.
Ready to simplify your WordPress management? Explore Liquid Web’s managed WordPress hosting plans today and unlock features designed to keep your site running smoothly!
Unpublishing WordPress Pages and Sites: FAQs
What’s the difference between “unpublishing” and “deleting” a WordPress page or post?
Unpublishing a page or post means it’s no longer visible to visitors but remains stored in your WordPress dashboard for future use. Deleting a page removes it permanently. If you might need the page/post later, unpublishing is the better choice.
Will unpublishing a page hurt my SEO?
Unpublishing a page/post can affect your SEO if the page/post has already been indexed by search engines. To minimize impact:
- Set up a 301 redirect to guide visitors to a similar page.
- Use tools like Google Search Console to remove the URL from search results.
- Consider leaving the page online but set it to “Private” or password-protected instead of unpublishing.
Can I unpublish a page or post temporarily and bring it back later?
Absolutely! You can set a page/post to “Draft” or “Private” in the WordPress editor. This keeps the content intact in your dashboard, ready for re-publishing when needed.
How do I unpublish pages/posts without affecting my site’s navigation?
If you unpublish a page or post, any links to that page in your site’s menu will break. To avoid this:
- Update your navigation menus in Appearance > Menus.
- Redirect broken links to relevant content using a plugin like Redirection.
Are there plugins that make unpublishing easier?
Yes! Plugins like WP Maintenance Mode can help unpublish an entire site temporarily, while tools like MemberDash allow you to restrict content visibility without unpublishing pages/posts.
Can I test changes without unpublishing?
Yes! Liquid Web’s staging sites let you preview updates and test changes without affecting your live site. This is a great way to avoid mistakes and ensure your content is polished before publishing.
What happens if I delete a page by mistake?
If you accidentally delete a page/post, you can usually recover it from the WordPress Trash folder (found under Pages or Posts) as long as it hasn’t been permanently deleted.