
◦ Comprehensive security
◦ 24/7 support
WordPress Guide → Build
How to build a WordPress site (a beginner’s guide)

You’ve been building your brand behind the scenes. Now it’s time. You know you need a website to launch your brand, but you aren’t sure how to start. The entire idea of the site gives you anxiety. We get it! Building and launching a website can be intimidating. This post will cover step-by-step how to create a WordPress site for beginners.
Believe it or not, it doesn’t take a lot to launch a WordPress website. First, of course, you need an excellent understanding of your brand, its visual identity, and the site’s goals. But from a tech standpoint, the things you need to launch are minimal when you use WordPress.
Keep reading to learn how to create a WordPress site.
What do I need to start a WordPress website?
WordPress is built on an open-source platform, allowing a diverse range of programmers to contribute to its library of themes and plugins. This means anyone can use this content management system (CMS) without needing advanced coding or web design knowledge.
The basic steps to create a WordPress site are:
- Choose a domain.
- Choose a WordPress hosting provider.
- Install WordPress on your server.
- Select and install a WordPress theme.
- Install and activate any plugins.
- Add pages and any posts you want to start with.
- Customize the theme and design your site.
- Backup the site.
- Run through a pre-launch checklist.
Before you start: Define your purpose
Before you even get started building a WordPress site, it’s important to define your purpose.
Knowing what type of website you want to run — whether it’s for a personal passion project, an ecommerce business, or a travel blog — is a critical step in uncovering your niche and your site goals. This is also a good time to decide who your target audience is, and how it will affect the style, tone, layout, and imagery or design work you choose to include.
1. Choose a domain name
The domain name is the URL for your website. It’s what people type to go to your site.
Your domain name should be clear and concise while representing your overall brand or site’s purpose. Try to come up with a name that is easy for users to spell, type into a search bar, or recall, as there are billions of websites currently online.
For example, if you are creating a WordPress site for a business, be sure to use the business name as the domain name. If you intend to brand yourself through your site, you should choose your own name (if available) as the domain name. If you’re having a difficult time coming up with a creative domain name, there are several domain name generators you can use to spark ideas.
Once you have your name chosen, it’s time to see if the domain is available. Not only should it be available on the web, but it should also be available on social media sites (you can manually search for your chosen domain name on these sites) in case you would like to create supporting social media accounts. Additionally, your chosen domain name should not be trademarked with the United States Patent and Trademark Office.
If the domain name you’d like to use is taken, you might still be able to use it by selecting a different top-level domain name extension. This means that, rather than using “.com” after your domain name, you could use top-level domain names like:
- .co
- .biz
- .inc
- .net
It’s important to note that while you can purchase a domain name from several hosting providers, it’s better to do so with the one that is hosting your website. This makes it easy to manage all the details of your site from one centralized platform. Plus, many hosting providers offer domain registration deals when you sign up for a hosting package.
So let’s talk about hosting providers …
2. Select a WordPress hosting provider
Choosing a company to host your website is one of the most critical decisions for your site. A WordPress web hosting provider gives you access to a server — or a portion of a server —from where your website will run. These providers typically offer multiple types of servers you can choose from, including:
- Shared servers: Several websites are hosted on a single shared server. In this model, server access and configuration are more limited, and performance is based on the load each website is putting on the server.
- Virtual private servers (VPSs): A VPS allows multiple websites to run on a single shared server while remaining isolated from one another. Typically, VPS hosting offers more control and performance than a standard shared server, however, they may require familiarity with server management.
- Dedicated servers: A dedicated server is a completely isolated server dedicated to a single website. This type of server offers higher levels of performance and customization, but it does require more advanced knowledge of server management and maintenance. Typically, larger organizations utilize dedicated servers to meet intense traffic demands, and many hosts offer dedicated servers for WordPress.
- Cloud servers: Similar to a dedicated server, a cloud server provides ultimate control and flexibility when it comes to performance and server customization. However, cloud servers provide more scalability, as they do not require changes in hardware to scale up or down.
If you’re launching your first WordPress site, chances are a shared server or a VPS package will provide you with enough processing power and customization for your site’s needs. Just be sure to choose a web hosting provider that provides:
- WordPress compatibility and easy installation
- Affordable, scalable hosting plans
- Automatic SSL certificates
- Automatic WordPress and plugin updates
- Malware monitoring
- Instant backups
- Expert customer support
Fully managed WordPress hosting plans
On top of these server options, many hosting providers also offer fully managed WordPress hosting plans.
Managed WordPress hosting adds an extra layer of support on top of WordPress server you’re renting. It combines the technical hosting you need with advanced support and services from WordPress experts.
For example, robust managed hosting providers generally ensure your site stays fast, secure, and updated.
Learn more
The best managed WordPress hosting providers (reviewed and compared)
3. Install WordPress
Once you have chosen your domain name and web hosting provider, it’s time to install WordPress. Many hosting providers allow you to install WordPress directly into your account within your control panel (cPanel).
If you’re unsure how to do this, be sure to refer to your web host’s WordPress installation documentation or reach out to customer support for assistance. In addition, you can reference the WordPress Codex for more information about the website installation process.
4. Choose and install a theme
The theme is a template that controls the appearance of your site. Choosing an impactful theme and design style is key to standing out online. WordPress offers a whole host of themes for all types of websites that require minimal knowledge of coding or web design, including both free and premium themes.
To browse through WordPress’s library of themes for your site:
- Hover your cursor over the “Appearance” tab in your WordPress dashboard and click on “Themes.”
- Click “Add New” and you can search for a theme that fits your site’s aesthetic and goals.
- When you’ve chosen a theme, navigate to the “Activate” button and click it.

Note: Before committing to a theme, WordPress gives you the option to see a preview of what your site would look like with any theme offered. Simply hover your cursor over a theme and select “Live Preview.”
Because WordPress offers so many theme options, it can be overwhelming to choose the best one for your site’s needs. Some tips:
- It’s okay to browse themes to get some web design ideas if you’ve never done this before.
- List out all the features and functionalities you want your site to have and double-check what widgets come with the themes you like.
- Be sure to select a mobile-friendly WordPress theme that automatically optimizes your site for mobile devices.
5. Install plugins
When launching a WordPress site, you’ll have the option to select and install WordPress plugins. These plugins add extended functionality to your site, such as enhanced security features, ecommerce tools, page building templates, and search engine optimization (SEO) tools. Currently, some of the most popular WordPress plugins include:
- Contact Form 7
- Yoast SEO
- WooCommerce
- Jetpack
- Elementor Website Builder
You can choose from thousands of plugins to add features and functionality to your site. But before you start going plugin wild, remember that each plugin you install potentially slows down your site. So only use what you need to make your site operate well.
To install a WordPress plugin on your site:
- Log into your WordPress dashboard
- Choose “Plugins”
- Select “Add New”

From there, you can search through all of the WordPress plugins to find what you’re looking for.
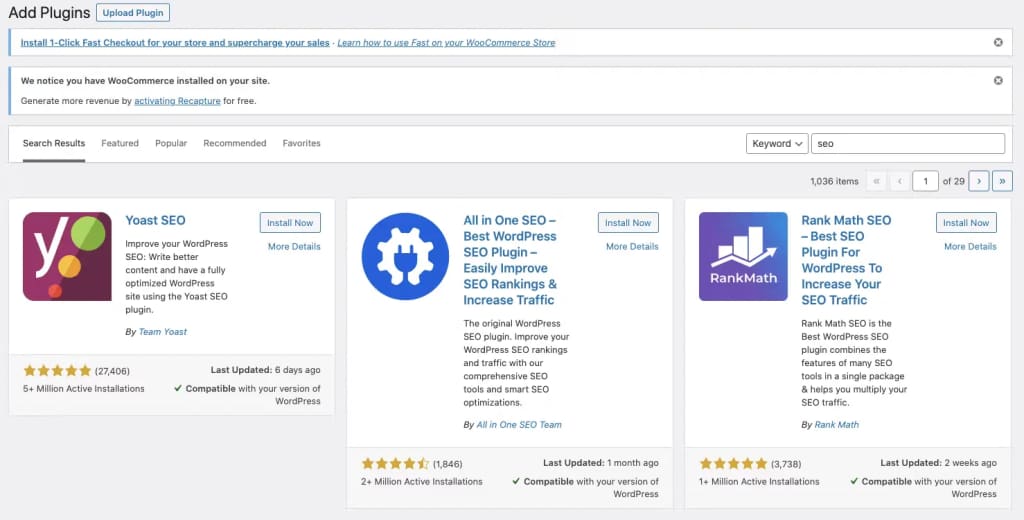
When you find the plugin you want to use, click “Install Now,” then:
- Select “Activate”
- You’ll automatically redirect to the tab containing all of your site’s installed plugins. You also will see a message at the top of the screen confirming the plugin’s activation.
- Go to “Settings”
- Select the plugin you installed
- Fill in any blanks you need to so the plugin is fully functioning.
Remember to uninstall any plugins you aren’t using to ensure that they don’t slow down your site. Also, update plugins as updates become available to keep them fully functioning.
Typical uses of plugins include:
6. Add posts and pages
Most WordPress tutorials direct you to customize your theme right after installation. But, it’s easier to customize your theme and design if you publish content first.
You can add content to your WordPress site in two ways — posts and pages. Posts are blog entries. They have a publish date, and typically all use the same template. Pages are static parts of your site, like your about or contact information. Pages can use different templates and design elements.
Most websites use a combination of posts and pages. Because posts/blogs are generally dated, anything time-sensitive is good content for a post — such as company updates, sales information, or timely industry insights. Content that is more evergreen and core to the brand is usually best on a page.
To add pages to your WordPress website:
- Log into your WordPress dashboard.
- Choose “Pages” and select “Add New.”

You will see the page editor screen:

- Provide a title for your page
- Add content, which may include text, links, images, etc.
- After you have the page as you want it, click “Publish.”
Rinse and repeat to add as many pages as you want to your website. And, of course, you can add pages as you recognize the need for them. Before you begin customizing your theme, create two blank pages. One titled “Homepage” and the other titled “Blog.” We’ll use those pages in the next step.
A few of the most important pages you should add and customize before launch include:
- Home
- Contact Us
- About
- Products or services
- Service areas
- Pricing
To add posts to your WordPress website:
- Log into your WordPress dashboard
- Choose “Post and select “Add New”

- Provide a title for your post.
- Add content, which may include text, links, images, etc.
- Select the categories and tags you want for your post.
- After you have the post as you want it, click “Publish.”
- You repeat this process every time you add a post to your site.
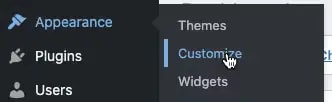
7. Customize your WordPress theme
Now that you selected a theme and made at least a couple of pages, it’s time to customize the look of your site. Go to “Appearance” and choose “Customize.”
You’ll now see all the options for how to customize your WordPress theme:

Start by clicking “Homepage Settings”.

You can select to use a static page for your homepage or a blog listing that shows all your latest blog posts. If you installed a theme with a cool-looking homepage, but you can’t see it when you preview your site, this is the setting you need to change. Select “A Static Page” under “Homepage Displays.”
Remember those blank pages we created in the last step? You can use the dropdown to select “Homepage” under the Homepage and “Blog” for the posts page.
As you make changes, you’ll see a preview of the new homepage to your right. Click through the remaining options to customize your website’s colors, fonts, headers, and footers.
For more advanced customization options, you might want to explore WordPress’s Full Site Editing capabilities, which allow for comprehensive design control without coding knowledge.
How to edit a header and menu
The header of your website is the top part with your logo and navigation. You’ll want to check out a few sections of the customizer to edit your header:
Click on “Site Identity.” Most themes will pull the header logo or site name from this section.

Click on “Header.” Themes often include settings for customizing the color and background of the header here.

Click on “Menu.” This menu area is where you tell WordPress what links to include in your site’s navigation. To create a menu, click the “Create New Menu” button.

You can also edit menus from the main Dashboard navigation by clicking “Appearance” and “Menu.”

On the “Create Menu” screen, give your menu a name and hit the “Create Menu” button.

Use the box on the left to add pages, posts, or other links to your site’s navigation, and then click the “Save Menu” button.

How to edit a footer
When setting up your site, you’ll probably want to edit the footer. The footer in WordPress is the bottom part of your website that appears after the content area. It appears on all pages of your website. You may want to add specific elements to your footer. But, at the least, you’ll want to change the copyright date and perhaps remove the “powered by WordPress” branding. Look for the area labeled “footer.” Once you select the footer area, you should quickly see where and how to edit the footer text.
Some themes will not include the content in the footer section of the customizer. You’ll only see color options:

In that case, you’ll want to head to the “Widgets” section on the customizer menu. You’ll see options to update the content for each section of the footer.

8. Backup your WordPress site
It may seem silly as you launch your site to think about a backup, but you want to protect your work right from the beginning. A backup is a copy of your site that you can restore if something goes wrong and your site disappears. You don’t want to lose your content, so a backup of your site protects your time and resources.
A full WordPress backup includes:
- Website Files. The files include your theme, plugins, scripts, media, etc. They’re anything dealing with the structure and functioning of your site.
- Database. The MySQL database stores your blog posts, comments, and any options you set in the admin area.
You want to back up both to protect your entire site.
3 ways you can choose to back up your site:
- Host. The first way to backup your website is the easiest, especially when you choose a host you trust. If you choose a host who does a daily backup of your site, you always have it. You can log on and download a zip file of the backup from time to time for double protection if you choose.
- Manually. The second way to backup your site is manually. This method requires you to log into your host server and download your WordPress directory. It’s a little more complicated, but you get used to the process after you’ve done it once or twice.
- Plugins. The third method to backup your website is through a plugin, with some of the most popular being UpdraftPlus, Solid Backups, and Duplicator.
It doesn’t matter how you choose to back up your site. The most important thing is to be sure your backups are automatically scheduled and are saved on a cloud storage service provider for ultimate assurance.
9. Run a pre-launch checklist
Once you are satisfied with your theme design and content, it’s important to review these four tips to clean up your WordPress site before you click the “Publish” button.
Secure your site
WordPress offers several security plugins that work to protect your site from cybercriminals. Prior to launch, be sure to select a security plugin — such as Sucuri or Solid Security Pro — to safeguard your site from cyber-attacks and keep it secure. This is also when you can establish WordPress user permissions to ensure you or other designated users can access the backend of your site.
Check for 404 errors
404 errors can easily interrupt the user experience, so be sure to comb through your site and eliminate any that exist. The easiest way to check your site for 404 errors is to add it to Google Search Console (GSC) and run a crawl report. If your site hasn’t been added to GSC, you can manually look through your site and ensure that all links are working as expected and pages are loading properly.
Inspect forms and media
Just like you need to look through your site for 404 errors, you must inspect all web forms and media prior to publishing. Manually test all your contact forms to ensure they are working properly, and be sure your images, videos, or sliders/carousels are loading correctly.
Review social integrations
If your WordPress site features a social sharing plugin or other social media integrations, it’s important to check them to ensure they are linking to the appropriate social media accounts.
Once you have completed this checklist, your new WordPress website is ready to publish.
WordPress website FAQs
Getting started
It’s a lot, but you can do it. Just take it one step at a time.
Since it’s easiest to register your domain name with your hosting provider, start by choosing a great WordPress hosting service.
Oh, hi. Did someone say WordPress hosting? That’s where Liquid Web comes in. Our team has been providing secure, flexible, lightning-fast WordPress hosting for almost three decades. You can manage it yourself, or take advantage of our industry-leading managed WordPress services.
Explore all of our WordPress hosting options or, if you have specific questions, start a chat and one of our experts will help you figure out which solution is best for you!
Next steps
What is managed WordPress hosting? →
Get details and decide if managed WordPress hosting is right for you.
What is WordPress? →
A beginner’s guide to get you all the basics and decide if WordPress is right for you.
A complete guide to WordPress shortcodes →
Shortcodes make life easier. Learn how to get started!