

 Mohammed Noufal
 Welcome Liquid Web customers and all readers. In this article, we’ll guide you through the process for how install to Chef Server and related components on your AlmaLinux servers hosted by Liquid Web. Chef Server is a powerful automation platform that helps you manage your server infrastructure with ease and efficiency.
Following our step-by-step instructions, you can set up Chef Server quickly and automate your server configuration and deployment processes. We’ll cover everything from preparing your server environment to installing Chef Server and the subsequent configuration. Whether you’re new to Chef or looking to enhance your automation capabilities, this article will provide the knowledge and tools you need to successfully deploy Chef Server on your servers running AlmaLinux. Let’s dive in and unlock the full automation potential for your server infrastructure!
Key points
Here are major areas to be covered in this help blog article about the Progress Chef platform for infrastructure automation:
- Learning more about Chef Server, Chef Repository, and Chef Infra Client
- Installing Chef Server on AlmaLinux
- Reviewing the Progress Chef setup process for Chef Server, Chef Repository, and Chef Infra Client
- Running a Chef recipe with an example
- Using the Progress Chef platform for automation
- Updating the Progress Chef components
- Uninstalling the Progress Chef Components
What is Chef Server, Chef Repository, and Chef Infra Client?
Progress Chef is a powerful automation platform that helps you manage your infrastructure as code. It uses a client-server architecture and consists of several components that we will look at in this post.
About the Chef Server software
The Chef Server (also known as Chef Infra Server) is the central hub of Chef’s architecture. It stores the cookbooks, policies, and metadata that describe your infrastructure. The server is responsible for managing the configuration of nodes and distributing configuration updates to them.
About the Chef Repository storage feature
The Chef Repository (“Chef repo” for short) is a version-controlled repository that contains all the configuration files, cookbooks, roles, environments, and other related files needed to manage your infrastructure. It’s where you define the desired state of your infrastructure using Chef’s domain-specific language (DSL), which is called the Chef Infra Language.
About the Chef Infra Client application
The Chef Infra Client is a lightweight agent that runs on each node in your infrastructure. It connects to the Chef Server to download and apply the configuration recipes and cookbooks. The client is responsible for converging the node’s current state to the desired state specified in the cookbooks. Chef Infra Client is included with Chef Workstation.
Installing Chef Server on Linux (AlmaLinux) step-by-step
The process for installing Chef Server on Linux is straightforward for the AlmaLinux distribution. One can just adhere to the guidelines and steps provided in this document to enjoy the many benefits of the Progress Chef platform for automation.
Prerequisites
Here are the prerequisites you should have in place before beginning the setup of the Progress Chef platform:
- Operating system: AlmaLinux 8 installed on your Liquid Web server.
- SSH access: On the system, root or sudo access is needed to install Chef components on your Liquid Web server.
- Disk space minimum: 8 GB free disk space.
- Recommended: 10 GB or more.
- CPU minimum: 2 CPU cores.
- Recommended: 4 CPU cores or more.
- RAM minimum: 4 GB RAM.
- Recommended: 8 GB RAM or more.
Example IP addresses for the AlmaLinux 8 servers in our demo
In this article, we are using three AlmaLinux 8 servers with the following details:
- Chef Server: chef-server.example.com (IP address of 192.168.1.10)
- Chef Workstation: chef-workstation.example.com (IP address of 192.168.1.11)
- Chef Infra Client: chef-client.example.com (IP address of 192.168.1.12)
Note that the IP addresses and domain names provided are examples only. You should replace these values shown with the actual IP addresses and domain names specific to your environment.
Overview of the Progress Chef setup process
Here’s and summary of the Progress Chef platform setup process and how to complete it using the guidance in this article:
- Identify your network details: Determine the IP addresses and domain names for your Chef Server, Chef Workstation, and Chef Infra Client within your local network.
- Replace the IP addresses and domain names: Throughout the article, wherever you see the example IP addresses (192.168.1.10, 192.168.1.11, and 192.168.1.12) or domain names (chef-server.example.com, chef-workstation.example.com, and chef-client.example.com), replace them with your actual network details.
- Configuration files: Ensure that any configuration files or scripts you use reflect your specific environment’s IP addresses and domain names.
To configure the hosts file, we must add the IPs to the /etc/hosts file on every server:
tee -a /etc/hosts << EOF
192.168.1.10 chef-server.example.com chef-server
192.168.1.11 chef-workstation.example.com chef-workstation
192.168.1.12 chef-infra-client.example.com chef-infra-client
EOF
Step #1. Access your Liquid Web server
To access your Liquid Web server via SSH for performing the Chef Server installation as a Liquid Web customer, follow the steps provided here in the following sections.
1.1. Open the Terminal (Mac/Linux) or the Command Prompt (Windows)
These two applications are available in your system’s applications or by searching for them in the start menu.
1.2. Connect to your Liquid Web server
Use the ssh command and your server’s IP address or hostname to connect to a connection to your Liquid Web server. Change your_username to the SSH username Liquid Web gave you and your_server_ip to your server’s IP address or hostname:
ssh your_username@your_server_ip1.3. Enter your password
You will be prompted to enter the SSH password provided by Liquid Web.
1.4. Verify your connection
Once connected, you should get a command prompt showing you have successfully signed in to your Liquid Web server over SSH. You can now proceed to install Chef Server on your Liquid Web server.
Step #2. Update your AlmaLinux system
Before installing Chef components, Liquid Web customers should keep their server’s operating system updated for security and performance reasons. To update the AlmaLinux system, use the following command:
sudo dnf updateStep #3. Install the Chef Server
Next, you will need to download and install the Chef Server.
3.1. Download Chef Server
Visit the Chef downloads page and download the latest version of the Chef Server to ensure you have access to the latest security updates, stability improvements, and new features:
wget https://packages.chef.io/files/stable/chef-server/14.12.21/el/7/chef-server-core-14.12.21-1.el7.x86_64.rpmHere is the output:

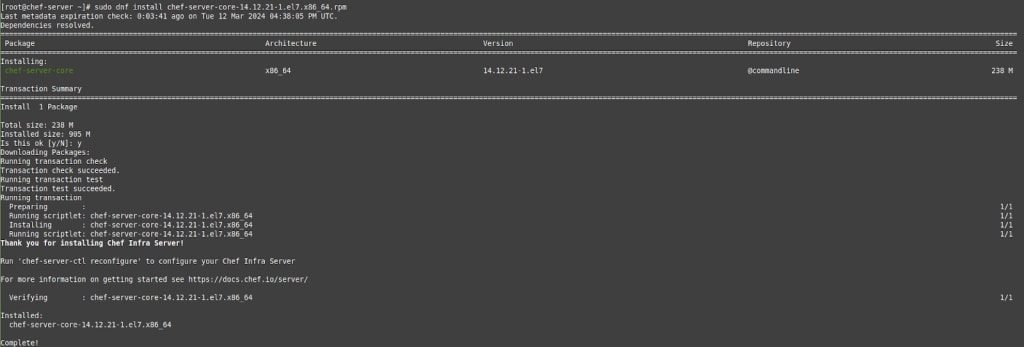
3.2. Install Chef Server
To install Chef Server, run the following command:
sudo dnf install chef-server-core-14.12.21-1.el7.x86_64.rpmHere is the output:
Step #4. Install Chef Workstation
Now, you can download and install the Chef Workstation software.
4.1. Download Chef Workstation
Return to the Chef downloads page and download the latest version of the Chef Workstation:
wget https://packages.chef.io/files/stable/chef-workstation/21.10.640/el/8/chef-workstation-21.10.640-1.el8.x86_64.rpmHere is the output:

4.2. Install Chef Workstation
To install Chef Workstation, run the following command:
sudo dnf install chef-workstation-21.10.640-1.el8.x86_64.rpmHere is the output:

Step #5. Install the Chef Infra Client
You are ready to download and install the Chef Infra Client.
5.1. Download the Chef Infra Client
Visit the Chef downloads page and download the latest version of the Chef Infra Client:
wget https://packages.chef.io/files/stable/chef/14.15.6/el/8/chef-14.15.6-1.el7.x86_64.rpmHere is the output:

5.2. Install the Chef Infra Client
To install Chef Infra Client, run the following command:
sudo dnf install chef-14.15.6-1.el7.x86_64.rpmHere is the output:

To learn more about how to Chef on Ubuntu, you can perform a search on Google.
Step #6. Configure Chef
Follow the instructions in the next sections to configure Chef appropriately.
6.1. Configure the Chef Server
To configure the Chef Server, run the following command:
sudo chef-server-ctl reconfigureHere is the output:
[root@chef-server ~]# sudo chef-server-ctl reconfigure

Documentation: https://docs.chef.io/server/
Patents:       https://www.chef.io/patents

+---------------------------------------------+
            Chef License Acceptance

Before you can continue, 3 product licenses
must be accepted. View the license at
https://www.chef.io/end-user-license-agreement/

Licenses that need accepting:
  * Chef Infra Server
  * Chef Infra Client
  * Chef InSpec

Do you accept the 3 product licenses (yes/no)?

> yes

Persisting 3 product licenses...
✔ 3 product licenses persisted.
---------
---------
Running handlers:
Running handlers complete
Chef Infra Client finished, 410/858 resources updated in 03 minutes 15 seconds
Chef Infra Server Reconfigured!
To check the status of components, run the following command:
sudo chef-server-ctl statusHere is the output:

6.2. Set up the Chef Repository
To create the Chef repo on the Chef Workstation, run the following command:
chef generate repo chef-repoHere is the output:

6.3. Create the catalog
Create a subdirectory with the name .chef to store the Knife configuration file and the .pem files needed for Chef Server authentication:
mkdir ~/chef-repo/.chef
cd chef-repo
6.4. Generate the SSH keys
Create an RSA key pair on the Chef Workstation by running the following command:
ssh-keygen -b 4096Here is the output:

6.5. Verify and share the public SSH key
Upload the public key to the Chef Server:
ssh-copy-id [email protected]Also, copy the .pem files from the Chef Server to the Chef Workstation:
scp [email protected]:/root/*.pem ~/chef-repo/.chefVerify that the keys have been copied by listing the contents of that directory:
[root@chef-workstation .chef]# ls ~/chef-repo/.chef
chefadmin.pem  chef-validator.pem
6.6. Creating a Chef cookbook
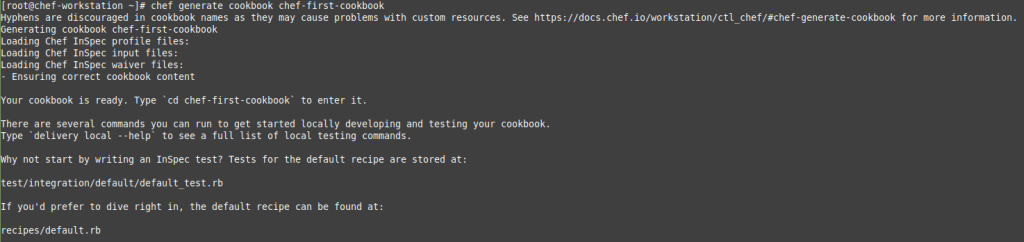
Generate a new Chef cookbook on the Chef Workstation. To generate a Chef cookbook, run the following command:
chef generate cookbook chef-first-cookbookHere is the output:
6.7. Configure Knife and bootstrap a client node
Create a config.rb file under ~/chef-repo/.chef/ on the Chef Workstation:
nano ~/chef-repo/.chef/config.rbThen, add the following lines:
current_dir = File.dirname(__FILE__)
log_level                :info
log_location             STDOUT
node_name                'chefadmin'
client_key               "chefadmin.pem"
validation_client_name   'chef-validator'
validation_key           "chef-validator.pem"
chef_server_url          'https://chef-server.example.com/organizations/chef-org'
cache_type               'BasicFile'
cache_options( :path => "#{ENV['HOME']}/.chef/checksums" )
cookbook_path            ["#{current_dir}/../cookbooks"]
In the above file, replace the Chef Server and organization details appropriately.
6.8. Copy the SSL certificates
To copy the required SSL certificates, run the following command from ~/chef-repo in the Chef Workstation:
knife ssl fetchHere is the output:

6.9. Verify Configuration
To verify that the config.rb is set up, run the following command:
knife client listHere is the output:
[root@chef-workstation chef-repo]# knife client list
chef-org-validator
Now, we will bootstrap the node and allow it to pull, apply, and read configurations from the Chef Server:
cd ~/chef-repo/.chef
knife bootstrap 192.168.1.12 -x root -P <password> --node-name chef-infra-client.example.com
Here is the output:
[root@chef-workstation chef-repo]# knife bootstrap 192.168.1.12 -x root -P <password> --node-name chef-infra-client.example.com
192.168.1.12 Chef Client finished, 0/0 resources updated in 01 seconds
Now, let’s check which nodes have been found:
knife node listHere is the output:
[root@chef-workstation chef-repo]# knife node list
chef-infra-client.example.com
[root@chef-workstation chef-repo]#
To get more information about the node, run the following command:
knife node show client-nodeHere is the output:
root@workstation:~/chef-repo# knife node show client-node
Node Name: chef-infra-client.example.com
Environment: _default
FQDN: chef-infra-client
IP: 192.168.1.12
Run List:
Roles:
Recipes:
Platform: AlmaLinux release 8.9
Tags:
Step #7. Allow HTTP and HTTPS through the firewall
To allow incoming traffic on HTTP and HTTPS ports and reload the firewall rules to apply any changes made, run the following commands:
sudo firewall-cmd --permanent --add-service={http,https}
sudo firewall-cmd --reload
Step #8. Create Chef admin user and organization
We must create an admin user with the appropriate keys to allow communication between the Chef Server, Chef Workstation, Chef Infra Client, and nodes.
8.1. Create Chef admin user
When creating an admin user, use the syntax shown below:
chef-server-ctl user-create USERNAME FIRST_NAME LAST_NAME EMAIL PASSWORDHere is an example:
[root@chef-server ~]# sudo chef-server-ctl user-create chefadmin Chef Administrator [email protected] 'strongpassword' --filename /root/chefadmin.pemTo list created users, run the following command:
sudo chef-server-ctl user-listHere is the output:
[root@chef-server ~]# sudo chef-server-ctl user-list
chefadmin
pivotal
Next, create an organization and add the already existing user. To create an organization, utilize the syntax listed below:
sudo chef-server-ctl org-create ORG_NAME "ORG_FULL_NAME" --association_user USERNAME --filename ORGANIZATION-validator.pemHere is an example:
[root@chef-server ~]# sudo chef-server-ctl org-create chef-org 'Chef Org' --association_user chefadmin --filename /root/chef-validator.pemTo view the organizations’ list, run the following command:
sudo chef-server-ctl org-listHere is the output:
[root@chef-server ~]# sudo chef-server-ctl org-list
chef-org
Verify that the RSA private keys are at /root for both the user and the organization:
[root@chef-server ~]# sudo find /root -name "*.pem"
/root/chefadmin.pem
/root/chef-validator.pem
Step #9. Verify the Chef installation was successful by component
Next, you should verify the Chef installation was successful by component.
9.1. Verify the Chef Server installation
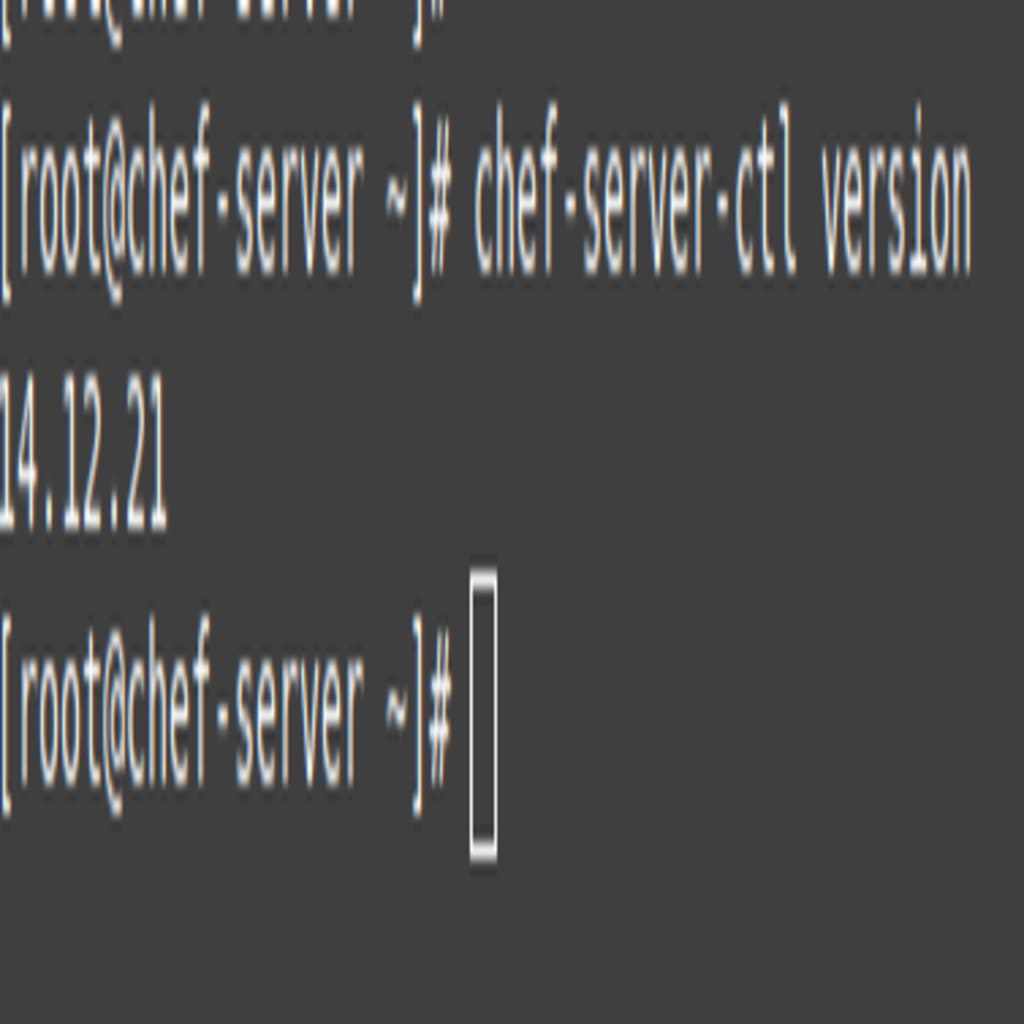
To verify the Chef Server installation, run the following command:
chef-server-ctl versionHere is the output:
9.2. Verify the Chef Workstation installation
To verify the Chef Workstation installation, run the following commands:
chef --version
or
chef -v
Here is the output:

9.3. Verify the Knife installation
To check the Knife installation, run the following command:
knife --versionHere is the output:

9.4. Verify the Chef Infra Client installation
To verify the Chef Infra Client installation, run the following commands:
chef-client --version
or
chef-client -v
Here is the output:

Running a Chef recipe with an example
Here’s an example of running a Chef recipe to install and configure NGINX on a node, along with the output.
Write a cookbook
Step #1. Create a new directory
Create a new directory for your cookbook and navigate into it:
mkdir -p ~/chef-repo/cookbooks/sample_nginx
cd ~/chef-repo/cookbooks/sample_nginx
Step #2. Generate a cookbook
Generate a new cookbook:
chef generate cookbook .Step #3. Edit the recipe
Edit the default recipe (recipes/default.rb) to install and configure NGINX:
package 'nginx' do
  action :install
end

service 'nginx' do
  action [:enable, :start]
end

file '/etc/nginx/sites-available/default' do
  content 'server { listen 80; server_name localhost; location / { root /var/www/html; index index.html; } }'
  notifies :restart, 'service[nginx]'
end
Upload the cookbook
Upload the cookbook to the Chef Server:
knife cookbook upload sample_nginxBootstrap a node
Bootstrap a node to install the Chef Client and apply the cookbook:
knife bootstrap NODE_IP_ADDRESS -x USERNAME -P PASSWORD --sudo -r 'recipe[sample_nginx]'Replace NODE_IP_ADDRESS, USERNAME, and PASSWORD with the appropriate values.
Run the Chef Client
SSH into the node and run the Chef Client to apply the cookbook:
sudo chef-clientDuring the Chef Client run, you should see an output indicating the steps being taken to install and configure NGINX on the node. Here is an example of that output:
...
[2024-03-12T12:00:00+00:00] INFO: Installing package nginx
[2024-03-12T12:00:10+00:00] INFO: Service[nginx] enabled
[2024-03-12T12:00:15+00:00] INFO: Service[nginx] started
[2024-03-12T12:00:20+00:00] INFO: File[/etc/nginx/sites-available/default] created
[2024-03-12T12:00:25+00:00] INFO: File[/etc/nginx/sites-available/default] owner changed to root
[2024-03-12T12:00:30+00:00] INFO: File[/etc/nginx/sites-available/default] group changed to root
[2024-03-12T12:00:35+00:00] INFO: File[/etc/nginx/sites-available/default] mode changed to 644
[2024-03-12T12:00:40+00:00] INFO: Service[nginx] sending restart action to service[nginx] (immediate)
[2024-03-12T12:00:45+00:00] INFO: Service[nginx] restarted
How to use the Progress Chef platform
To use Chef, you would typically:
- Install and configure the Chef Server.
- Set up and configure your Chef Workstation.
- Write cookbooks and recipes to define the desired state of your infrastructure.
- Upload your cookbooks to the Chef Server.
- Bootstrap your nodes to install and configure the Chef Client.
- Run the Chef Client on your nodes to apply the desired configuration.
How to update the Progress Chef components
Let’s look at the ways to update the various Progress Chef components in the next sections.
Update the Chef Server software
Download the latest Chef Server package from the Chef website. Then, SSH into your Chef Server and run the following commands:
#To stop the Chef Server service.
sudo chef-server-ctl stop

#To install or upgrade the Chef Server package using the RPM package manager.
sudo dnf update chef-server-core-<VERSION>.rpm

#To reconfigure the Chef Server.
sudo chef-server-ctl reconfigure

#To restart the Chef Server service after configuration changes or upgrades.
sudo chef-server-ctl restart
Replace the values and version as per your requirement.
Update the Chef Workstation software
Download the latest Chef Workstation package from the Chef website. Next, SSH into your Chef Workstation and run the following commands:
sudo dnf update chef-workstation-<VERSION>.rpmReplace <VERSION> in the syntax above with the proper version.
Update the Chef Infra Client application
SSH into your node with Chef Infra Client installed and run the following command:
sudo dnf update chefHow to uninstall the Progress Chef components
Uninstall the Chef Server software
SSH into your Chef Server and run the following commands:
sudo chef-server-ctl stop
sudo dnf remove chef-server-core
Uninstall the Chef Workstation software
SSH into your Chef Workstation and run the following command:
sudo dnf remove chef-workstationUninstall the Chef Infra Client application
SSH into your node with Chef Infra Client installed and run the following command:
sudo dnf remove chefSimplify your setup — Chef Server installation on AlmaLinux with Liquid Web
The article outlines installing a Chef Server on Liquid Web servers running AlmaLinux, including setting up the Chef Workstation and Chef Infra Client. It provides detailed instructions for users to configure their infrastructure for efficient automation and management using the Progress Chef platform.
Liquid Web’s reliable servers and excellent support services ensure a smooth installation process, making it an ideal choice for deploying Progress Chef components in production environments. The robust infrastructure and high-performance servers provide a stable platform for managing large-scale environments. Liquid Web’s comprehensive support services, including 24/7 technical support, enhance the overall experience and effectiveness of using Progress Chef for infrastructure management.