Forcing SSL Connections on Windows Servers
If you want to make sure every website visitor is using a secure (SSL) connection, you can adjust IIS to redirect this traffic. This will redirect http://mysite.com to https://mysite.com. Of course, this will only work if you have an up-to-date SSL installed for your domain. If you need to install an SSL for your domain, see Installing an SSL Certificate in Plesk or Installing an SSL Certificate on a Windows Core Managed Server.
Plesk Fully-Managed Server
In Plesk Onyx (versions 17.0 and up), you can force https connections by checking the box in the Hosting Settings section of a domain.
- Open the Domain in Plesk.
- Click on Hosting Settings.

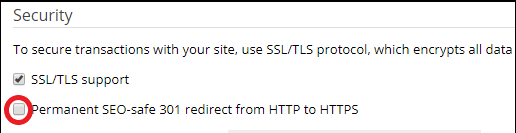
- In the section labeled Security, check the box next to Permanent SEO-safe redirect from HTTP to HTTPS. Then scroll to the bottom of the page and click OK.
Core-Managed and Self-Managed Servers (or servers with Plesk version 12.5 or older)
To force https on servers in IIS, you can use the URL Rewrite module in IIS or add a few lines of code to the web.config file for the site.
To use the IIS URL Rewrite module
- Open IIS, select the domain you want to modify, and double-click URL Rewrite.

- Click Add Rule in the upper right corner, then Select Blank rule (under Inbound rules) and click OK.

- Set the following options to match those pictured below
- Requested URL – Matches the Pattern
- Using – Regular Expressions
- Pattern – (.*)
- Conditions, Logical group – Match All
- Conditions, Input – {HTTPS}, Matches the Pattern, Off
- Action Type – Redirect
- Redirect URL – https://{HTTP_HOST}{REQUEST_URI}
- Redirect type – Permanent (301)


- Click Apply. (If the rule causes problems with the site, you can select the rule name and click Disable Rule on the right side of the screen to stop it).
To Redirect Using the Web.config File
Another method of forcing https is to add a few lines of code to the web.config file. These directions assume you are comfortable editing your site’s web.config file. For more information on web.config files, see Understanding the web.config file.
- Make a backup copy of your web.config file.
- Open the web.config file and add the following code snippet to the configuration/system.webServer section. Save the file when you are finished adding the code.
<rewrite>
       <rules>
            <clear />
                <rule name="Redirect to https" stopProcessing="true">
                    <match url="(.*)" />
                    <conditions>
                        <add input="{HTTPS}" pattern="off" ignoreCase="true" />
                    </conditions>
                    <action type="Redirect" url="https://{HTTP_HOST}{REQUEST_URI}" redirectType="Permanent" appendQueryString="false" />
                </rule>
       </rules>
</rewrite>
NOTE: |
| If you are using a Content Management System (like WordPress or Joomla) or other custom web applications, any of these methods may cause your site to work incorrectly. You may need to consult a web developer for more complex issues. |