FTP Clients and Cloud Sites
FTP—File Transfer Protocol is a common method to move files from your local computer to your website. However, FTP is not a secure file transfer method and malicious attacks often target FTP.
Similar in use and functionality to FTP, SSH File Transfer Protocol (SFTP) is a secure file transfer protocol and performs the same functions as FTP, but over an Secure Shell (SSH) connection. Just like FTP, you can use SFTP with a desktop FTP client. Most FTP clients, like Filezilla, CoreFTP, and Cyberduck support SFTP. We recommend you use SFTP with Cloud Sites by connecting via port 22.
To do this, you need to download an FTP client, configure your FTP client, and then upload the files you need.
Warning: |
| Every FTP client is different; the process for the FTP client you choose may be slightly different than the steps outlined here. This article is designed for people who are comfortable downloading software to their computer. |
Downloading Your FTP Client
You need to securely connect your local computer to your Cloud Sites account to upload files to your domain. You do this by downloading a FTP client. You are not restricted to the FTP client you chose, and some of the more common programs include Filezilla, CoreFTP, and Cyberduck. If you have never used FTP before, using one of these clients will make the setup easier.
Every client has different download and installation instructions. Follow your normal process for downloading and installing software to your computer.
Configuring Your FTP Client
You’ll need your domain’s FTP server information (usually this is ftp.mysite.com, replacing “mysite.com” with your domain) and your FTP username and password when you connect using your FTP client.
- Logging Into the Cloud Sites Control Panel.
- Click on the website where you’ll be uploading your content.

- Click on FTP to expand your site’s FTP information.

- You’ll see an FTP server and a directory path listed. You can use this FTP server to add content to your site even if you haven’t yet registered your domain. After you register your domain, there are two ways to add content to your site:
- The general FTP server, often ftp1.ftptoyoursite.com. This server can be used to add content to your site even if your domain registration or transfer has not yet completed.
- The FTP server specific to your domain. It will use your domain name with the subdomain “ftp.” For example:
ftp.mysite.com
and can only be used after your domain registration or transfer is completed.
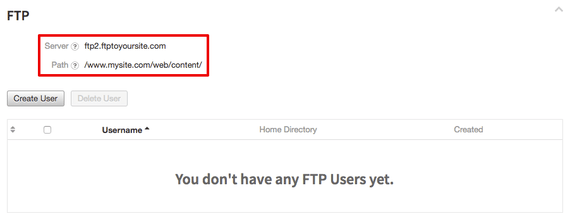
- To log into the FTP server, you’ll have to create an FTP user. In the FTP section, click the Create User button.

- Enter a username for your FTP user, then enter and confirm a strong password. For more information about creating strong passwords, see Best Practice: Creating a Secure Password.
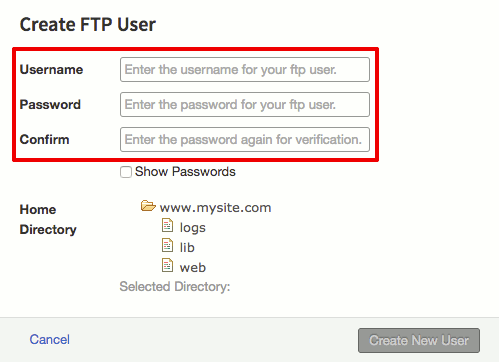
- Choose the folders you’d like your user to be able to access from the folder listing. Your public web content will all be uploaded to www.mysite.com/web/content. Then click Create New User.

- Now that you have an FTP username and password, open the FTP program of your choice. In this example, we’ll be using Filezilla, which has a quick connection option. Enter your FTP server address, your FTP username and password, and designate port 22 as the connection port. Then click Connect to start your FTP session.

Uploading Files with FTP
You’re all set to start uploading the files you need once you’ve opened an FTP connection to your server. In this example, we’ll be using Filezilla, but most FTP clients are simple drag and drop interfaces. In this example, we’ll upload files to the content directory, but you can upload files to any directory you need and have access to.
- On one side of your screen, you’ll see a listing of directories and files on your local computer. On the other side of your screen, you’ll see a list of directories and files for your Cloud Site.

- Locate the files on your local computer that you want to move to your website. Then, click and drag the files to the content folder on your server. Depending on how large your files are, it may take a little bit of time to transfer the files.
- Visit your website to confirm your pages are working correctly.
Troubleshooting
If you are uploading site content but the uploaded pages are not working correctly, check with your developer or your web development software to make sure you have uploaded all the necessary files. Then, make sure you’re uploading the files to the content folder of the domain you’re building. - When you are done uploading files, disconnect from your server.