Setting Up Cloud Block Storage
Cloud Block Storage (CBS) provides additional hard drive space for your Cloud VPS Server with just a few clicks. The simplicity of Cloud Block Storage is that it provides you a raw block of space that you can partition to store site backups, site files, and images. While you can use Cloud Block Storage for site backups, it is not intended for full server backups. Those are best done by using our server backup options or cPanel backups.
Adding Cloud Block Storage to your Account
- Login to your Liquid Web account.
- Click on Storage in the left side menu, then click on Cloud Block Storage.

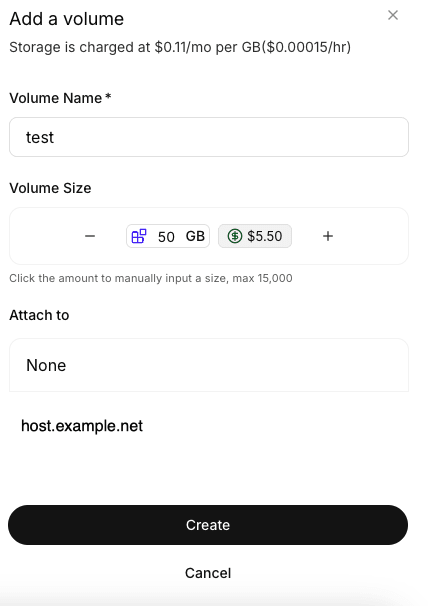
- Click on the Add a volume button.

- Enter a name for the volume and select the volume size you want to use (you can always adjust both later). Also choose which host you would like to attach the volume to (or select “None” if you don’t want to attach the volume to a specific host yet).
Mount the Volume
Although the volume is attached to the server as a device, it still needs to be formatted with a filesystem and mounted before you can use it. The following directions are for use with Linux systems. If you need to add Cloud Block Storage to a Windows server, see our article Adding Cloud Block Storage on a Windows Server.
- By default, the device is in the file /dev:
[root@core -}# ls /dev

vdb- You will need a directory to mount the device on, use the mkdir command.
mkdir /mnt/vdb- Once you create the directory, mount the device.
mount /dev /mnt/vdb/- On most systems, you can mount the device directly in /etc/fstab. Before making an changes to etc/fstab, be sure to make a copy of the file using:
cp /etc/fstab /etc/fstab.bak
- Now you can modify /etc/fstab by appending it using the following:
echo "/dev/vdb /mnt/vdb ext4 defaults,_netdev 0 0" >> /etc/fstabbut if you are using Ubuntu 10 or Debian 6 systems, you need the UUID of the device first. Using the blkid command, you can find the UUID.
[root@core ~]# blkid
/dev/vda1: LABEL="/boot" UUID="32e7f110-e8c0-40a2-8a4a-6c9e7c2dfe83" TYPE="ext3"
/dev/vda2: LABEL="SWAP-vda2" UUID="f7e08f56-f003-4aed-abd5-bda36ab20c6e" TYPE="swap"
/dev/vda3: LABEL="/" UUID="d84078bb-5766-4de2-b5b5-7a478359469b" TYPE="ext3"
/dev/vdb: UUID="ea1bc733-1491-4759-b8d5-052b091538ed" TYPE="ext4"(/dev/vdb is the actual mount point of the device; the ID in /dev/sbs is a symlink) Using the UUID, add it to /etc/fstab.
UUID=ea1bc733-1491-4759-b8d5-052b091538ed /mnt/vdb ext4 _netdev,defaults 0 0- Now that you’ve mounted your device, it will mount to the /mnt/sbs directory on every reboot.
Mounting the Volume on Reboot
If you followed the directions above when mounting your Cloud Block Storage initially, the volume will automatically mount as part of the reboot process. If you want to verify that the volume will be mounted after a reboot, you can run the following command on the server:
DID=$(blkid -s UUID -o value /dev/vdb); grep -E "$DID|/dev/sbs|/dev/vdb" /etc/fstabThe command checks for three possible ways to mount the volume and if any output is returned, the volume will be remounted on reboot. If no output is returned, following step 5 above will mount the volume and set it mount on reboot.
Your Cloud Block Storage is now mounted and ready for you to use on your server. If you have a Windows server and need instructions on how to add Cloud Block Storage, see our article Adding Cloud Block Storage on a Windows Server.