Enabling DKIM in cPanel
DomainKeys Identified Mail (DKIM) is a way to attach an encrypted digital signature to your email. Like adding an SPF record to your server, DKIM helps prevent email spoofing. Email spoofing is when spammers forge the sending address to look like your own email. Spammers spoof your address to make it more likely that recipients will open spam emails, less likely that messages will be marked as spam, and more difficult to find the true spam source.
Outgoing DKIM works by generating an encrypted digital signature that is attached to email messages sent by your server. This signature is generated using a public key you save as a DNS TXT record. Theoretically, only you have access to your DNS records, so mail signed using this key should be unmodified and verified as coming from your server. If you don’t use your server to send mail, adding DKIM records to your server will have no effect on your mail reputation.
There are three parts to enabling DKIM:
Generating Your DKIM Key
On a cPanel server, generating a DKIM key is easy! cPanel does it for you.
- Log into the cPanel account with email accounts where you’d like to enable DKIM. DKIM records are tied to a domain, you each domain you email from will need its own record.
- Scroll down to Email and click on Email Deliverability.
- Click on Repair to automatically set up DKIM (If the option is available to you, this is only an option if DNS is hosted on that server), or click on Manage next to the domain you want to enable DKIM on.
- If you were able to click on repair, then you’re already done! cPanel does all the work for you if you host the DNS on that server!
- After clicking Manage you’ll see a field that shows your current raw DKIM record. This is the public key you need to add to your DNS records. It should look something like this:
default._domainkey IN TXT "v=DKIM1; k=rsa; p=MIIBIjANBgkqhkiG9w0BAQEFAAOCAQ8AMIIBCgKCAQEAyGm4KfaLQs
OiNqfNGT0DDa+XE+TmIyr03F3/AM
U8SXFwgItBU/PikYTmIyr07yhQoqlPrSL27l8XHf8AMIIB1LtxU2/490wRkuu9ZorEj
RkIXSbev1GyAinBQNa5Rln2S+8AMIIBhZzfkNw7panbVJ0HPREiZAJ5TQEX1LjTqB/nArmNaMXaRUCwmYzGY45z8
"eW2BJMM7Ftsj3nOTmIyr0LFSL27l8OaMDdcvpCglrFWoF1dXA78ORuvMSL27
l8A5+UWRFBQ4NP6awWYj2LTSyeNeTlafawRk2B3C/dNcwpoLjz3T1wBHctcL
uC13+nMzzyUtgIVgz/7Ka8AMIIBQIDAQAB;
Copy this record and paste it into a text document to prepare for the next step: adding your DKIM record to DNS.
Adding Your DKIM Key to DNS
Now that you’ve generated your DKIM record, you need add the record wherever you host DNS at. These directions are different depending on where your DNS is hosted:
If you don’t know where your DNS is hosted, read Where Is My DNS Hosted? first!
Your DNS Is Hosted at Liquid Web
If you are using Liquid Web’s nameservers, you can update your DNS records right in your Liquid Web account. Liquid Web’s nameservers are:
- ns.liquidweb.com
- ns1.liquidweb.com
or…
- ns.sourcedns.com
- ns1.sourcedns.com
- Before you begin to add your DKIM record to your Liquid Web account, there is a small amount of formatting to do. The text portion of your DKIM record should look similar to this:
"v=DKIM1; k=rsa; p=MIIBIjANBgkqhkiG9w0BAQEFAAOCAQ8AMIIBCgKCAQEAyGm4Kfa
BhFDhZzfkNw7pan+XE+TmIyr03F3/AMU8SXFwgItBU/PikYlddmgf7yh
QoqlPrUMEqPZXHfIE8uGg1LtxU2/490wRkuu9ZorEjRkIXSbev1GyAi
nBQNa5Rln2S+AeBhFDhZzfkNw7panbVJ0HPREiZAJ5TQEX1LjTqB/nA
rmNaMXaRUCwmYzGY45z8"eW2BJMM7Ftsj3nOPYRbYxLFCzroSSOaMDd
cvpCglrFWoF1dXA78ORuvMSL27l8A5+UWRFBQ490wRkuu9ZorEjRNeT
lafawRk2B3C/dNcwpoLjz3T1wBHctcLnuC13+nMzzyUtgIVgz/7KaGQv
5rnQIDAQAB;
Some punctuation needs to be removed to format this record correctly.
- Remove the quotation mark at the beginning of the record.
- Remove the space and quotation mark in the middle of the record.
- Remove the slash and semicolon at the end of the record.
With those few edits, you’re all set to load your DKIM record into your Liquid Web account.
- Log into your Liquid Web account.
- In the left navigation menu, click on Domains.

- The Domains Dashboard has four tabs along the top. Click on DNS.
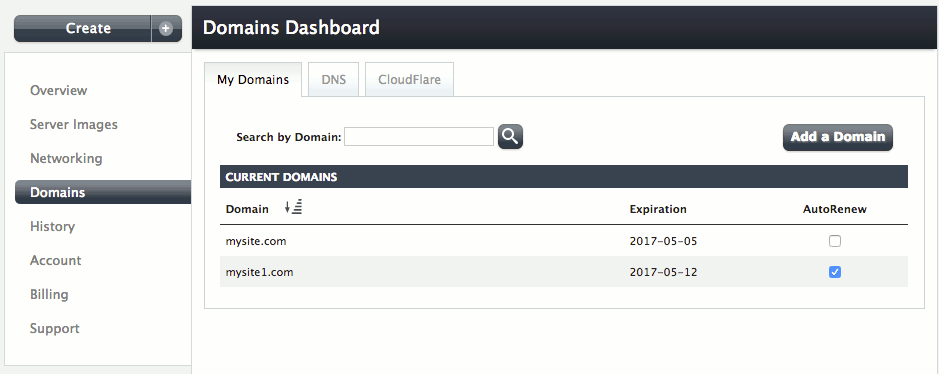
- Scroll down to Current DNS Zones and click the [+] next to the domain where you’re adding the DKIM record. You’ll see a list of your current DNS records. At the bottom of that list, click on Add a New Record. Now, you can follow the steps you’d normally use to add a DNS record.
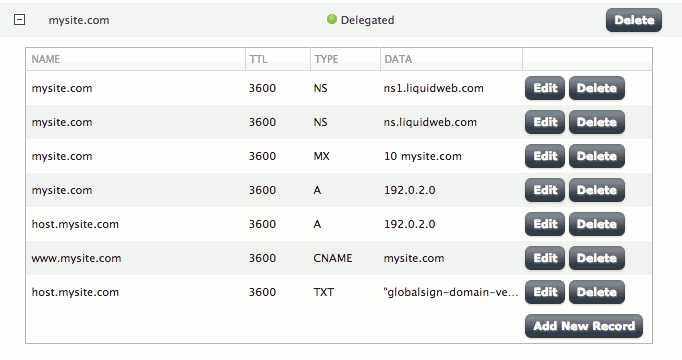
- The first field in your new record is for the subdomain. In this field, enter the first part of your record:
default._domainkey

- The second field is the time to live, or TTL. This setting tells external DNS resolvers how long to cache DNS lookup results for your domain. It’s recommended to set it the same as your other records..
- Now, choose TXT from the Type dropdown menu.

- The last field is the data field. Here you’ll copy and paste the rest of the record cPanel created for you.

- Click the green checkmark to save your DNS record.
Now that your DKIM record has been added, all that is left is to add a TXT policy record.
Your DNS Is Hosted with Another Company
If you registered your domain at another company and host your DNS there, you log into your account with that company to manage your DNS. Find their DNS record editor and enter your DKIM record according to their specifications.
Now that your DKIM record has been added, all that is left is to add a TXT policy record.
Adding a TXT Policy Record
A policy record is a DNS TXT record that talks more generally about DKIM on your server. It shows your server uses DKIM verification and makes DKIM work more smoothly. A policy record is just one more DNS TXT record. Wherever you added the DKIM DNS record, you’ll add the policy record in the same area.
There are different tags that make up the text of a policy record:
- t=y; tells other servers your domain is testing DKIM. This means if your DKIM isn’t working properly, other servers are less likely to reject your email.
- o=~; means that some of your mail is signed by DKIM, but not necessarily all. o=-; means all your mail is signed by DKIM. So, if another server receives a message that isn’t signed, it will be rejected.
- n=your information here; is a note. It doesn’t affect DKIM, but you can use it to explain more about your specific DKIM. This will show up in error logs if something DKIM verification fails.
- r=postmaster@mysite.com; is the responsible email address for this domain. Use an email address you can access on your server.
Most likely, your policy record will look like this:
_domainkey IN TXT "t=y; o=~; n=Interim Sending Domain Policy; r=postmaster@mysite.com"
Using t=y; and o=~; will help your email be delivered even if the DKIM signature gets broken in transit from your server to the receiving server. Of course, replace “postmaster@mysite.com” with the responsible email address, and create one if you need to.
You’ve successfully created a DKIM record for your domain! You can check to make sure it’s working by sending a test message from a domain email account to check-auth@verifier.port25.com.You don’t have to include a subject or any body text. You’ll receive an automated reply with the status of DKIM, as well as other services you may have.