Installing WordPress with cPanel
WordPress is a content management system (CMS) that helps you manage your website’s look and content. If you aren’t familiar with CMS’s, check out What Is a Content Management System (CMS)? to decide if WordPress is right for you.
Installing WordPress on your domain is simple when you manage your server with cPanel. The WordPress Toolkit in cPanel installs packages so you don’t have to download and install them manually. The Toolkit walks you through installing WordPress, choosing some basic settings, and setting up an administrator account. You can also manage your WordPress installations, including themes, plugins, and updates, all from within the WordPress Toolkit.
Note: |
| This article uses images from cPanel using the Jupiter theme. Your cPanel interface may appear slightly different if you use a different theme. |
- Log into your domain’s cPanel account.
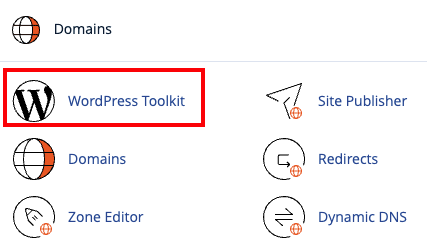
- On the home page of cPanel, click on the WordPress Toolkit in the left menu or scroll down to the Domains section, and click on the WordPress Toolkit.


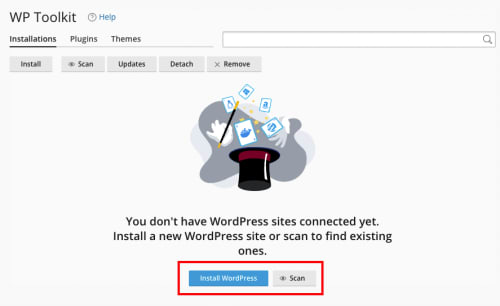
- From the WordPress Toolkit page, you can click Install WordPress to begin installing WordPress or Scan to look for WordPress installations on the server that were installed without using the Toolkit.
- If you have installed an SSL certificate on the domain where you’re installing WordPress, choose https:// or https://www. in the Installation Path.
- Make sure your domain is correct (you can choose to install on a subdomain), and decide which Directory to use for WordPress. This determines the URL used to see your WordPress site. The default is mysite.com/wp.
Tip:
To install WordPress on mysite.com (instead of mysite.com/wp), leave the In Directory field blank. 
- Next, Enter a Website Title. Choose a theme and set the default language and version of WordPress you would like to use.


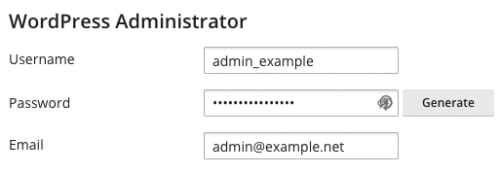
- Create your Administrator Account. This is how you’ll start making changes and editing your site. Enter a Username and Password and an Admin Email you will check for WordPress notifications.
Password Security
We recommend choosing a unique username (not “admin”) and choosing a strong password. If someone discovers your password, they have control over your whole site. For help with creating a secure password, see our article Best Practice: Creating a Secure Password 
- You can expand the drop-downs for Database and Automatic Update Settings if you would like to modify them, but the default options work well for most users.
- Click Install.
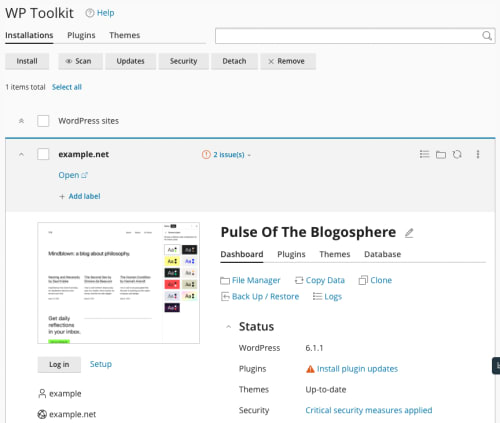
- Once you have installed WordPress, the WordPress Toolkit will inform you that the installation was successful and present the WordPress Toolkit Management page. From here, you can see a thumbnail of the WordPress page and manage plugins, themes, security, backups, and more.

You’ve successfully installed WordPress on your domain. Now you can start exploring different themes and plugins and creating content for your new site!