Setting up WordPress Multisite
WordPress Multisite (WordPress MultiUser prior to version 3.0) enables you to manage multiple WordPress sites from a single WordPress control panel. Every site uses the same database, themes, plugins, and file structure to keep everything localized to a single installation. You can deploy sites quickly with the same plugins, themes, and template as other sites.
This article assumes that you already have installed WordPress and are familiar with the WordPress administrator interface and with editing configuration and htaccess files.
Adjusting the WordPress Address URL
- Log into your WordPress administrator control panel.
- In the left navigation menu, click on Settings.
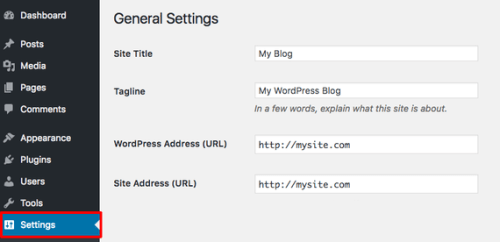
- In the WordPress Address (URL) field, make sure your URL doesn’t include “www.” This address should look like this:
http://mysite.com

Enabling WordPress Multisite
Now you’ll need to add one line to your wp-config.php file. You can do this from your control panel’s file manager, via SSH, or via FTP.
- In the root WordPress installation directory (this will very likely be in your public web content folder), find the wp-config.php file.
- Open the file however you’d like (by editing the file in your control panel’s file manager, using a command line text editor, or downloading the file via FTP).
- Locate the line
/* That's all, stop editing! Happy blogging. */
and above that line, add:
define( 'WP_ALLOW_MULTISITE', true );
- Be sure to save the file (and upload the new version if you’re using FTP). Now you can set up your multisite network.
Setting Up Your Multisite Network
- Log into your WordPress administration interface.
- In the left navigation menu, click on Tools and then Network Setup. If you can’t see this option, look at your wp-config.php file again to make sure you allowed Multisite.

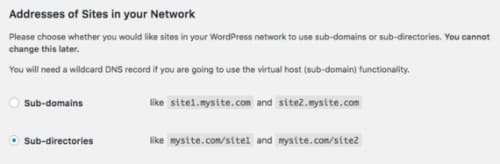
- If you plan to use multiple URLs (domain mapping), under Addresses of Sites in Your Network, select Subdomains. This makes managing the URLs easier in the future. Otherwise, choose to use subdirectories.
- In the Network Details section, add or edit the Network Title and Network Admin Email.

- Once you’ve entered your basic settings, click Install.
- Once the installation has finished, you’ll see specific information you need to add to your wp-config.php and .htaccess files.
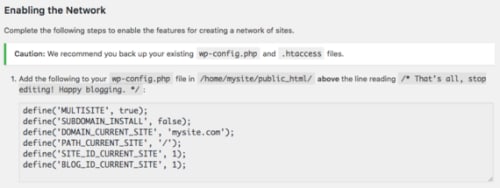

Save these configurations: you’ll need them for the next part in this process!
Editing Configuration Files
After enabling Multisite in WordPress, you need to add certain information to your wp-config.php and .htaccess files to make sure Multisite works correctly. Luckily, WordPress tells you exactly what you need to add to each file after you install Multisite. If you have exited the WordPress administration interface, you can find this information again by logging in and clicking on Tools and then Network Setup in the left navigation menu.
Editing Your wp-config.php File
- In the root WordPress installation directory (this will very likely be in your public web content folder), find the wp-config.php file.
- Open the file however you’d like (by editing the file in your control panel’s file manager, using a command line text editor, or downloading the file via FTP).
- Locate the line
/* That's all, stop editing! Happy blogging. */
and above that line, you’ll add the first section of text from the Enabling the Network screen during the multisite network setup. Be sure your domain and filepath are correct. The text will look similar to this:
define('MULTISITE', true); define('SUBDOMAIN_INSTALL', false); define('DOMAIN_CURRENT_SITE', 'mywordpressblog.com'); define('PATH_CURRENT_SITE', '/'); define('SITE_ID_CURRENT_SITE', 1); define('BLOG_ID_CURRENT_SITE', 1); - Be sure to save the file (and upload the new version if you’re using FTP). Now you’ll edit your .htaccess file.
Now you can add new WordPress rewrite rules to your domain’s .htaccess file.
Editing Your .htaccess File
- In the root WordPress installation directory (this will very likely be in your public web content folder), find the .htaccess file. If you don’t already have an htaccess file, you can create a new one.
- Replace any other WordPress rules with the rules from the Enabling the Network screen during the multisite network setup. The text will look similar to this:
RewriteEngine On
RewriteBase /
RewriteRule ^index.php$ - [L]

# add a trailing slash to /wp-admin
RewriteRule ^([_0-9a-zA-Z-]+/)?wp-admin$ $1wp-admin/ [R=301,L]

RewriteCond %{REQUEST_FILENAME} -f [OR]
RewriteCond %{REQUEST_FILENAME} -d
RewriteRule ^ - [L]
RewriteRule ^([_0-9a-zA-Z-]+/)?(wp-(content|admin|includes).*) $2 [L]
RewriteRule ^([_0-9a-zA-Z-]+/)?(.*.php)$ $2 [L]
RewriteRule . index.php [L]
Be sure to save the file.
- To apply your changes, log out of the WordPress administration interface (if you haven’t already) and then log back in.
Once you log into WordPress again, you’ll see that the interface has changed slightly and you can begin creating sites on your WordPress Multisite network.
Adding Sites to Your WordPress Multisite Network
Once you’ve configured Multisite, you can start adding websites to your Multisite network. If you are using Cloud Sites, please follow the instructions in Configuring WordPress Multisite on Cloud Sites.
- Log into the WordPress dashboard for your Multisite installation.
- In the top navigation menu, click on My Sites, then Network Admin, then Sites.
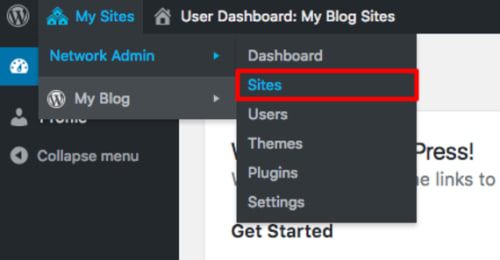
- You’ll see a listing of all the sites your Multisite installation currently supports. To add a new site, click Add New.

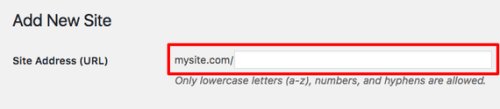
- Enter your new site’s Site Address (URL). Depending on how you initially configured your Multisite network, the field will ask you for either a subdomain or a subdirectory.
- Then, add a Site Title and Admin Email. This is just like a normal WordPress installation: the site title will show up in the header of the site and can be changed at any time. The admin email will create a user account for logging into just this new site’s WordPress dashboard.

- Once you’ve chosen your site’s settings, click Add Site.
After adding your sites, you’re ready to start building your WordPress sites!