
 Echo Diaz
 When using PhpMyAdmin, it’s essential to have the correct user permissions to create edits/writes to the database. Otherwise, insufficient permissions can lead to errors like the ones pictured below “#1044 – Access denied for user …[using password: YES]” and “#1045 – Access denied for user…[using password: YES]”. In our tutorial, we’ll show you how to correct this issue using the command line terminal. Let’s get started!
![#1044 - Access denied for user …[using password: YES]](https://res.cloudinary.com/lwcom/images/w_514,h_212,c_scale/f_auto,q_auto/v1776927788/prod/Screen-Shot-2019-04-19-at-12.43.31-PM/Screen-Shot-2019-04-19-at-12.43.31-PM.png?_i=AA)
![#1045 - Access denied for user…[using password: YES]](https://res.cloudinary.com/lwcom/images/w_515,h_209,c_scale/f_auto,q_auto/v1776927785/prod/Screen-Shot-2019-04-19-at-12.40.04-PM-1/Screen-Shot-2019-04-19-at-12.40.04-PM-1.png?_i=AA)
Pre-flight
- Root access to the server hosting PhpMyAdmin
Step 1: Connect to your server using SSH, from your computer’s terminal.
Step 2: When the MariaDB was installed a default user was also created, for our Ubuntu install this details of this user can be found at /etc/dbconfig-common/phpmyadmin.conf. We’ll be talking our default user, phpmyadmin, and granting them permissions to create a database within PhpMyAdmin.
MySQL;
grant create on *.* to phpmyadmin@localhost;
[su_box title=”Note” style=”glass” box_color=”#3ac6eb” radius=”20″]
Alternatively, if you are trying to delete a database you can use this command replacing username with the user in question.
UPDATE mysql.user SET Grant_priv='Y', Super_priv='Y' WHERE User='username';[/su_box]
FLUSH PRIVILEGES;
GRANT ALL ON *.* TO 'username'@'localhost';
Step 3: Log into PhpMyAdmin, by going to http://yourhostname.com/phpmyadmin.

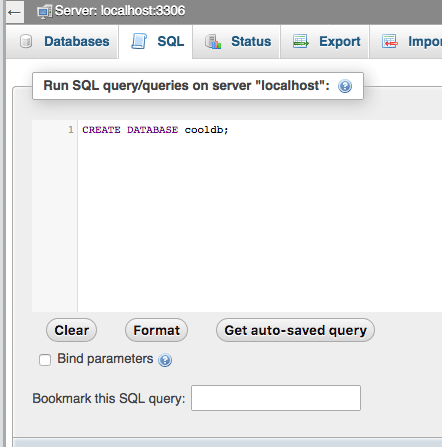
Step 4: Create a Database within PhpMyAdmin by selecting the SQL tab and running a command to create the database. Paste in the following command, replacing cooldb with the database name and selecting Go.
CREATE DATABASE cooldb;
Step 5: You’ll know the database was created by the success message and it’ll appear in the left-hand side menu bar.
Liquid Web server customers get the convenience of calling our support techs 24/7. Our technicians have a wealth of knowledge and can help with common issues like the ones outlined in this article. Make the switch and get around the clock support.