Change a Domain Name in cPanel/WHM
Changing an existing domain name and the associated account on your server is a task that most users don’t think about until it becomes necessary. Thankfully the tools provided by cPanel make this relatively easy.
There are several approaches you can take to updating a domain name. This article describes two possible methods that are most frequently used by our support team. If you have any doubts that these choices not the best option for your domain please open a ticket with our support team and we will be happy to help.
Here are two suggested paths you can take to update an existing domain name:
Backup the Existing Account
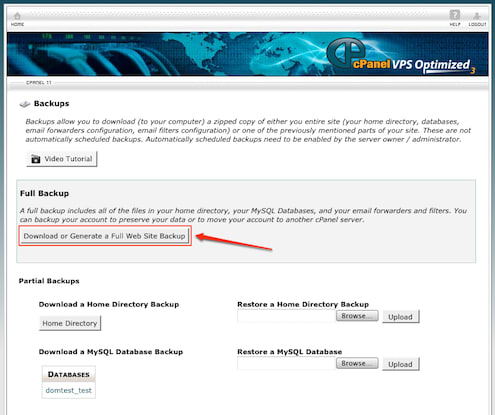
Log in to the domain’s cPanel interface and click on the Backups icon. On the Backups screen, click the button marked Download or Generate a Full Web Site Backup.

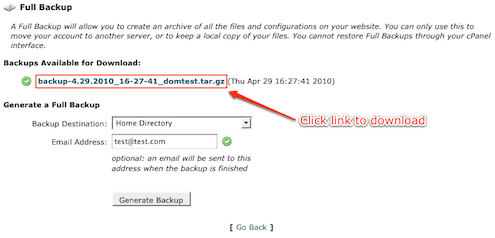
On the following screen you will be asked where you want the backup file to be created (normally the Home directory is fine) and what e-mail address should be notified when the backup is complete. Click the Generate Backup button when you are ready.
Once the backup is complete you can log in to the domain’s cPanel and download the backup file to your local computer, as picture below:

Now that you have a full backup of your domain, it’s time to choose which one of two different options you will use to update or change the domain name.
Option 1 – Update Existing Account and Park Old Domain Name
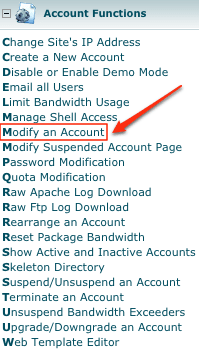
Log in to your server’s WHM as root and find the navigation link called Modify an Account, pictured below:

Locate the account in the list (1) and click the Modify button (2).
On the following screen locate the text field that contains the current domain name. Change the text in the box so that it displays the new domain name you wish to use (1). The domain’s username can be changed if you wish (2). When you are finished making your changes click on the Save button (3).
Back in the WHM’s navigation bar, find the DNS Functions area and click the link marked Park a Domain.
On the Park page, select the new domain name from the list on the left (1), type the old domain name in the text field on the right (2), then click the Submit button (3).
Option 2 – Create a New Domain Account and Redirect the Old Domain Name
Log in to your server’s WHM and create a new domain account with the new domain name.
Log in to the domain-level cPanel interface for the old domain name (in this example we would get to it by going to newtest.com/cpanel).
Once you are logged in to the domain’s cPanel interface, find the section labeled Domains and click on the Redirects icon, pictured below:
On the Redirect page make sure the Type field is set to Permanent (301) (1), make sure you have the old domain name in the second line (2), enter the new domain name in the “redirects to” field (3), and optionally check the box for Wild Card Redirect (4). Knowing whether or not you need a Wild Card Redirect is outside the scope of this tutorial. If it causes any problems you can always go back and change the redirect to not use a Wild Card.
When you have finished filling out the form click the Add button (5).
Related Articles:

About the Author: Jay Allen
Our Sales and Support teams are available 24 hours by phone or e-mail to assist.
Latest Articles
How to use kill commands in Linux
Read ArticleChange cPanel password from WebHost Manager (WHM)
Read ArticleChange cPanel password from WebHost Manager (WHM)
Read ArticleChange cPanel password from WebHost Manager (WHM)
Read ArticleChange the root password in WebHost Manager (WHM)
Read Article


